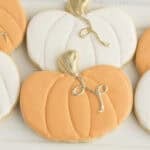
Decorated Pumpkin Shaped Cookies (Sugar Cookies with Royal Icing)
Description
Decorated Pumpkin Shaped Cookies are easy, versatile, and perfect for Fall. Made with my favorite roll-out sugar cookie dough, then decorated with royal icing and a little gold “bling” instead of the traditional green or brown, these are perfect for Fall Festivals, Halloween, Thanksgiving, or simply enjoying with family when the leaves turn.
Ingredients
Units
Scale
Cookie Ingredients
- 1 cup (2 sticks) Salted Butter, at room temperature
- 1 cup Sugar
- 1/2 teaspoon Salt
- 1 Large Whole Egg
- 1 Large Egg Yolk
- 3/4 teaspoon Vanilla Extract
- 1/2 teaspoon Almond Extract
- 2 1/2 cups All-purpose Flour, sifted
Royal Icing Ingredients
- 2 Tablespoons Meringue Powder
- 3 1/2 Tablespoons of 1/2 Water
- 8 ounces Powdered Sugar (by weight, sifted if needed)
- 1/4 - 1/2 Light Corn Syrup
- A few drops of Almond Extract
- Gel Food Coloring, if desired
Decorations (optional)
- Sanding Sugar
- Sparkling Sugar
- Sprinkles
Instructions
Making Sugar Cookie Dough
- In a large bowl (or the bowl of a stand mixer), use an electric mixer on medium speed to cream together the butter, sugar and salt until light and fluffy
- Next add the egg yolk, beat it some more, then add the whole egg. Mix in the vanilla and almond.
- Add flour and beat on low until well-combined. Do not overbeat. The dough will be sticky!
- Divide the dough in half and wrap in plastic wrap. Refrigerate for at least an hour, but I usually do mine the day before.
Rolling Out & Baking Cutout Cookies
- When you’re ready to bake, allow the dough to come to room temp for at least 10 minutes, then knead it until it returns to a smooth texture.
- Preheat over to 375° F and line a baking sheet with a piece of parchment paper.
- Roll the dough to ¼ inch thickness on a lightly floured surface.
- Continue sprinkling flour when needed to prevent dough from sticking. Use your pumpkin cutter to cut the cookies into pumpkins, then place them on a prepared baking sheet lined with parchment paper.
- Don’t skip the chilling time! Stick the cookies (on the sheets) back in the freezer for exactly 10 minutes to allow them to re-chill. This will keep your cookies perfectly shaped! When they’re chilled, bake for 8-10 minutes (depending on size) for the perfect cookie!
- Allow the baked pumpkin cutout cookies to rest on the cookie sheet for at least 5 minutes, then move to a cooling rack to completely cool.
- If you like the flavor of a golden brown cookie with slightly crunchy edges, you can let these bake an extra minute or two. If you prefer perfectly cooked cookies, you can watch them and take them out as soon as they’re baked before browning. I rarely get browned edges with these cutout cookies – they hold their shape, taste yummy, and are not crunchy! After experimenting with multiple recipes, this has to be my favorite!
How to Pipe Royal Icing Pumpkin Cookies (Cookie Tutorial)
- I will give you very specific instructions to make these pumpkin decorated cookies, but obviously, you can change this up depending on how you want to do your cookies!
- Want simple pumpkin cookies? Skip the gold and go easy. More or less colors? Go for it. More gold or no gold? Totally up to you!
- I want this to be a fun recipe for you so don’t stress if your first batch is not perfect! Your second batch will be better than your first, and so on.
- The more you make, the better you’ll get and beautiful result or not, you’ll have delicious cookies to eat!.
- The easiest thing to do with these cookies is use tipless bags. You can snip off the tiniest of pieces from the bottom of the bag and it acts like a round piping tip. If you prefer, take a piping bag and add a coupler and small round tip. I usually choose a #1 tip for piping and a #3 or #4 for flooding..
- Separate the icing into two bowls. Keep one white, add a couple of drops of orange gel coloring to the other. I specifically used Americolor Pumpkin, but go with any shade you like!
- For both white and orange icing, you’ll need piping-consistency icing and flooding-consistency icing.
- Using thick piping icing, outline the edges of the cookies with the color of your choice. Allow the outline to dry for 3-4 minutes.
- With the same thick icing, draw curved lines from top to bottom to create the pumpkin’s sections. You can do just a few sections or several – choose the look you like best. Allow the lines to dry for 3–4 minutes.Note: I did a few different ones, so you can choose which pumpkin look you like best. Allow this to dry for 3-4 minutes.
- Use flood icing to fill in every other section of the pumpkin. Let the icing dry for 5–10 minutes, or until it can be gently touched without sticking to your finger.
- To save time, you can outline several cookies first, then add the pumpkin section lines, and then start flooding. By the time you circle back, the earlier cookies will have had time to dry.
- Once the first set of sections is dry, flood the empty sections with icing to finish filling in the pumpkin. Allow them to dry for 15-20 minutes. Use a scribe tool or toothpicks to pop any bubbles.
- Use thick white icing to fill in all the stems on the pumpkin top and pipe the curly vines on top of the pumpkins. These will need to dry for at least 8 hours (or overnight) before you paint on them.
- Note: since I painted my stems and vines gold, it didn’t really matter what color the icing was underneath. If you choose to use brown icing or green icing and not paint, then you’d obviously use that for the stem and/or vines.
- Paint the stems and vines with the gold paint. Allow it to dry for at least an hour before stacking or packaging.
Notes
- This recipe yields approximately 2 dozen 3-inch cookies. You may get different amounts using different sizes and shapes of cutters.
Recipe Card powered by