How to Stop a Cake from Doming
One of the biggest challenges of baking cakes is learning How to Stop a Cake from Doming. I’m going to share three easy ways to solve this common cake problem and hopefully, you’ll be baking beautiful level cakes (without a domed top!) before you know it!
Originally posted January 2015, updated November 2023

Several years ago I wrote a post titled How to Bake a Level Cake for Cheap! That post has been super popular for anyone wanting to bake flat cakes. But the other day when someone asked on my Facebook page about how to avoid “the dreaded dome” when baking a cake, I thought I’d do a little updated post on this topic and add some extra tips for how to get the top of your cake level or flat.
First thing, I should note that I’m talking about cakes baked in traditional round or square cake pans – not special shapes like a bundt cake. Having level cakes is really important when you’re stacking a layer cake or tiered cakes. If you’re not careful, domes lead to lopsided cakes or a cake that is leaning or may fall over.
Without too much rambling today, let’s get to it!
How to Stop a Cake from Doming:

1. Bake lower and slower!
What do I mean? The baking temperature I use for all of my cakes is 325°F (a lower temperature) and I adjust the baking time to bake them for 40 minutes to an hour or longer (slower).
If your oven is hotter, that will make the batter rise more quickly. That’s how you end up with a domed cake. Instead, I always set my timer for 40 minutes and check them for the first time!
Note: pan size matters when you’re changing the time and temperature of your baking. Smaller pans are usually done or very close to done at around 40 minutes for my recipes. Bigger cakes will require a longer baking time. When I make a larger cake (up to 16 inches for weddings) – I bake them for as long as an hour and fifteen minutes.
For this tip to work, your oven temperature needs to be accurate. This is easy to verify with an oven thermometer. I love all of the thermometers made by Thermoworks. I’d recommend the ThermoWorks Square Dot to check the temperature of your oven.
You may also have to adjust my temperature and cooking time recommendations based on your cake recipes and the amount of batter you put in your cake pans. But overall, this lower/slower method allows the cakes to be baked more evenly.
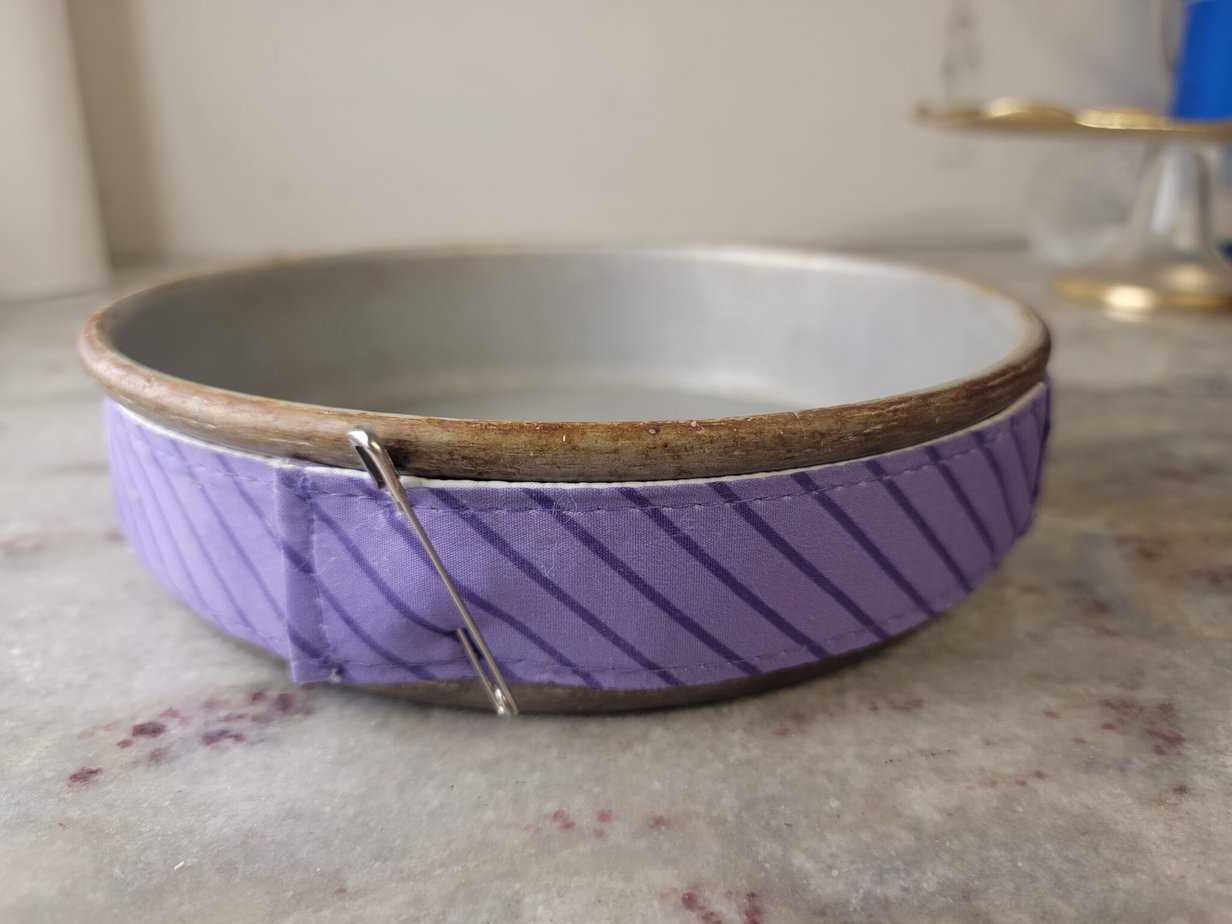
2. Wrap cake strips around the outside of your pans when you bake cakes.
Cake strips are thick fabric strips that are soaked in water and wrapped around the edges of the cake pans to bake more level cakes. These are usually secured with safety pins, velcro, or other clips that come with the strips. If budget is an issue, you can easily make homemade cake strips.
This is the method that I dedicated an entire post to… If you don’t have the budget to buy cake strips, I have good news for you! You can read this post for instructions on cutting a wet towel into strips and you get the same result as using store-bought cake strips! Using strips of a damp towel around the outside of the cake pan works really well and you probably have everything you need already in your house!
How does this work to prevent the top of the cake from doming? The wet cake strips or wet towels lower the temperature on the outside edges of the pan, causing the outside of the pan to stay cooler and cook slower. As the cake rises, the heat is more evenly distributed and this gives the middle of the cake time to catch up with the edges and you end up with a flat top for your cake. Or at least smaller cake domes.
To get all the details click over to this post: How to Bake Level Cakes for Cheap.

3. Use Heating Cores.
You have a couple of options here… you can use real heating cores (as seen above) – or you can use flower nails as heating cores. I’ve done both!
Here are some that I have: Wilton Flower Nails, Ateco Heating Cores (these are called heating cores, but they look like flower nails…love them!!), and a Wilton Heating Core. Any or all of these products will help you prevent a cake from doming.
Standard Heating Cores
When I first started doing cake, I bought a standard heating core – as seen above. Someone also gave me one they weren’t using anymore, so I have two. To use these, I spray my pans with Baker’s Joy or paint them with my homemade cake release, and then I spray/paint the heating core also (on the outside and inside – anywhere it’s going to touch the cake).
I got good results with the regular heating core I didn’t love them.
Flower Nails
Then I found out I could use flower nails. I still spray the flower nails (or Ateco Heating Cores) with cooking spray and put them in the center of the pan (upside-down). These work great to prevent cake doming without having to patch up the center of the cake when you’re done.
These heating cores that look like flower nails (turned upside down) or standard heating cores basically do the same thing. They heat up in the middle of the cake batter and distribute heat from the center toward the outside at the same time that heat is baking the cake from the outside edges toward the center.
This way the sides of the cake and the center are baking more evenly and you end up with a flat surface instead of a dome shape. After the pans and heating cores are prepped, fill the pans with batter as usual. Be sure to put batter inside the ‘real’ heating core at the same level as in the pan).

Then bake them (lower and slower!!) until a toothpick comes out clean. You can see in the photo above that the one on the left has a flower nail and the one on the right has a heating core. Both cakes are baked perfectly level. For the one with the heating core, you just have to pop out that little plug of cake and put it back in the center:
Anywho… that’s it!! 3 Ways to Avoid Domed Cakes!
More is better (sometimes) – Use Cake Strips and Heating Cores
Oh – one more thing!! Sometimes, if I’m baking a really large cake or a giant sheet cake, I’ll use 2 flower nails. Or I’ll use a heating core and wet towels on the outside for extra assurance that the cake will come out level!
How to level a cake?
If after your best efforts, you still end up with a dome in the middle of your cake, you will want to fix that before stacking a layer cake. To do that, you’ll either need a cake leveler or a long serrated knife to cut the dome off.
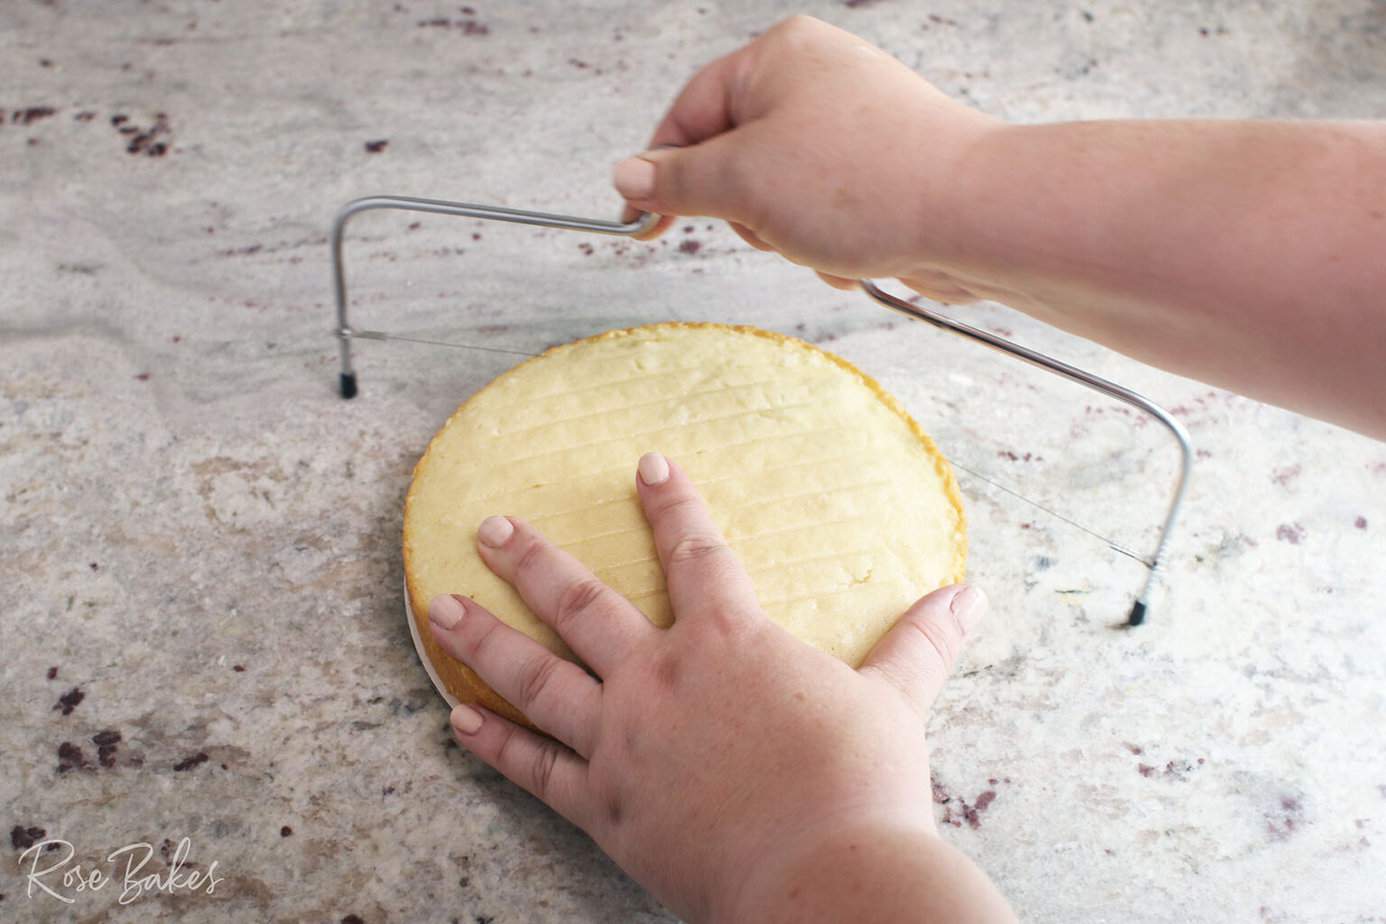
Either of these tools works very well for removing the dome and leveling your cake. And bonus, you can use the scraps to make cake pops!
What do you think? Have you ever used any of these methods? Do you have other secrets for baking a level cake?? I’d love to hear them in the comments!


I use a can cut of the top and bottom and spray it well the then the cake slides out when done.
Very cool idea!
I’m a home baker and have used all three methods. For me, the 325 works perfectly. I also put a cookie sheet on a rack on the lowest level of the over to make sure the heat is evenly distributed. I use the nails on the deeper cake pans. The only down side is that the when the cake is domed and that dome is taken off……it’s the most delicious part of the entire cake. My favorite treat!
AGREED!! I just told someone that on Facebook… that is the BEST part of a cake!!!
My husband and son in law call those the “scraps”. I have customers who actually ask me if I have any “scraps” they can have.
I’ve just discovered the flower nails! My mum used to wrap wet newspaper around the pans. I always dome the batter in the opposite direction which also helps. I discovered while trying to bake a bundt cake by using a small metal bowl pushed down into the batter that just pushing it down a little way would result in no dome. The bundt cake didn’t come out as I hoped (probably needed some weight in the bowl) but it was obvious doing the same without pressing down so far would give a flat cake!
I’ve used the first two methods….but never tried the heating core/flower nail trick- but then I don’t bake cakes larger than 9″. My trick is to gently press down on the cake when it’s still warm and get rid of the bump.
Radhika
I’ve also done that if it’s not too severe! Great idea!
Great ideas I’ve tried 2 of these methods. I need to definitely try the towel method. There are times where I go the ultra lazy (easy) route and get my cake circle and put in pan when cqke oa out of oven and just press down. Even the cae out without having to cut up cake and “taste test” them. Yes my favorite part of baking but also the most dangerous;)
🙂 I love the idea of using a cake round!! When I’ve done that in the past, I usually use a clean towel to press down… the cake round is much smarter!!
Hi, this is the first time I read your blog and I love it. I have been in the cake business for 10 years now and always bake at 325 but this did not prevent domed cakes. I have also tried the towel method which is good but messy and the nails did not work for me either. What has worked for me is baking with the cake pans covered. They come out flat even if they raise over the border. What I use is a metal cake board which is flat. I guess a bigger pan on top will do the trick also. I hope you try this and let us know if it worked for you.
Very interesting!
I just used this method today and it worked perfectly! I covered my two round cake pans with the bottom of a rectangle pop out cake pan. They were perfectly flat and browned on top!
Do you bake with convention or convection oven?
Thanks
A conventional oven 🙂
Just thinking of the idea of the towels around the cake pan or the baking strips now available in almost any craft or baking supply business. We all know about the method of using a water bath with cheesecakes and most likely a few other types of similar cakes but has anyone ever tried using a water bath with an ordinary cake batter and pan? I’ve never tried it but I would think it would work in the same manner. Oh, and one piece of advice. I mostly use baking cores for large cakes and I learned this VERY important lesson the hard way. Accidentally one day I forgot to spray the core both inside and outside with the cooking spray. IT WAS A MESS trying to salvage that core to pop back into the hole. I will NEVER make that mistake again and you don’t want to either.
I have heard of baking regular cakes with a water bath, but I’ve never tried it myself.
In thinking about your comment that you bake all of your cakes at 325 degrees I began thinking about Bundt cakes. This type of cake already takes an hour or more to bake, do you use this temperature for a Bundt, tube or loaf type cakes? Considering that a domed top isn’t usually something that we as bakers need to worry with these types of cakes, I’m just curious if you use this lower temperature for these thicker cakes too and how long a Bundt cake may take to bake at this temperature.
Honestly, I don’t bake many bundt cakes – maybe 1 or 2 a year. But when I do, I follow the recipe instructions for those – I don’t change them up.
I am a part time home baker. I have used the water bath fr regular cakes and I love the resulting moist and even cakes.
I set my water-bath pan with cold water and allow enough time for the required temperature to be reached so there will be no difference in temperatures. I use a rectangular pan that spans the width of the oven, so the steam gets transferred all throughout the oven instead of concentrated in one area. I also set it on the lowest rack.
It works perfectly for me all the times.
Hi Rose!
I’ve never tried any of these methods before and always leveled with a serrated knife. BUT I did notice that when I started using your homemade cake release that my layers would come out way flatter. No idea why! I’m wondering if I combine that with baking at a lower temperature I’ll get cake that I don’t even have to level. That’d be nice =)
Hi Rose,
I too have always used the ‘low and slow’ method – 25 degress lowe than the recipe calla for and start at an additional 10 mins and go from there – and on anything bigger than 10″ I use the baking strips on the outside of the pan. I am very intrigued by the method of using the flower nail – excellent idea – thank you so much for that excellent tip! The only variant is that I only bake to the point where the cake taster coming out and being a tiny but crumbly. That way, when they rest on the cooling rack for the 10 mins in the pans after coming out of the oven, thr last of the baking occurs then, leaving my cakes perfectly cooked and never dry!
Claudine
Great tip!
My cakes are already taking near 50 to an hr on 350 and that’s with the bake even strips. But i always do have a flat top. So does the the bake time increase with the bake even strips i have always wonder that? Because i hate to open the oven door at 30 mins and my cake is never anywhere near done, and like you say now at the 40 min mark we are somewhere close to been set and done. Also can i use a flower nail and the bake even strips if i am using a 10 inch cake pan or bigger. Also should I just stick with 350 with my cakes if the are still moist and nice text, some don’t be or should i also try switching to 325, or would that take even longer if my cakes are are ready taking close to an hr at 350? Sorry so many questions I just want to get it right and just a little help if you don’t mind pretty please, thank you!
I use the bake even strips every time at 350° and I always get flat top cakes. I bake more square cakes than round cakes but they both come out with flat tops and I don’t have to cut the top to level them.
Hi there…I read all the responses and see that everybody is using different methods when baking their cakes. I have been using both the flower nails and baking strips for all my cakes since my reignited passion began in 2012. A home baker myself, I have recently discovered my 20+ year old oven is running about 25 degrees hotter. Ultimately, at the time I discovered it, I was in the middle of a wedding cake and had to take all my stuff 40 mins away to my daughters house. I wasted a bunch of ingredients during this discovery. Not to mention that it was raining all day long when I was doing the baking at her house. My issue is not doming, but sinking in the middle. I think I have discovered what was not a problem in the past, but may be the problem from cake info overload. I think I’m mixing it too long. Before, I never timed it. Just mixed to what I thought was 2 mins, scraping the bowl as I go and stopping. I’ve turned my oven down 25 degrees, so shortening the mixing is the next step.
Forgive my rambling, but had to tell someone who may get some benefit from my experience.
When I got my Artisan Kitchen Aid stand mixer, the instructions said they are so efficient, they require only half the recipe’s mixing time. At first, I was afraid to cut the time, but the result was a flattish sunken cake. Next time I cut the mixing time in half and had a perfect cake. I used the Wilton baking strips for both cakes, so I know it was the time.
Thanks for that tip. I bought new cake pans never had issues until these pans came 3 – 4 inches deep and they started sinking in. Any tips. I watched it baked and could see it forming at the middle and when done baking, it would have a caved in look and not the straight up round look a round cake should have. Any tips???
The pans are 3-4″ deep? If so, you’ll have to bake for a long time at a lower temp and possibly use wraps on the outside and the flower nail in the center.
Thanks for the tips, they are really useful! Is there any other thing that I can use as a flower nail or heating core? Like a toothpick wrapped up in aluminum foil, for example.
Do you still usually have to level the cakes a bit like with a wire blade to get that perfect look? Do you think the flower nail and the low temperature cooking is enough or is it worth doing all three?
I sometimes still use the Agbay – especially for wedding cakes that I need to be really level (because of multiple tiers! But for smaller cakes, I don’t usually bother with cuttinng off the tops.
I am trying to cook a particular bar cake for our local show but it domed and cracked in the middle. We have to use their recipe and it has to be a bar not round or anything. No holes in it from testing. They say you can tell a cake is done if you put your ear to it and it makes little noises. Last year I burnt my ear even though not on the tin, and now doing this different one they have specificed in practiced it is very awkard putting your ear down to the cake. So can’t use the nail or whatever the pan is. Never seen or heard of this type of pan. I’m in Australia. I’ll try the wet bandages or a water bath. When trialing this bar cake recipe I did cook in on a slightly lower temp and about the 40 mins as they said 35 – 40 mins. Does anyone have any other tips for cooking this bar cake. Its actually called a peach blossom cake and its got dobs of pink in the white cake. I didn’t like the look after I had cooked and cut it though it wasn’t that bad. It was nicely cooked despite the domed affect. My husband who isn’t a cook or interested wisely said maybe I should use the icing bag to put the pink in uniformly.
I baked a 9×13 sheet cake which called for 7 cups of cake batter… it took 45 min at 350 degrees… I noticed it bakes outside to middle ( middle taking longer to get done) The outside seemed drier than middle… how do I make a moist cake all over ?
You’ll want to wrap the pan in a strip or use a center core.
Thank you… will try that next time
I tried the wet towel method, since I didn’t have any baking nails or cores handy (I hadn’t even heard of them until I found your website), and it worked perfectly!!