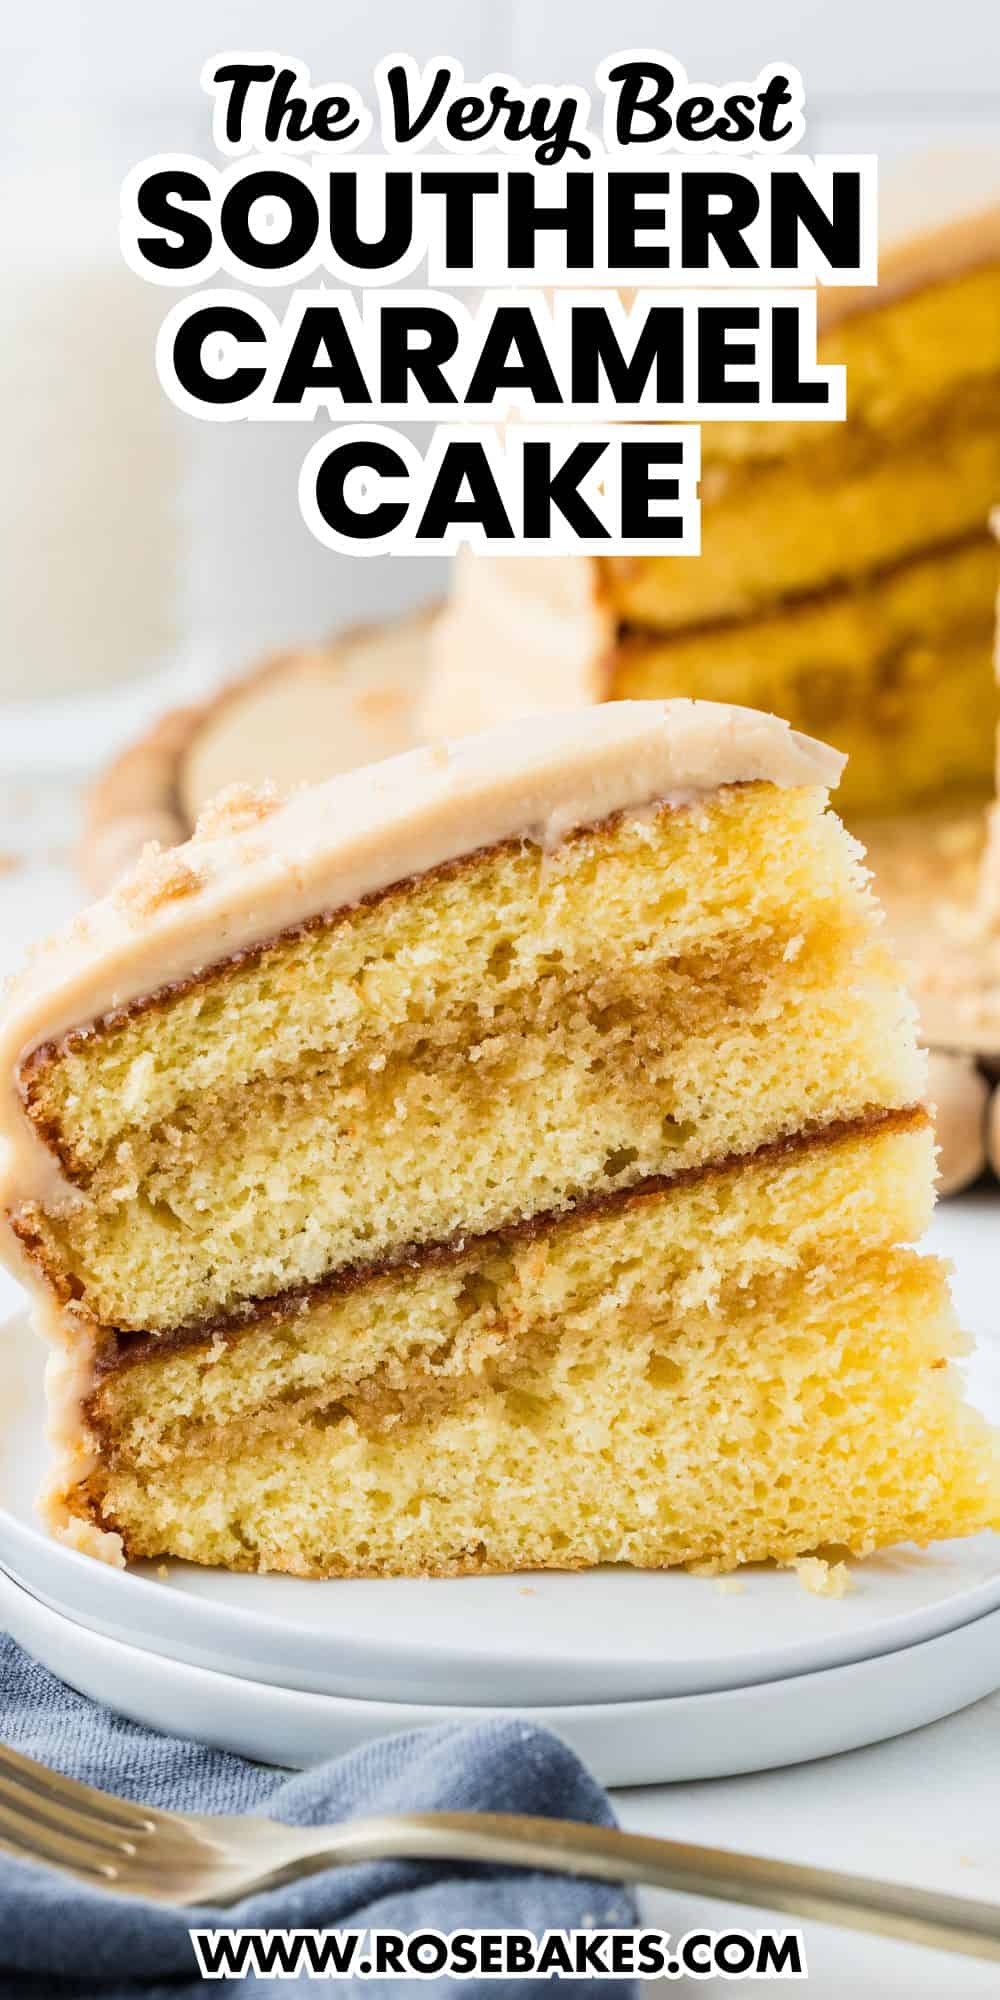
Southern Caramel Cake Recipe (Semi-Homemade)
This Southern Caramel Cake recipe is rich, buttery, and surprisingly easy to make, thanks to a semi-homemade shortcut that still delivers incredible flavor. Made with a simple yellow cake mix base and layered with a luscious homemade caramel filling and frosting, this old-fashioned caramel cake has that classic, melt-in-your-mouth texture everyone loves.
Originally posted March 2012, updated March 2026
Southern Caramel Cake Recipe
If you love caramel even a little bit, you need to make this caramel cake recipe. The cake itself is soft, buttery, and simple thanks to a cake mix base, but the real star is that homemade caramel in both the filling and the frosting.
This traditional Southern caramel cake is rich, sweet, a little nostalgic, and completely irresistible. It’s perfect for holidays, a potluck, a special occasion, or anytime you’re craving a delicious cake loaded with deep, sweet caramel flavor.
It’s the best caramel cake you’ll ever eat!
Why You’ll Love This Decadent Caramel Cake
- Tastes like you worked all day (but you didn’t!). The cake mix shortcut keeps things simple, while still delivering amazing results that taste like a homemade cake.
- Semi-homemade with from-scratch flavor. The homemade caramel filling and dreamy caramel frosting give it that rich, old fashioned caramel cake taste.
- Perfect for any occasion. Whether it’s a holiday, birthday, or just a random day when you want something special, layer cakes are always a hit!
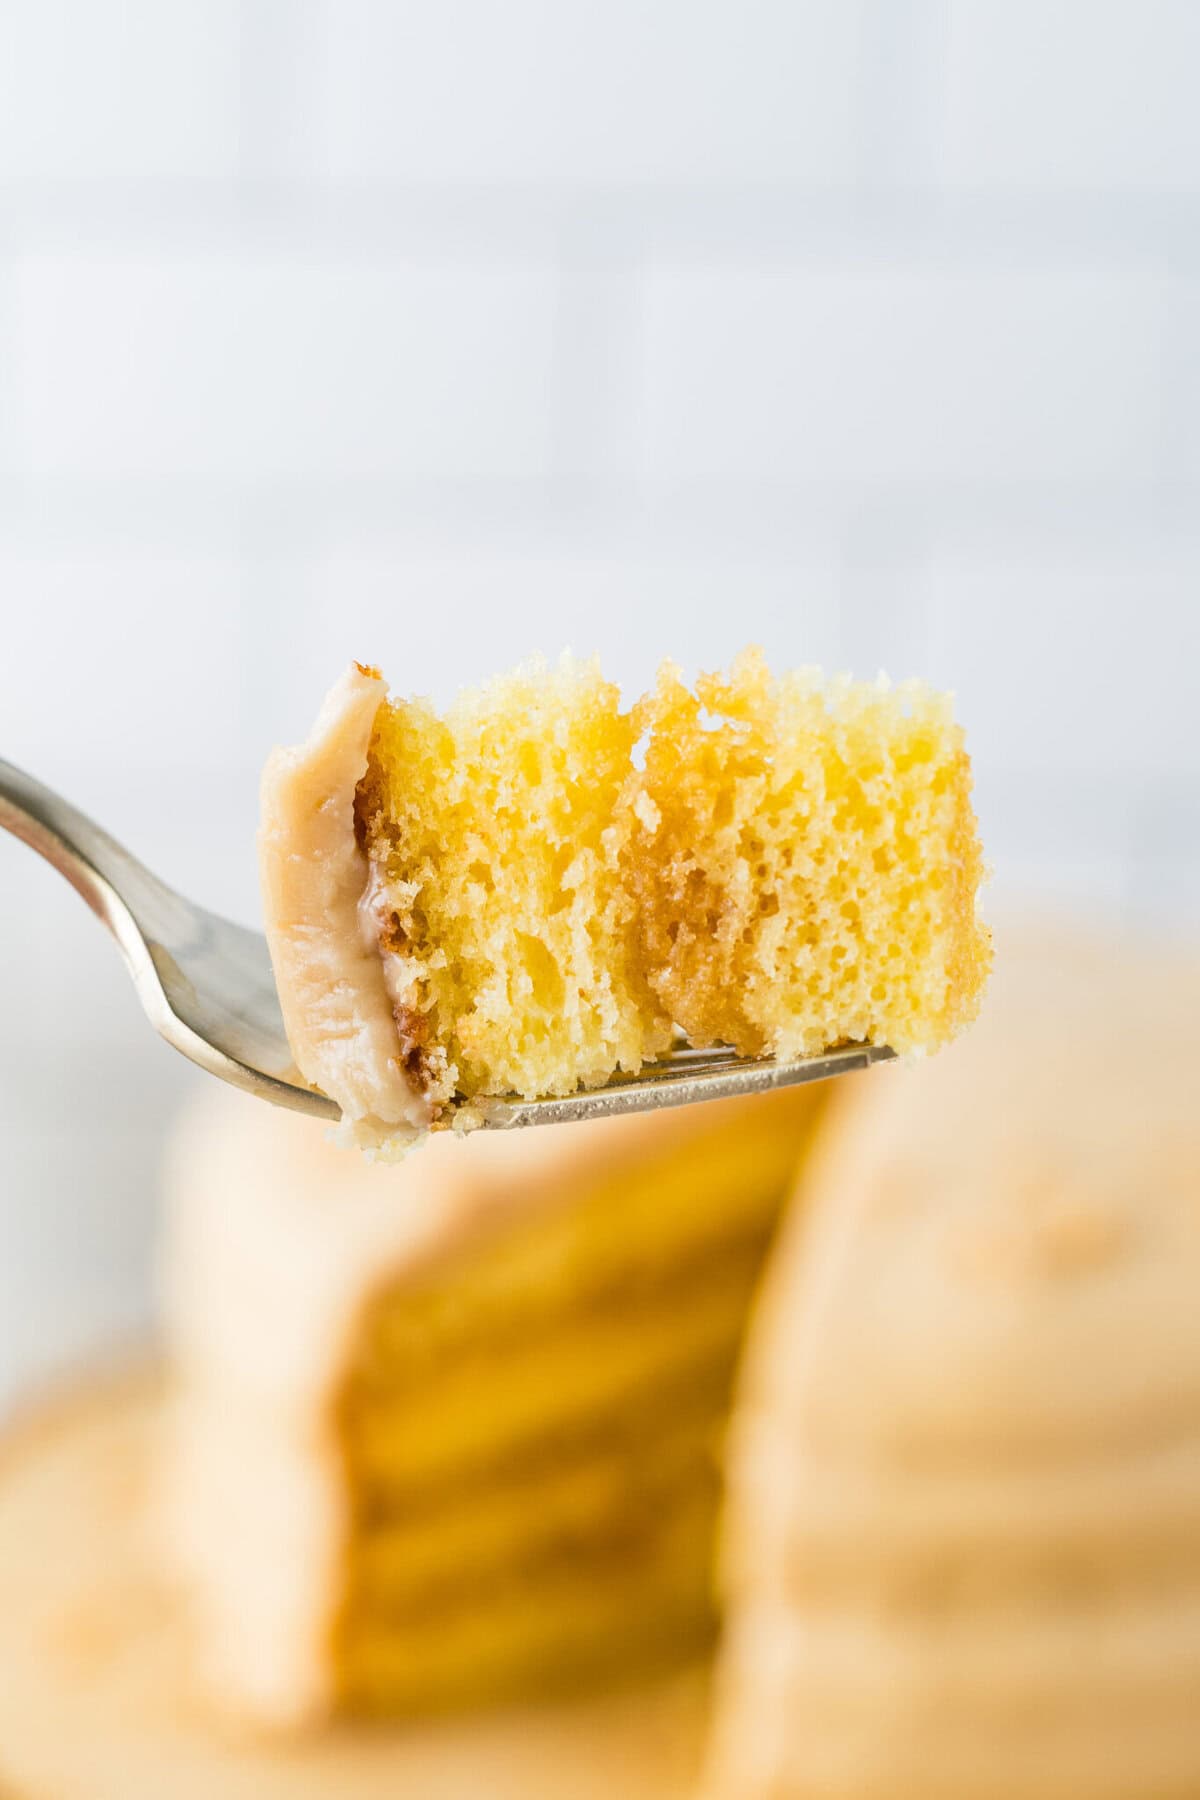
- Soft, moist, and tender layers. Thanks to the butter and buttermilk, every bite is rich, fluffy, and full of rich caramel flavor.
- Impressive and bakery-worthy. This caramel layer cake looks like it came from a professional bakery – especially with that classic poured caramel frosting.
- A tried-and-true favorite. It’s been loved for years, and for good reason. Once you try it, you’ll understand why.
- Easy enough for home bakers. You get a showstopping dessert without complicated steps or techniques.
Tools Needed
You don’t need anything fancy for this old-fashioned caramel cake recipe, but having the right tools will make everything go a lot smoother.
- Two 8-inch round cake pans
- Stand mixer or hand mixer
- Large bowl
- Medium saucepan
- Large saucepan (for frosting)
- Rubber spatulas
- Offset spatula (helpful for smoothing batter and frosting)
- Whisk or wooden spoon
- Measuring cups and spoons
- Wire rack
- Parchment paper (optional, but recommended)
- Cake turntable (optional, for decorating)
- Piping bags and tips (optional, if decorating)
Ingredients
This is a traditional caramel cake with a couple of shortcuts!
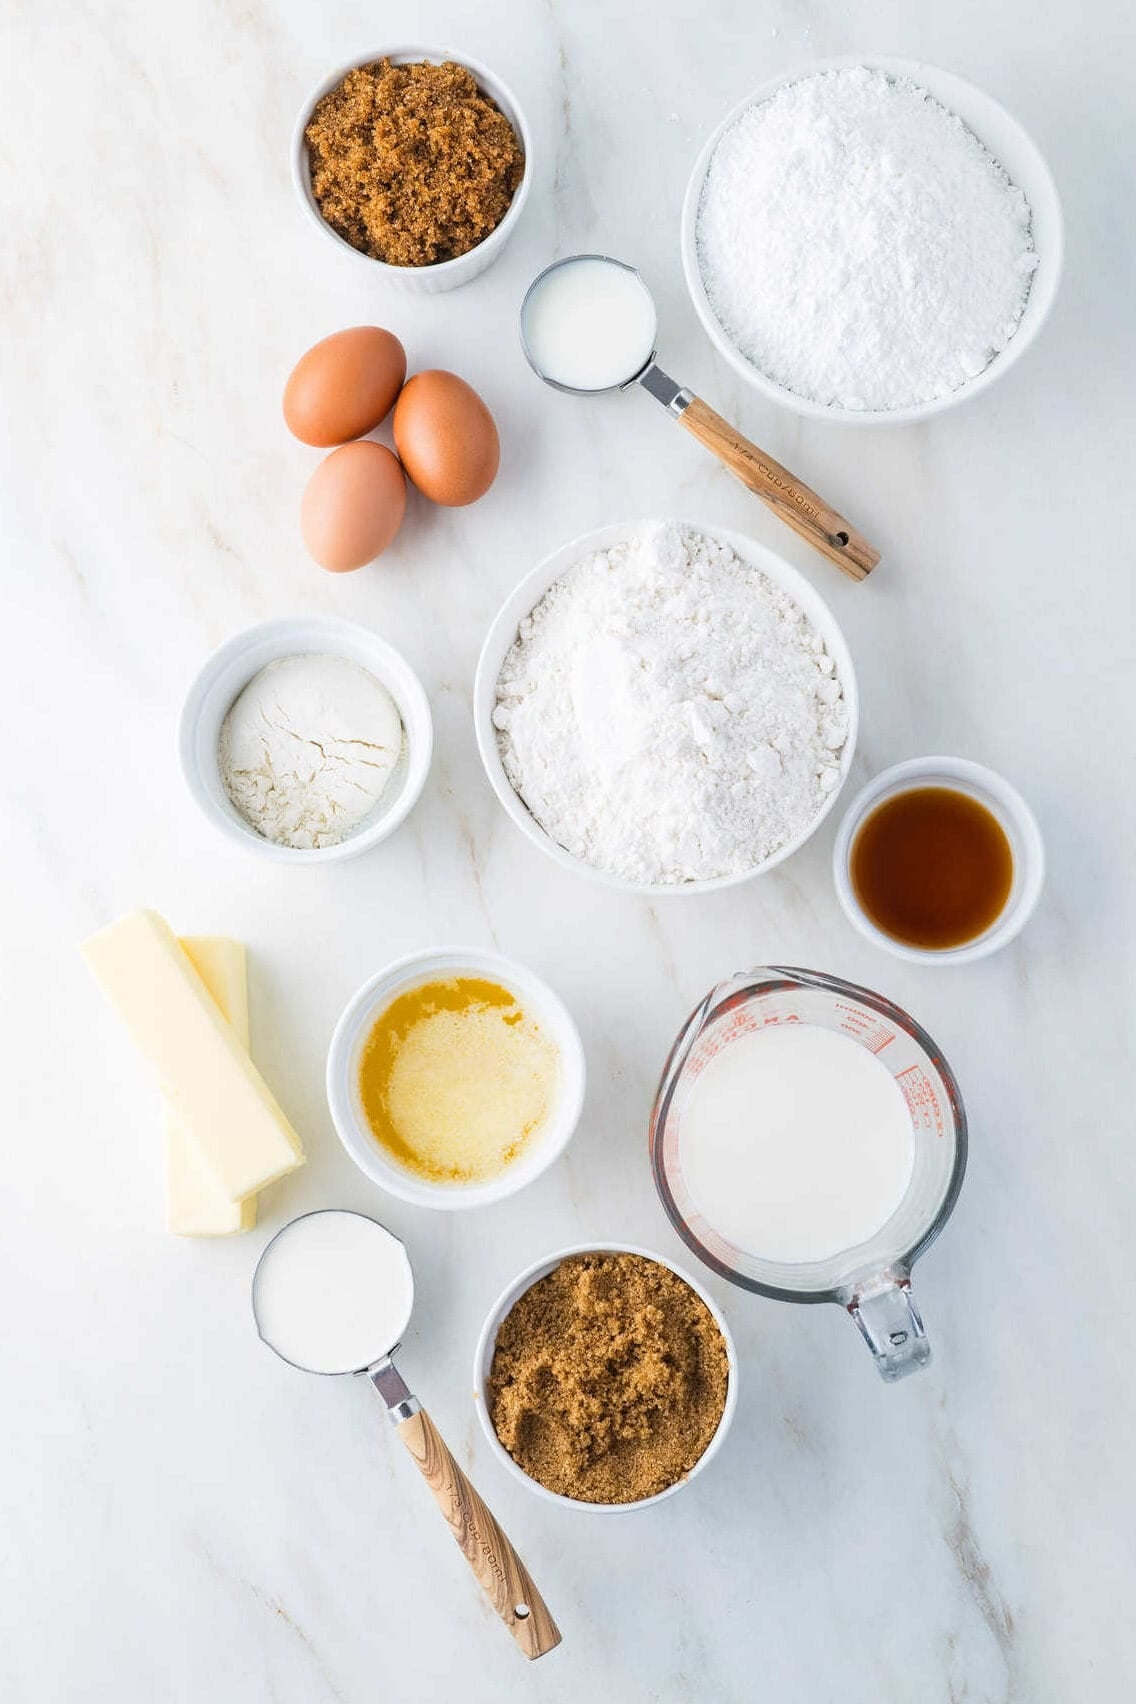
For the Cake
- Yellow cake mix
- All-purpose flour
- Large eggs, room temperature
- Butter, melted
- Buttermilk
- Vanilla extract
For the Homemade Caramel Sauce
- Butter, melted
- Brown sugar, packed
- Milk
- Vanilla extract
For the Homemade Caramel Frosting
- Butter
- Brown sugar, packed
- Heavy cream (plus additional for best results)
- Powdered sugar
- Vanilla extract
Note: For deep caramel flavor (and color), use dark brown sugar. For a lighter finish, use light brown sugar. I used dark for the filling (caramel sauce) and light brown sugar for the homemade caramel icing.
How to Make a Caramel Cake
Cake Instructions
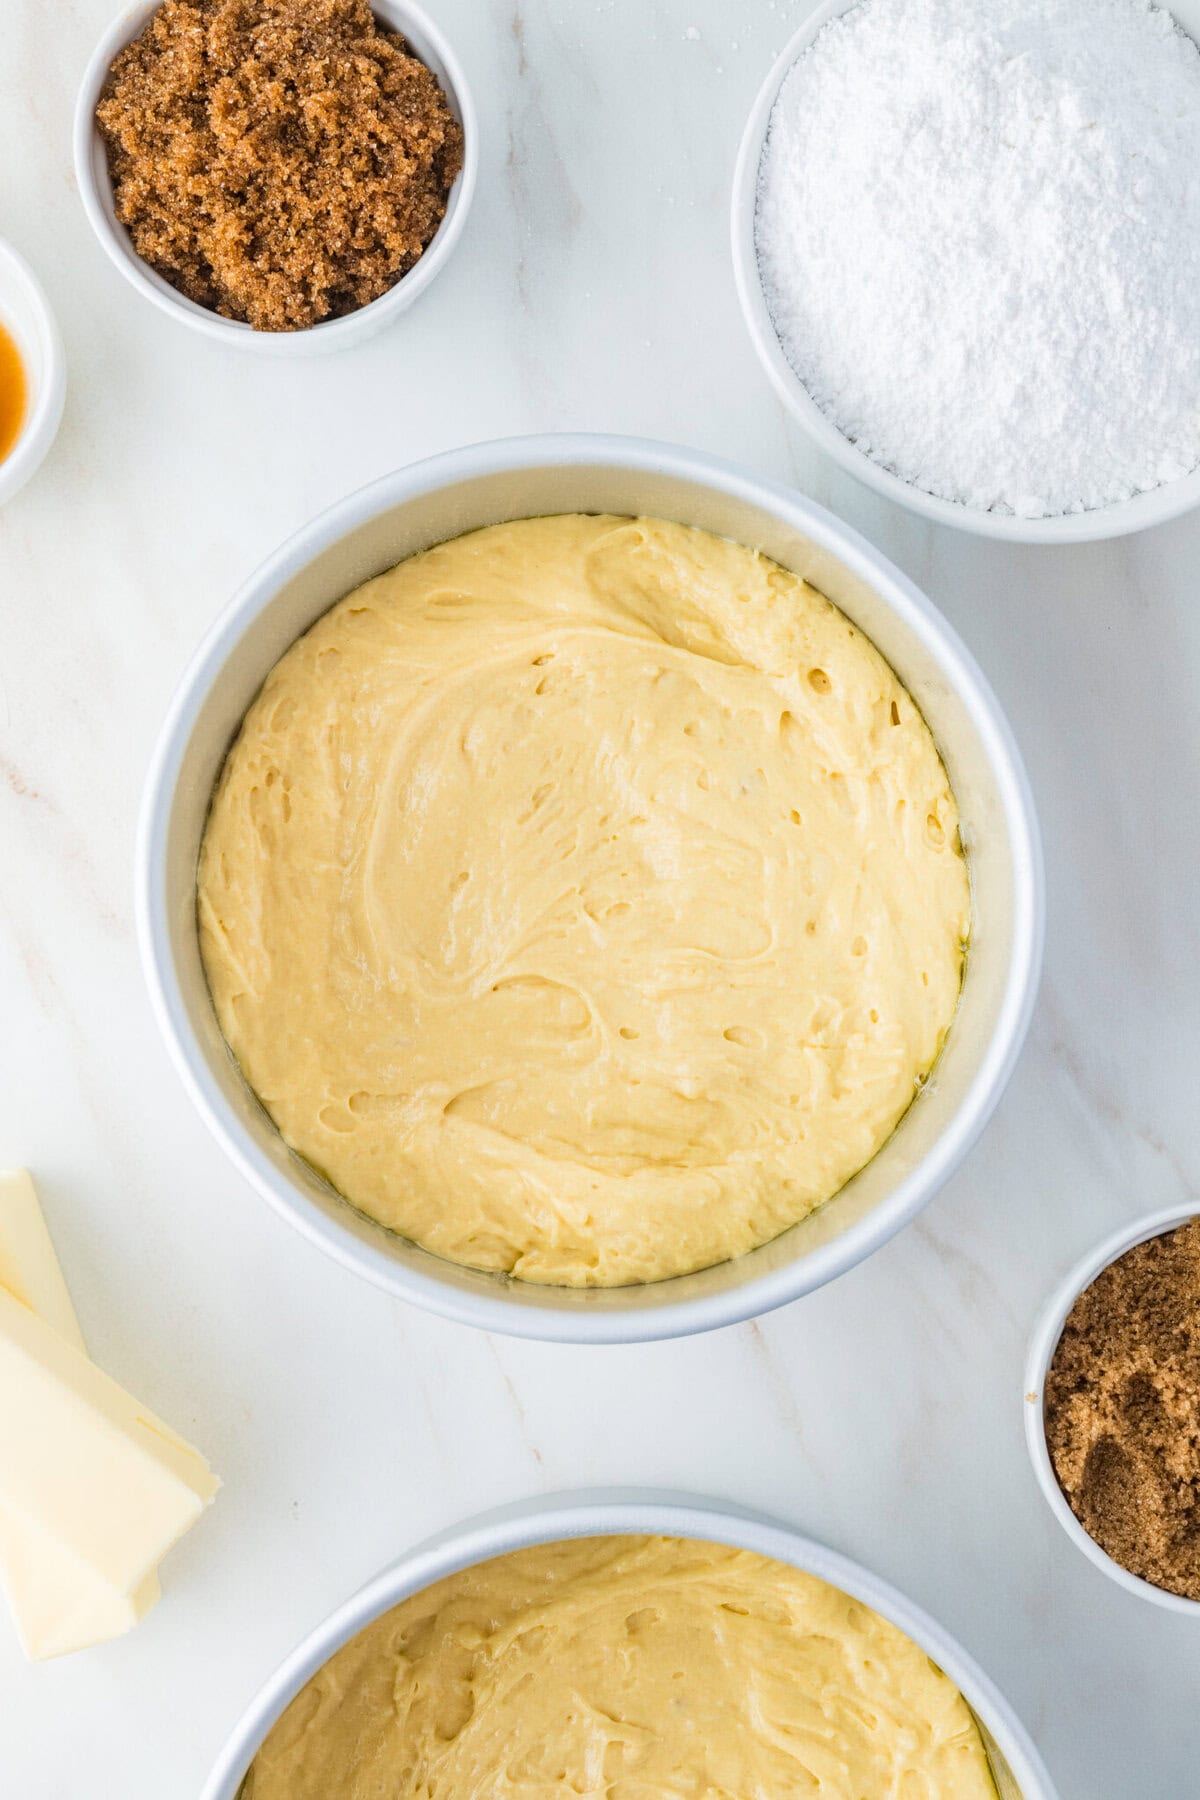
- Preheat the oven to 350°F. Spray two 7-inch or 8-inch cake pans with cake release spray or homemade goop. You can also line the bottom of the pan with parchment if you like, for extra insurance against sticking.
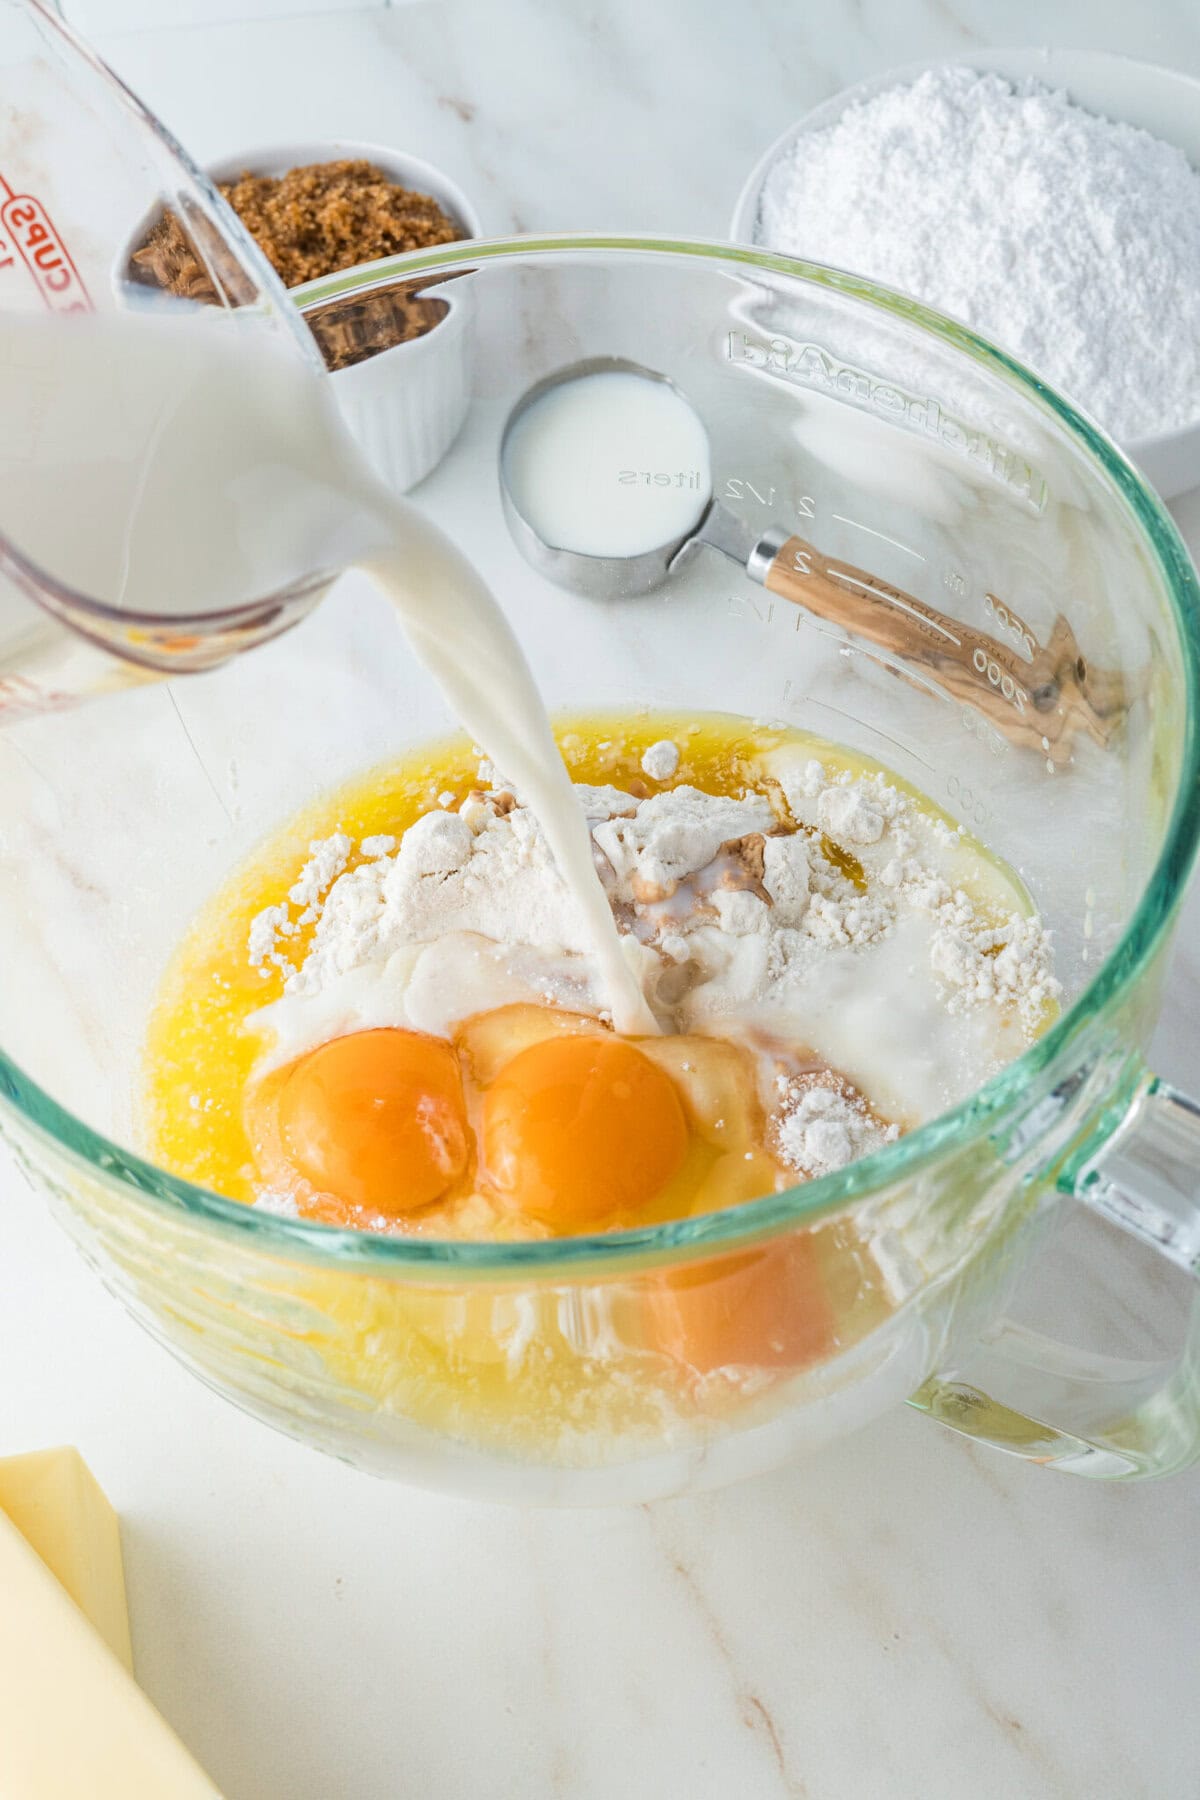
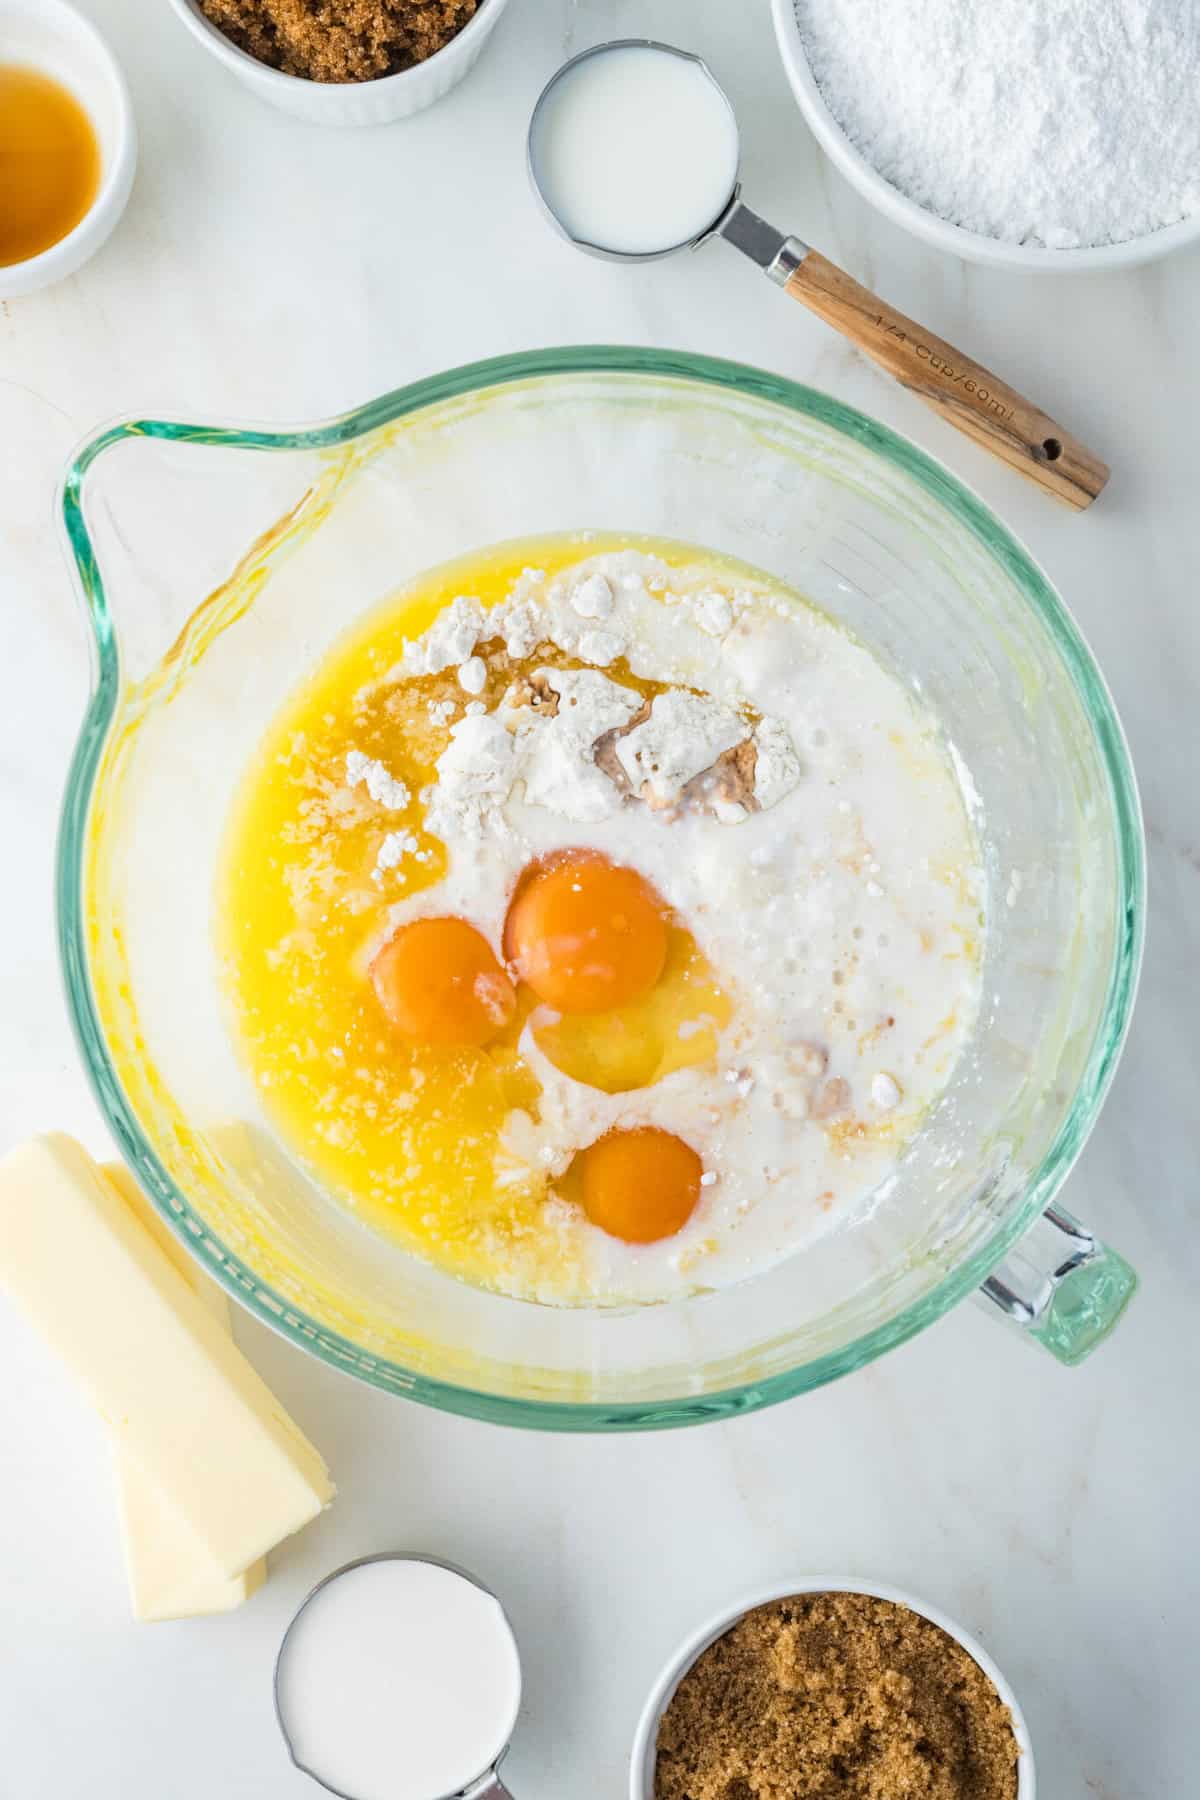
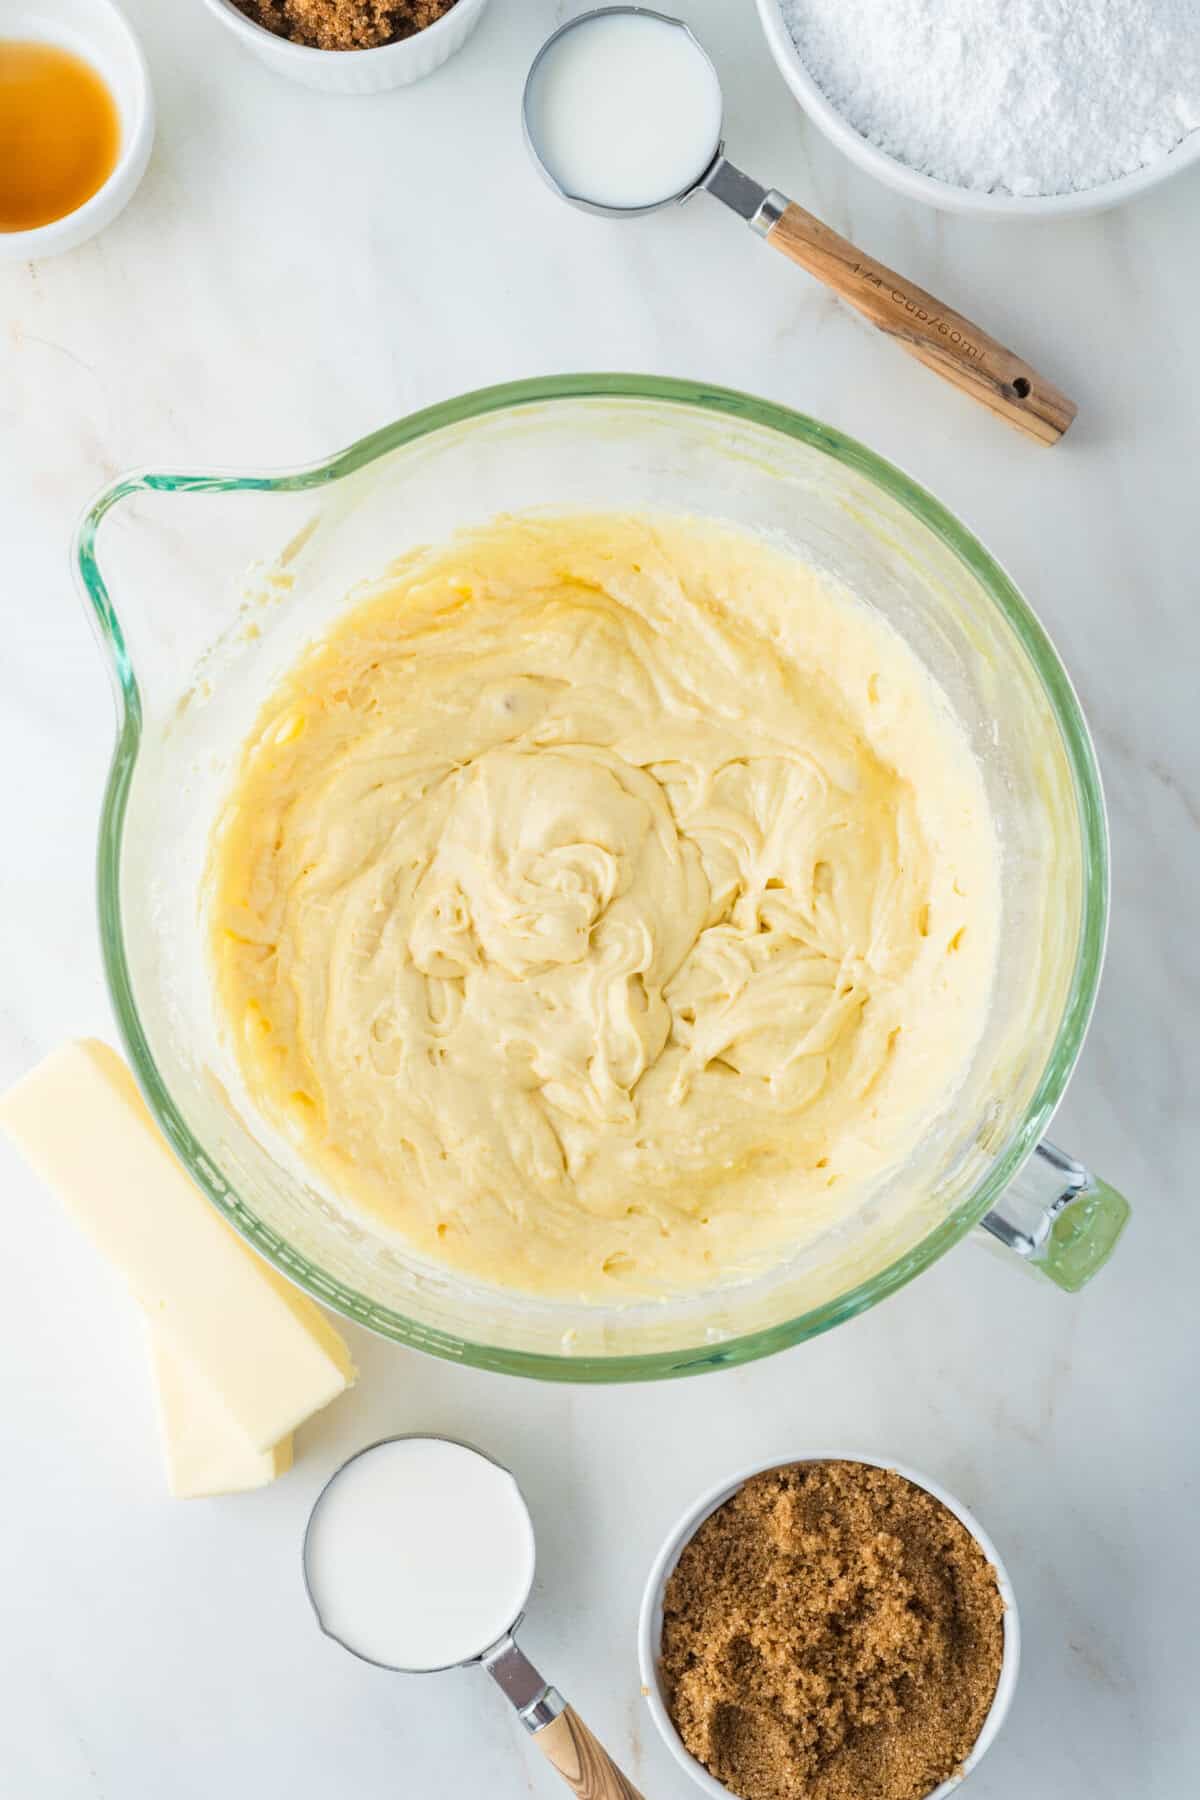
- Place the cake mix, milk, melted butter, eggs, and vanilla extract in a large mixing bowl or the bowl of a stand mixer.
- Mix on medium speed for at least 3 full minutes, until the cake batter is well blended and smooth.
- Divide batter evenly between the two pans, smoothing it out with a rubber spatula. Place the pans in the oven side by side.
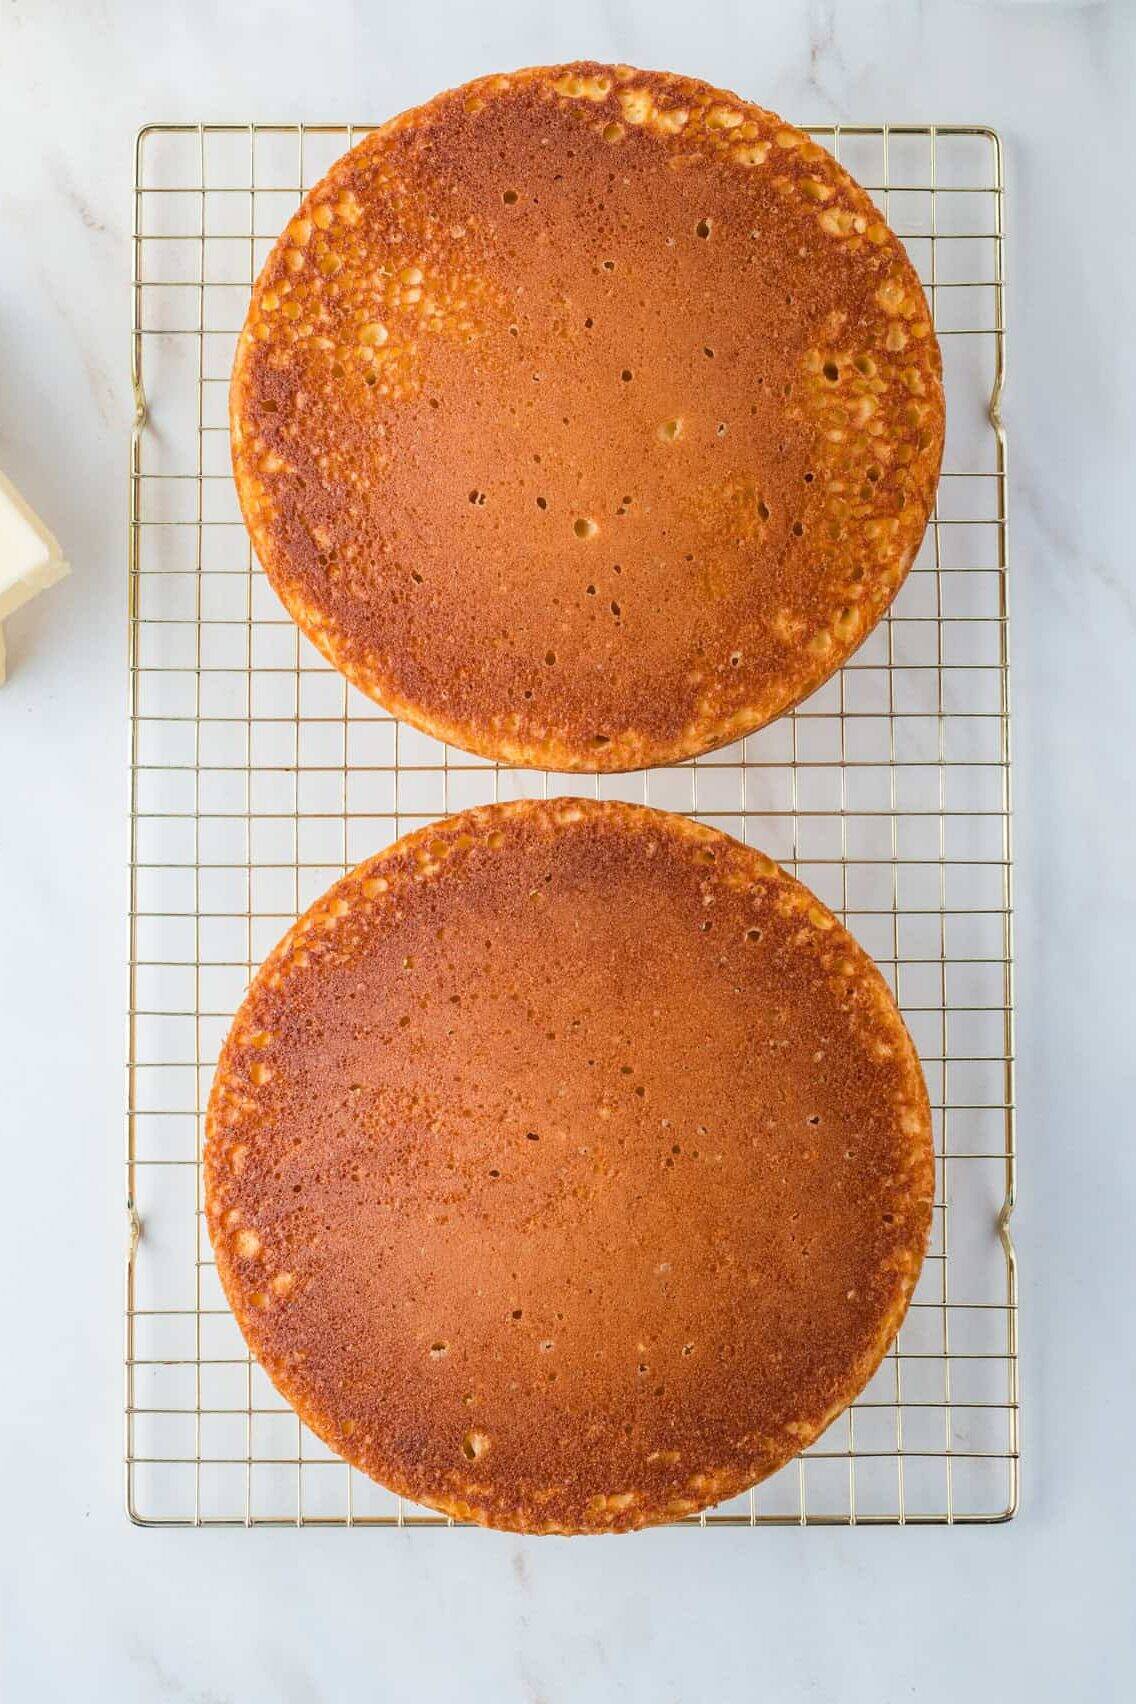
- Bake the cakes for 25–30 minutes, until golden brown and they spring back when pressed. You can also do the toothpick test if you like.
- Remove the pans from the oven and place them on wire racks. Let the cake cool in the pans for at least 10 minutes.
- Remove from the pans and allow them to cool completely, at least 30 minutes more.
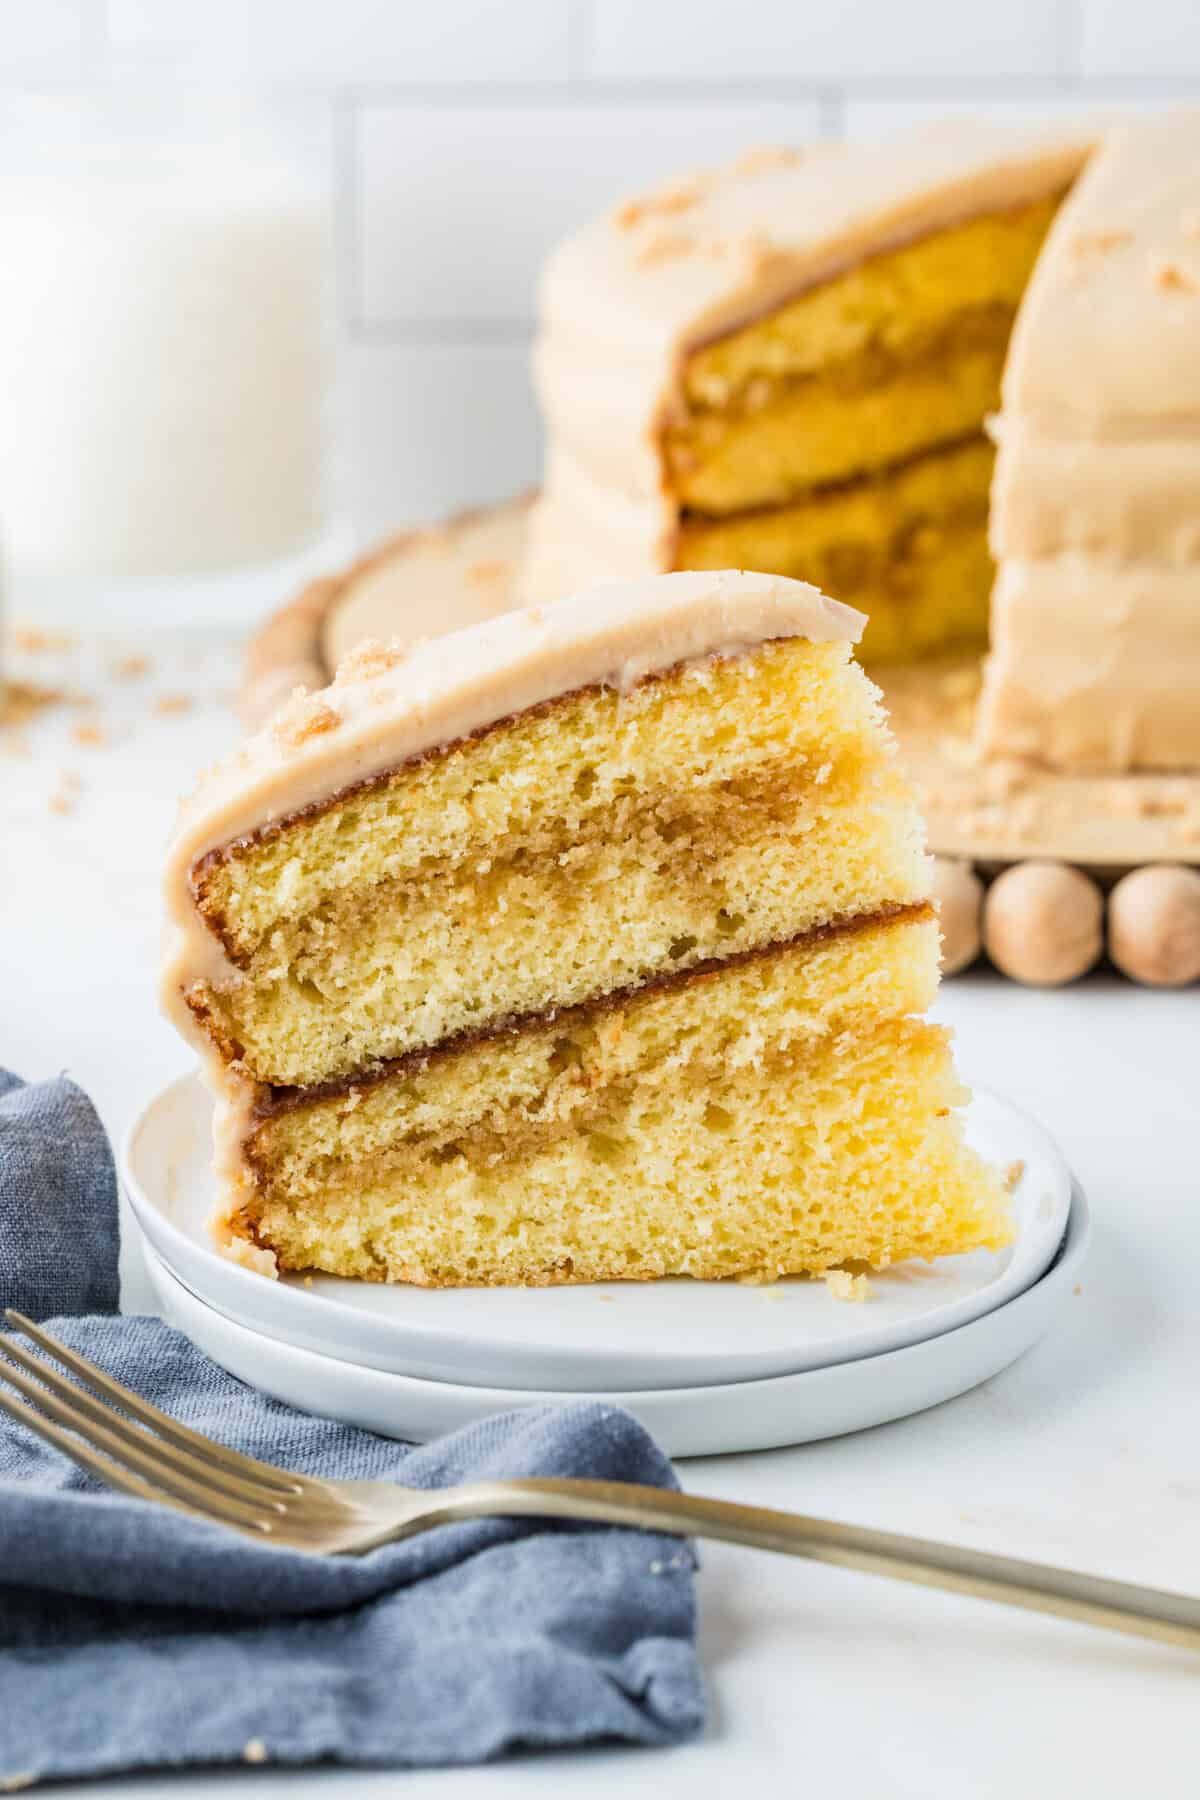
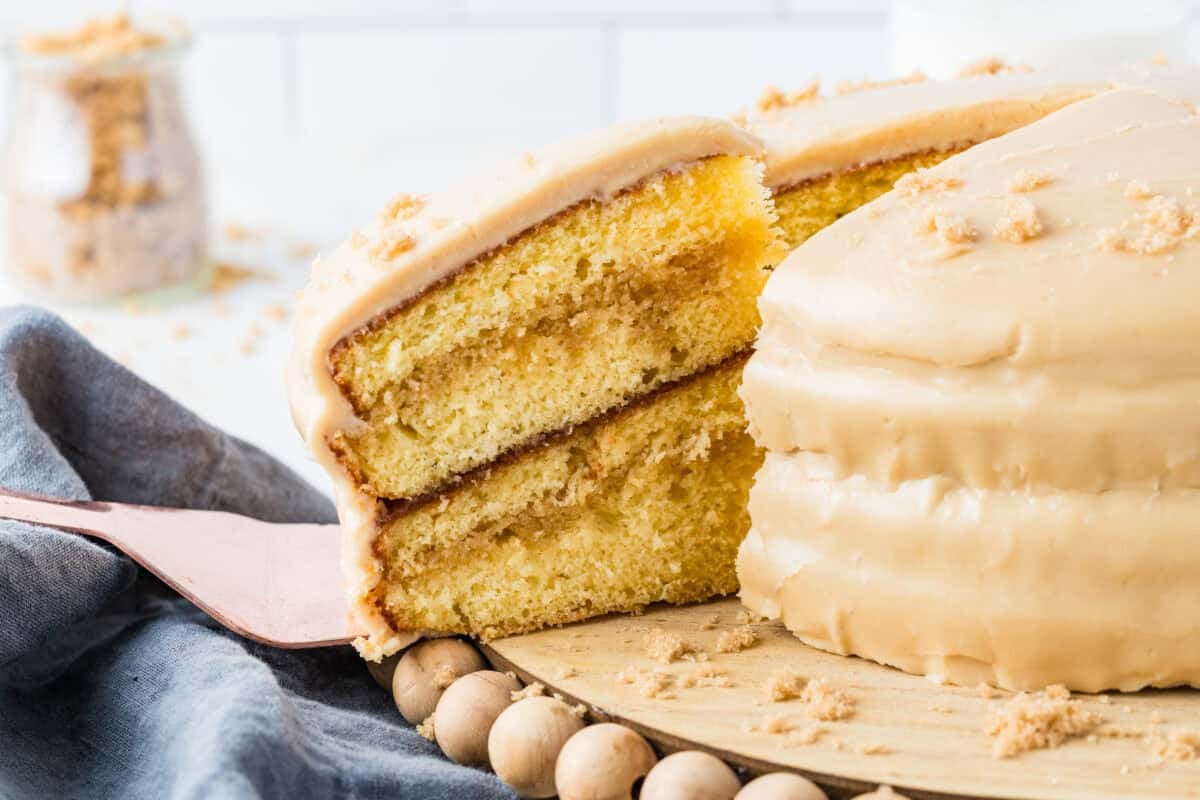
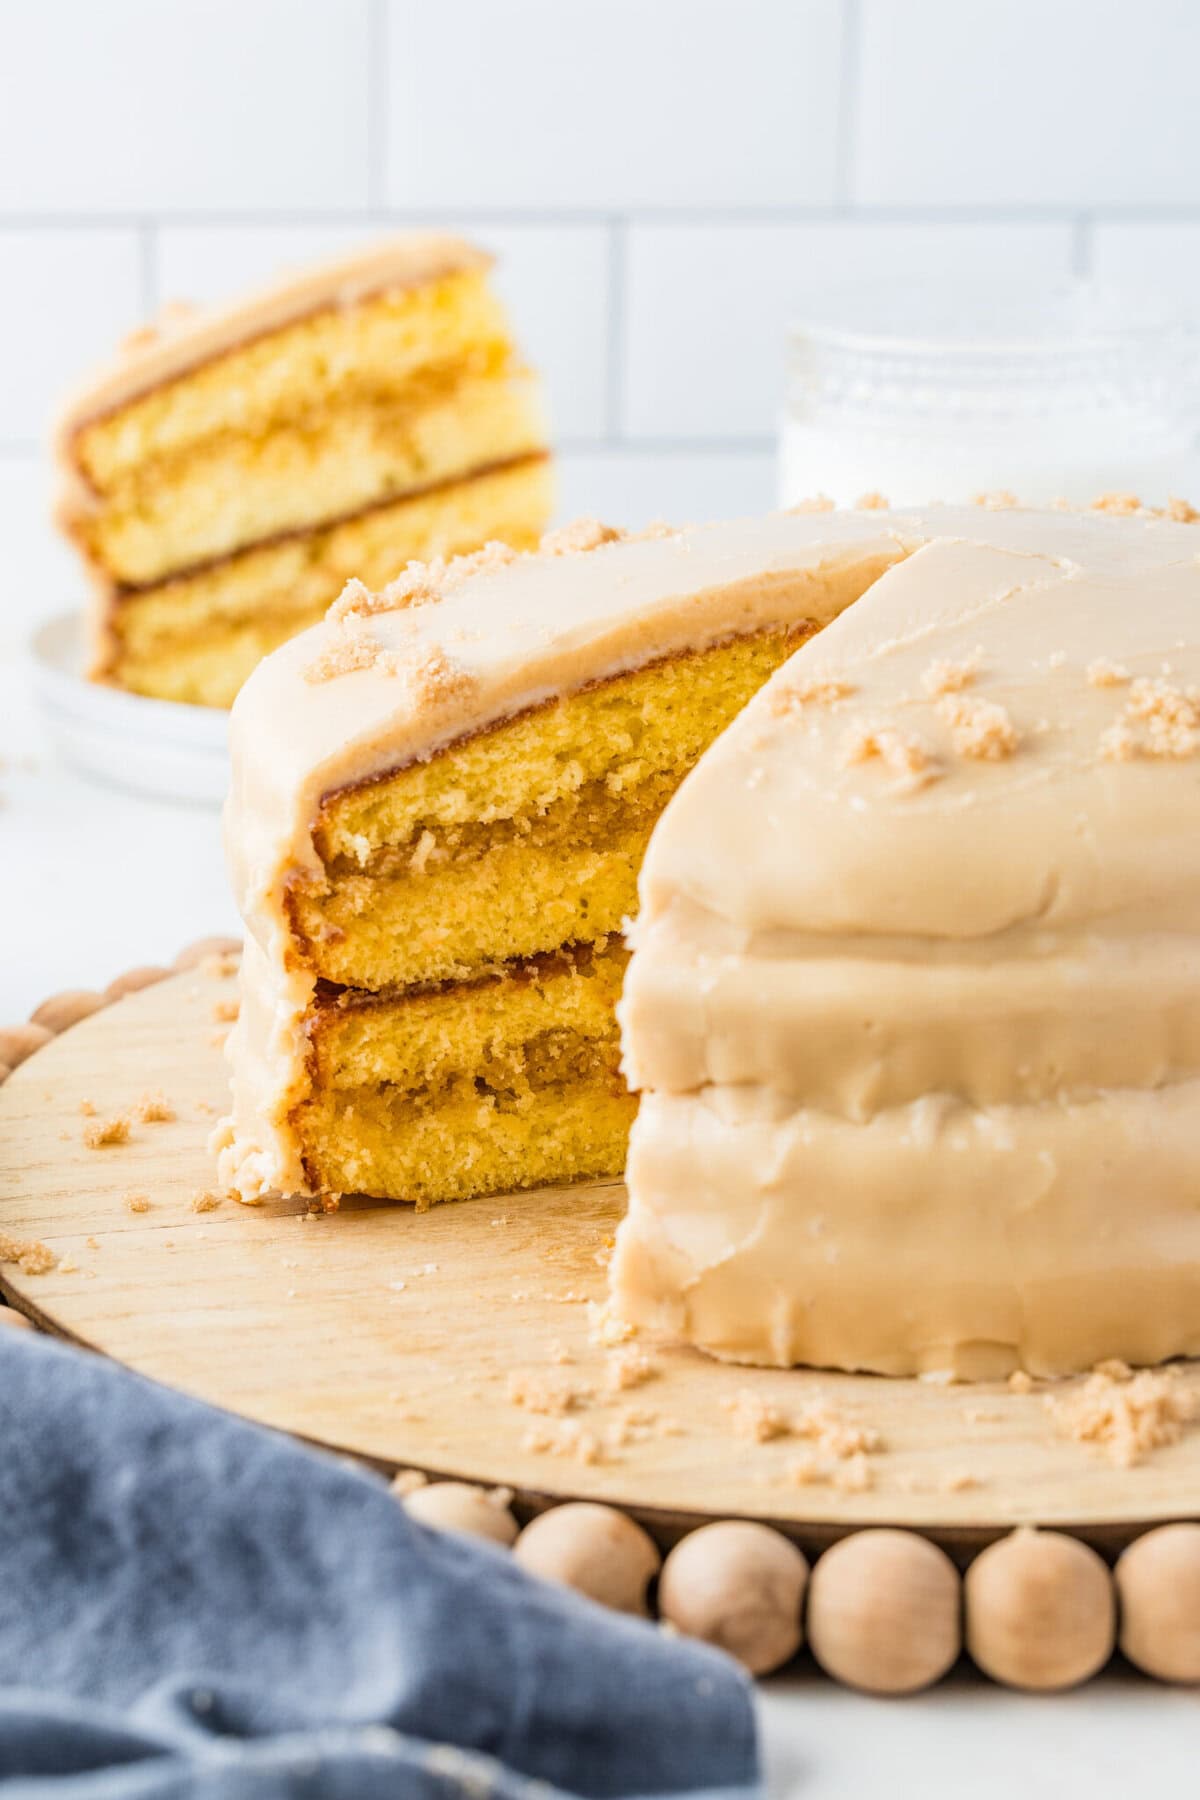
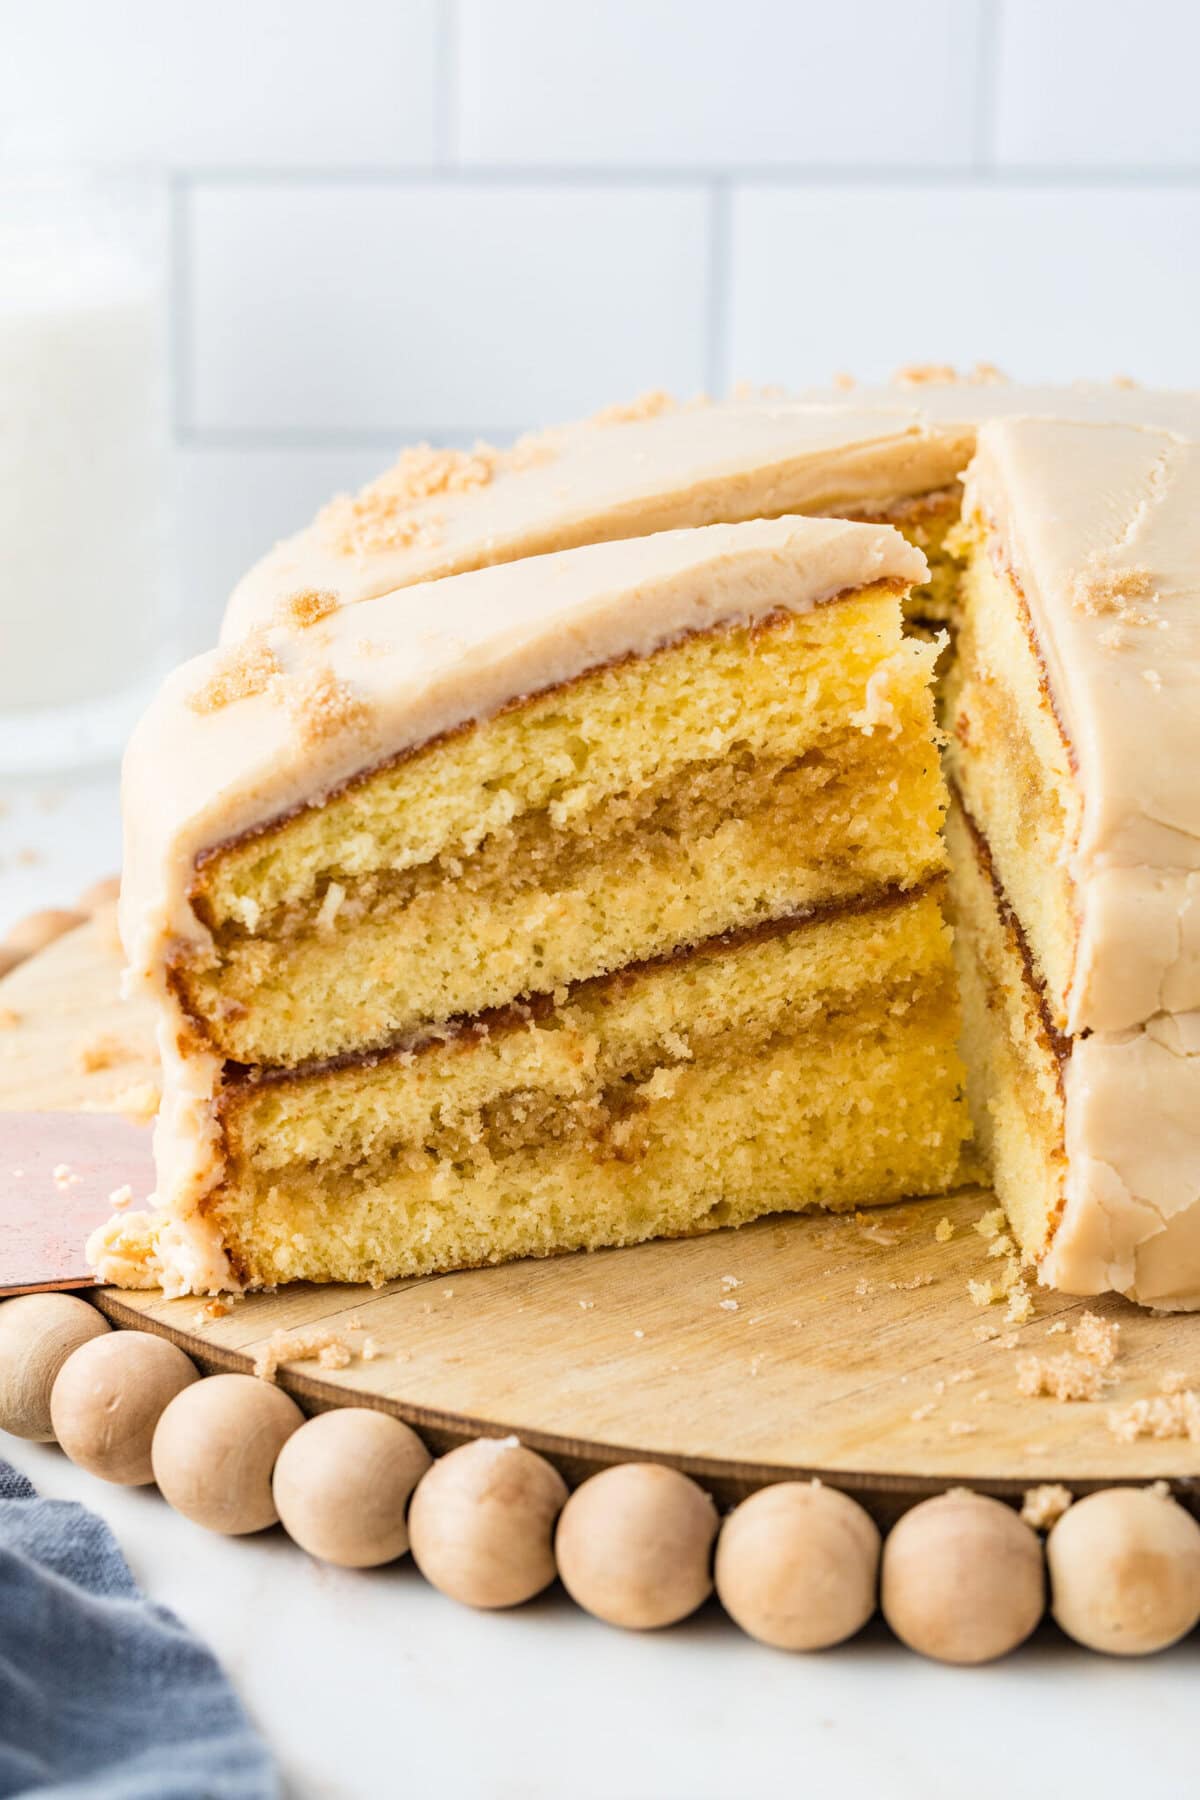
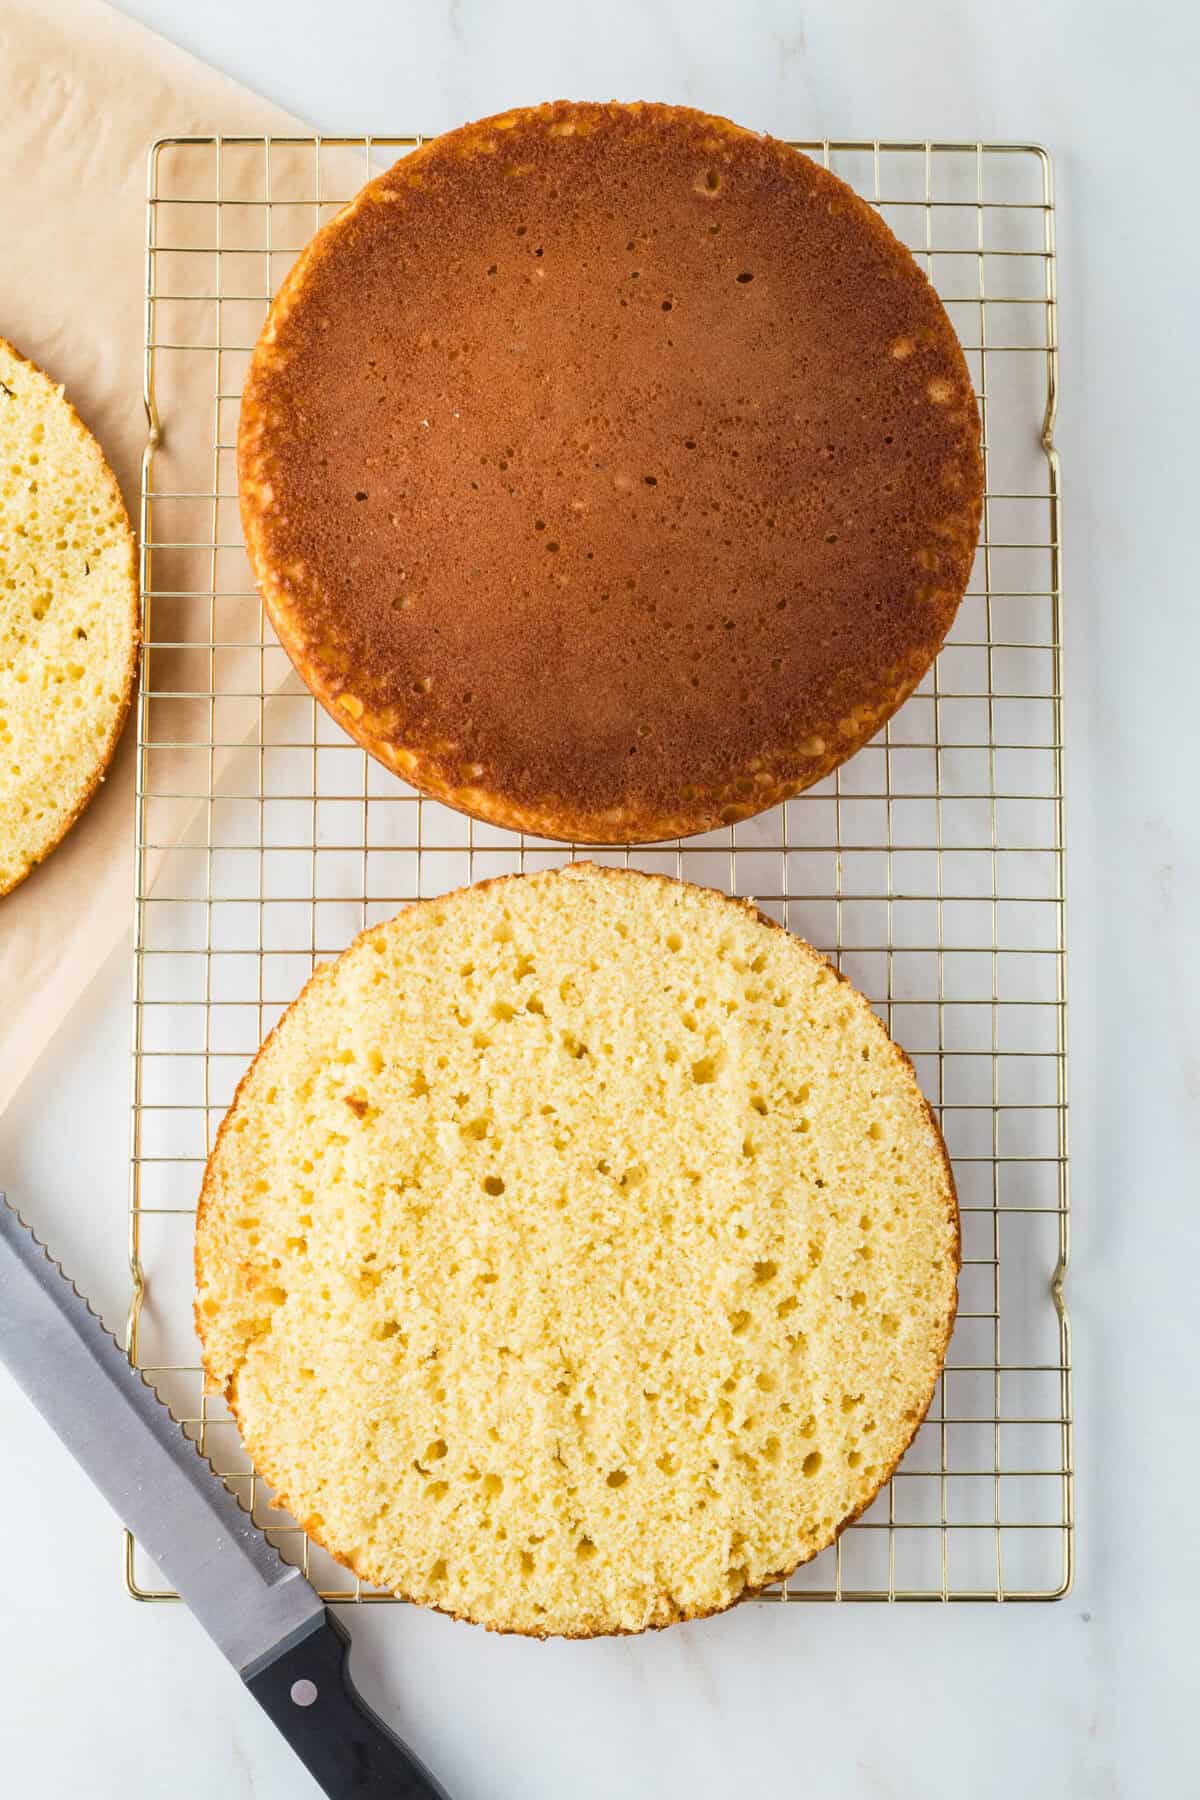
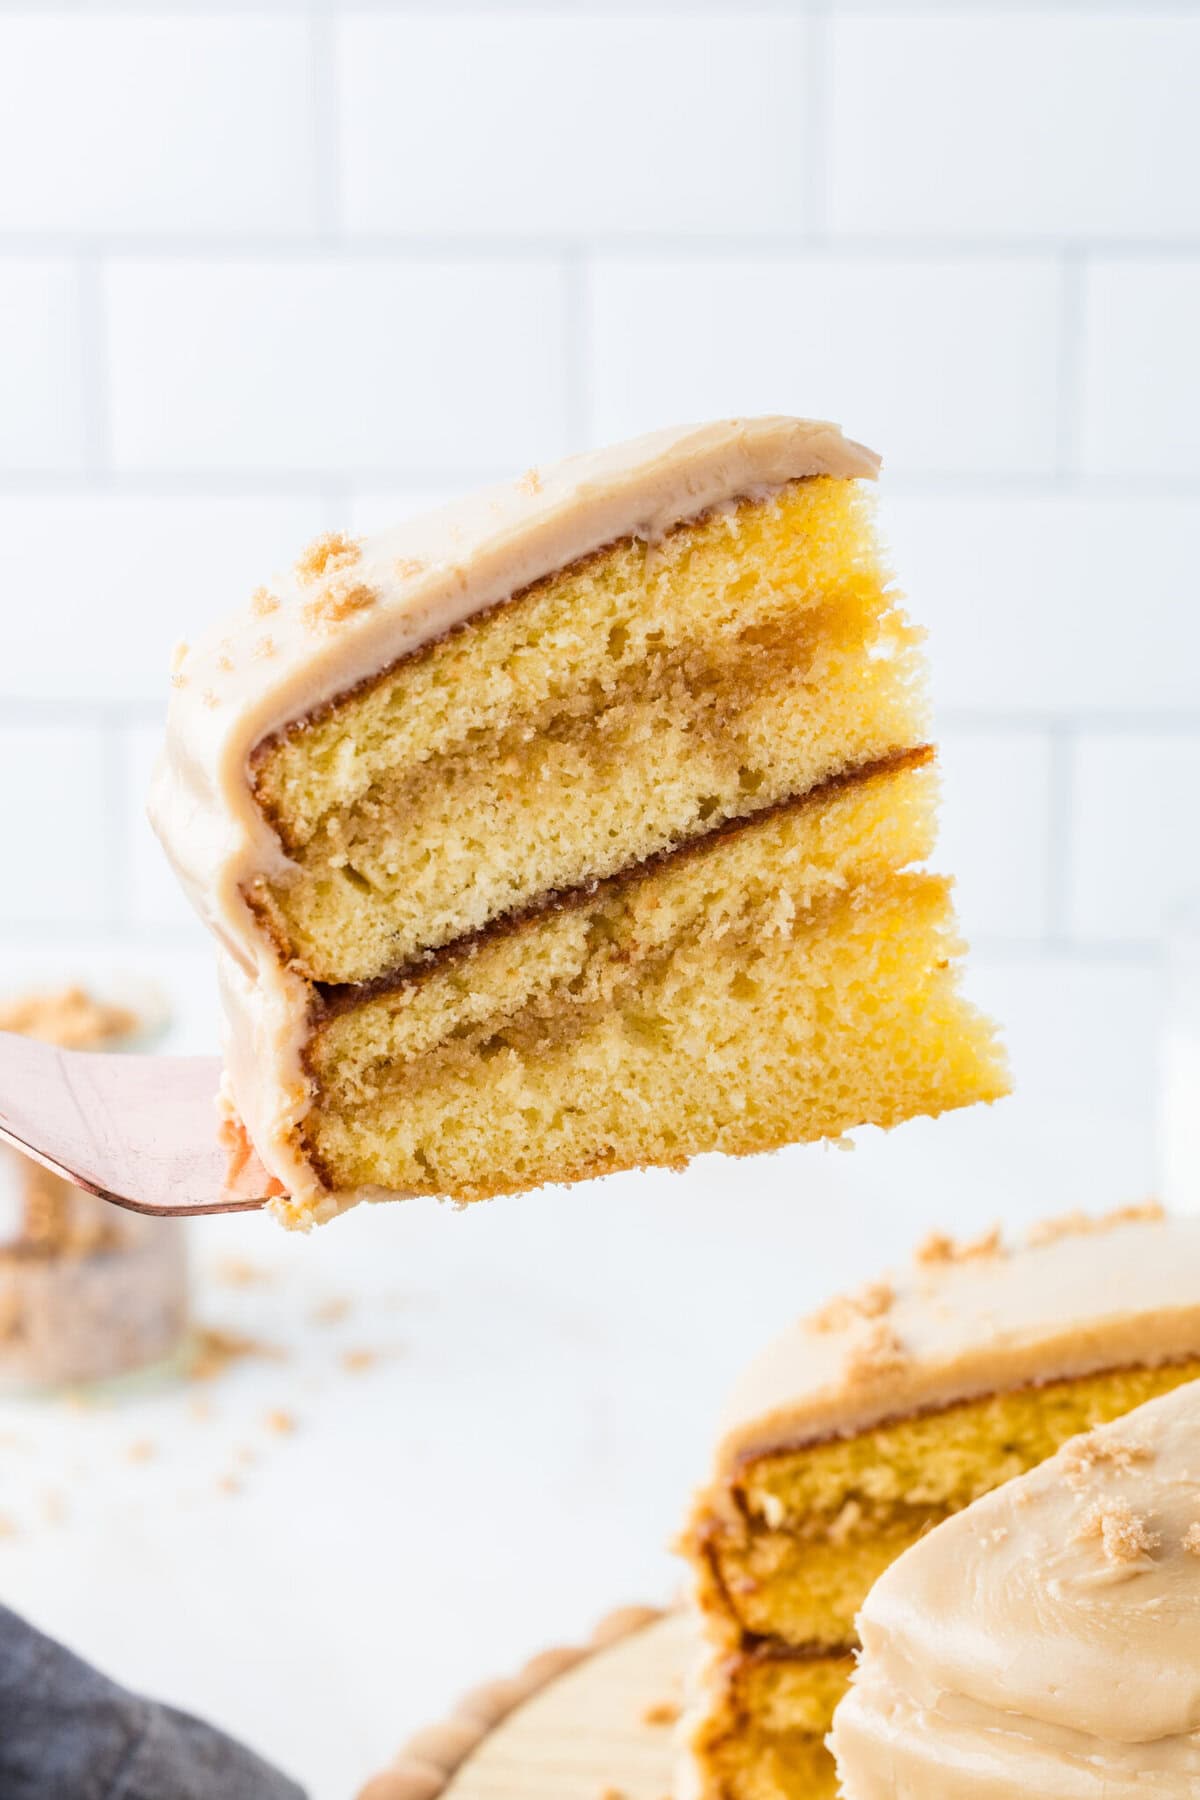
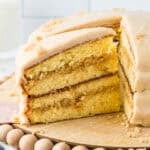
- Torte (cut) each cake layer into two even layers.
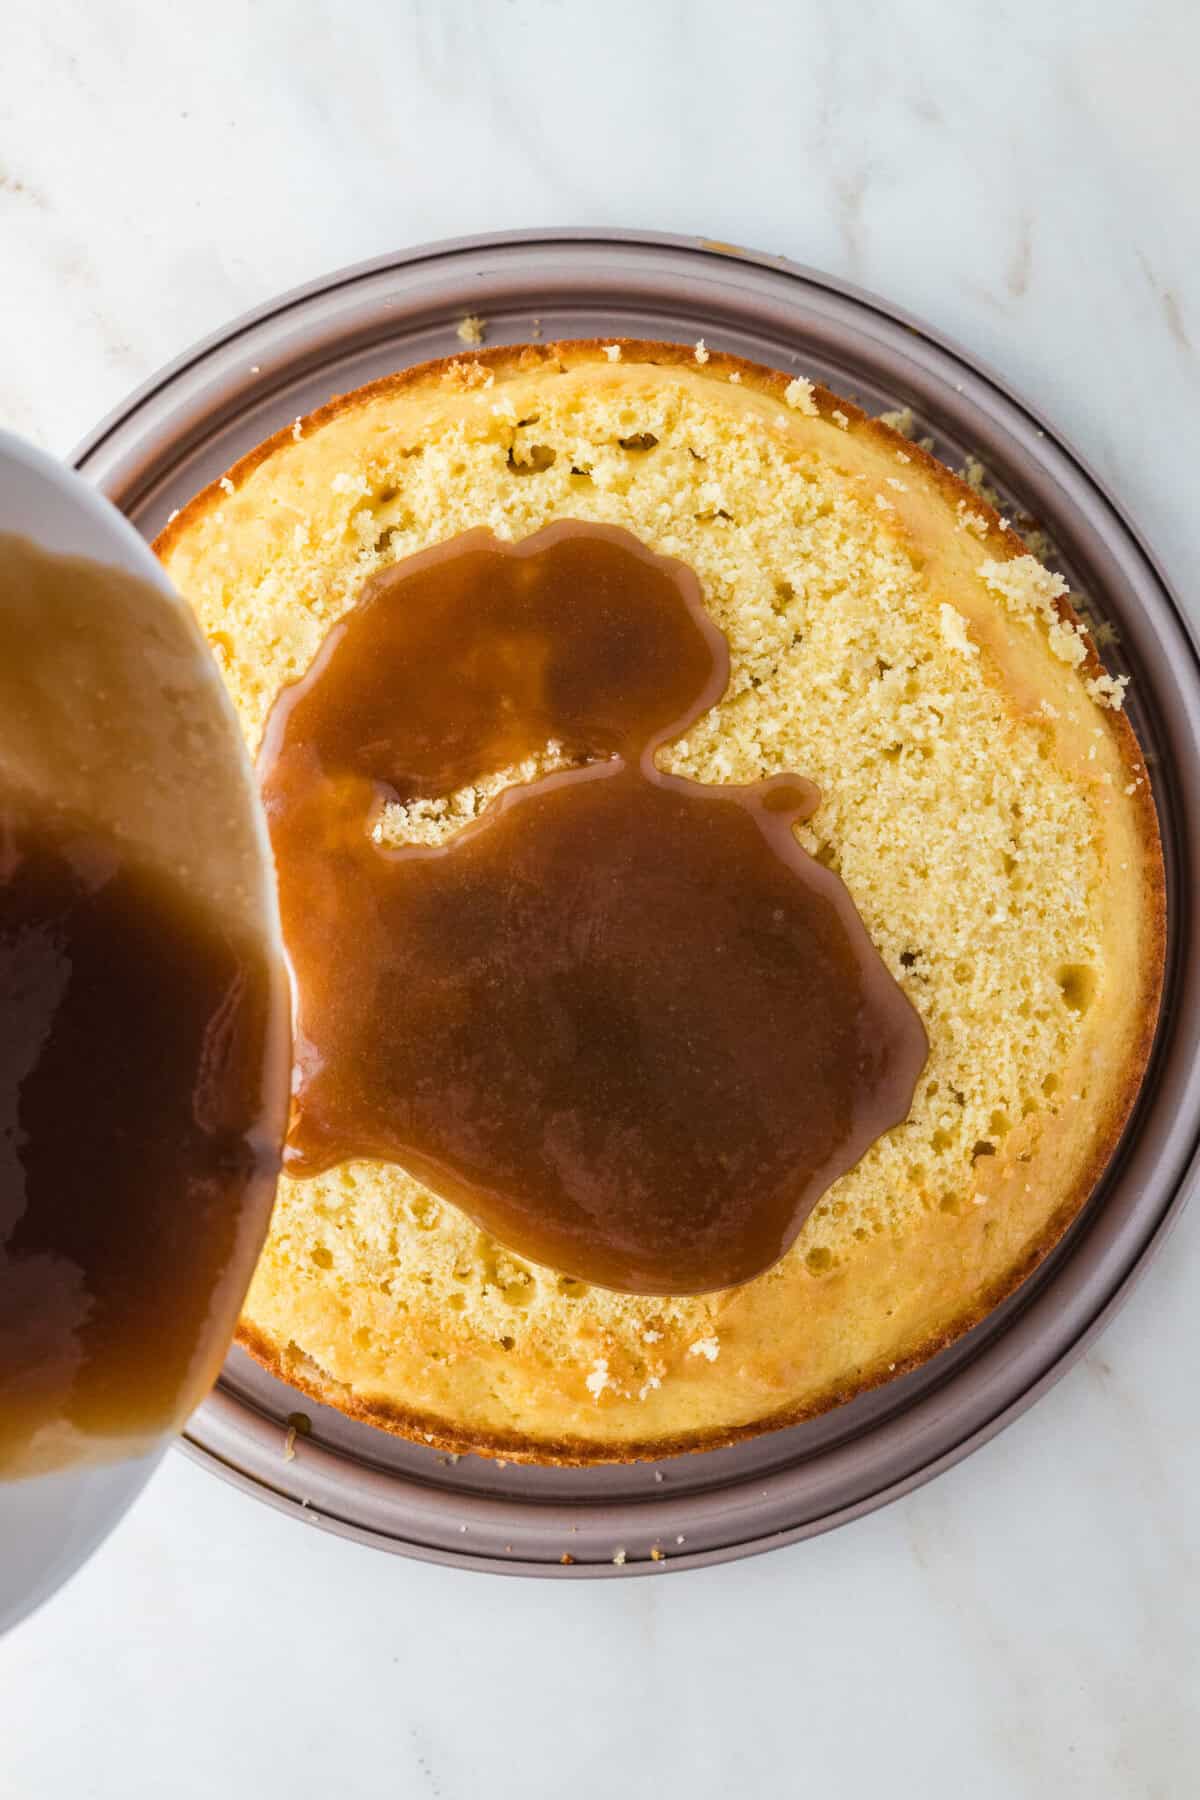
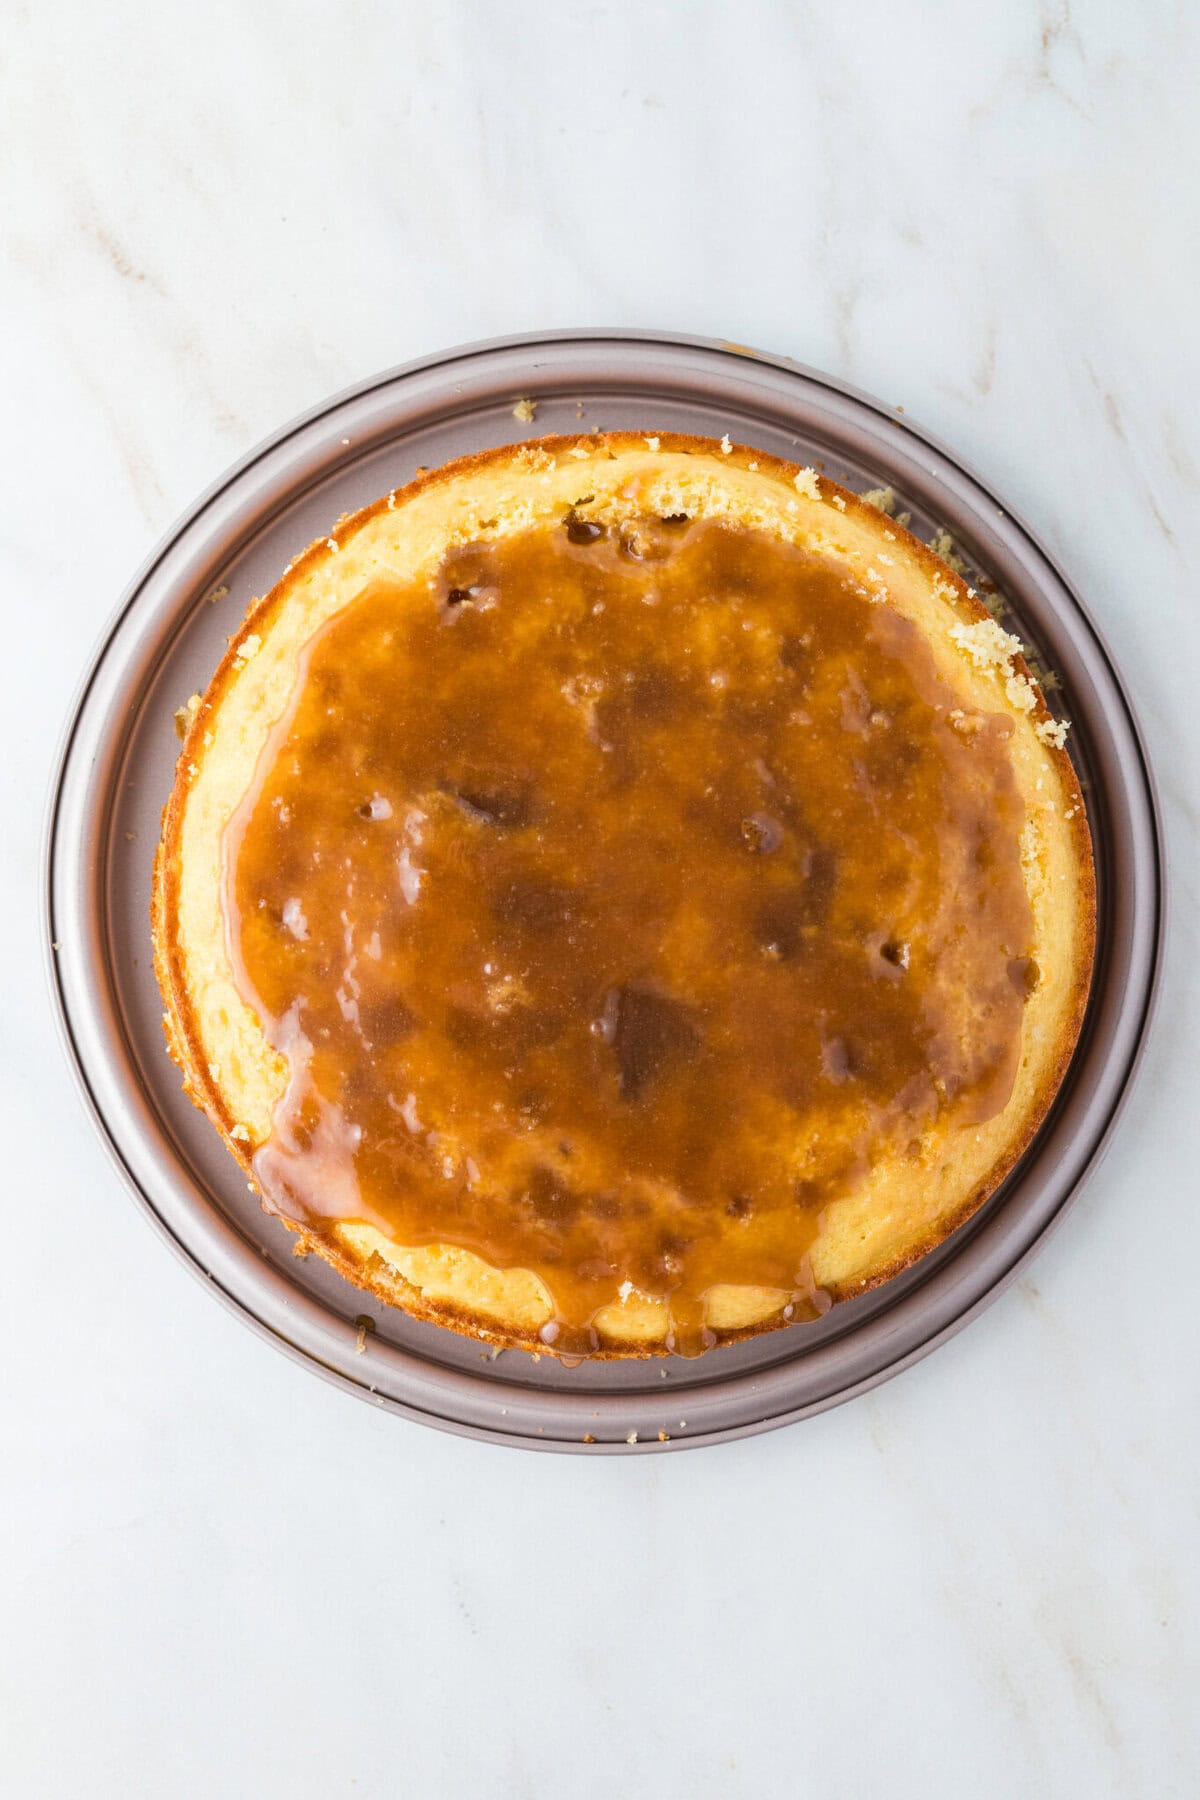
Caramel Filling Instructions
Once the cakes are cooled, start working on the hot caramel filling and frosting.
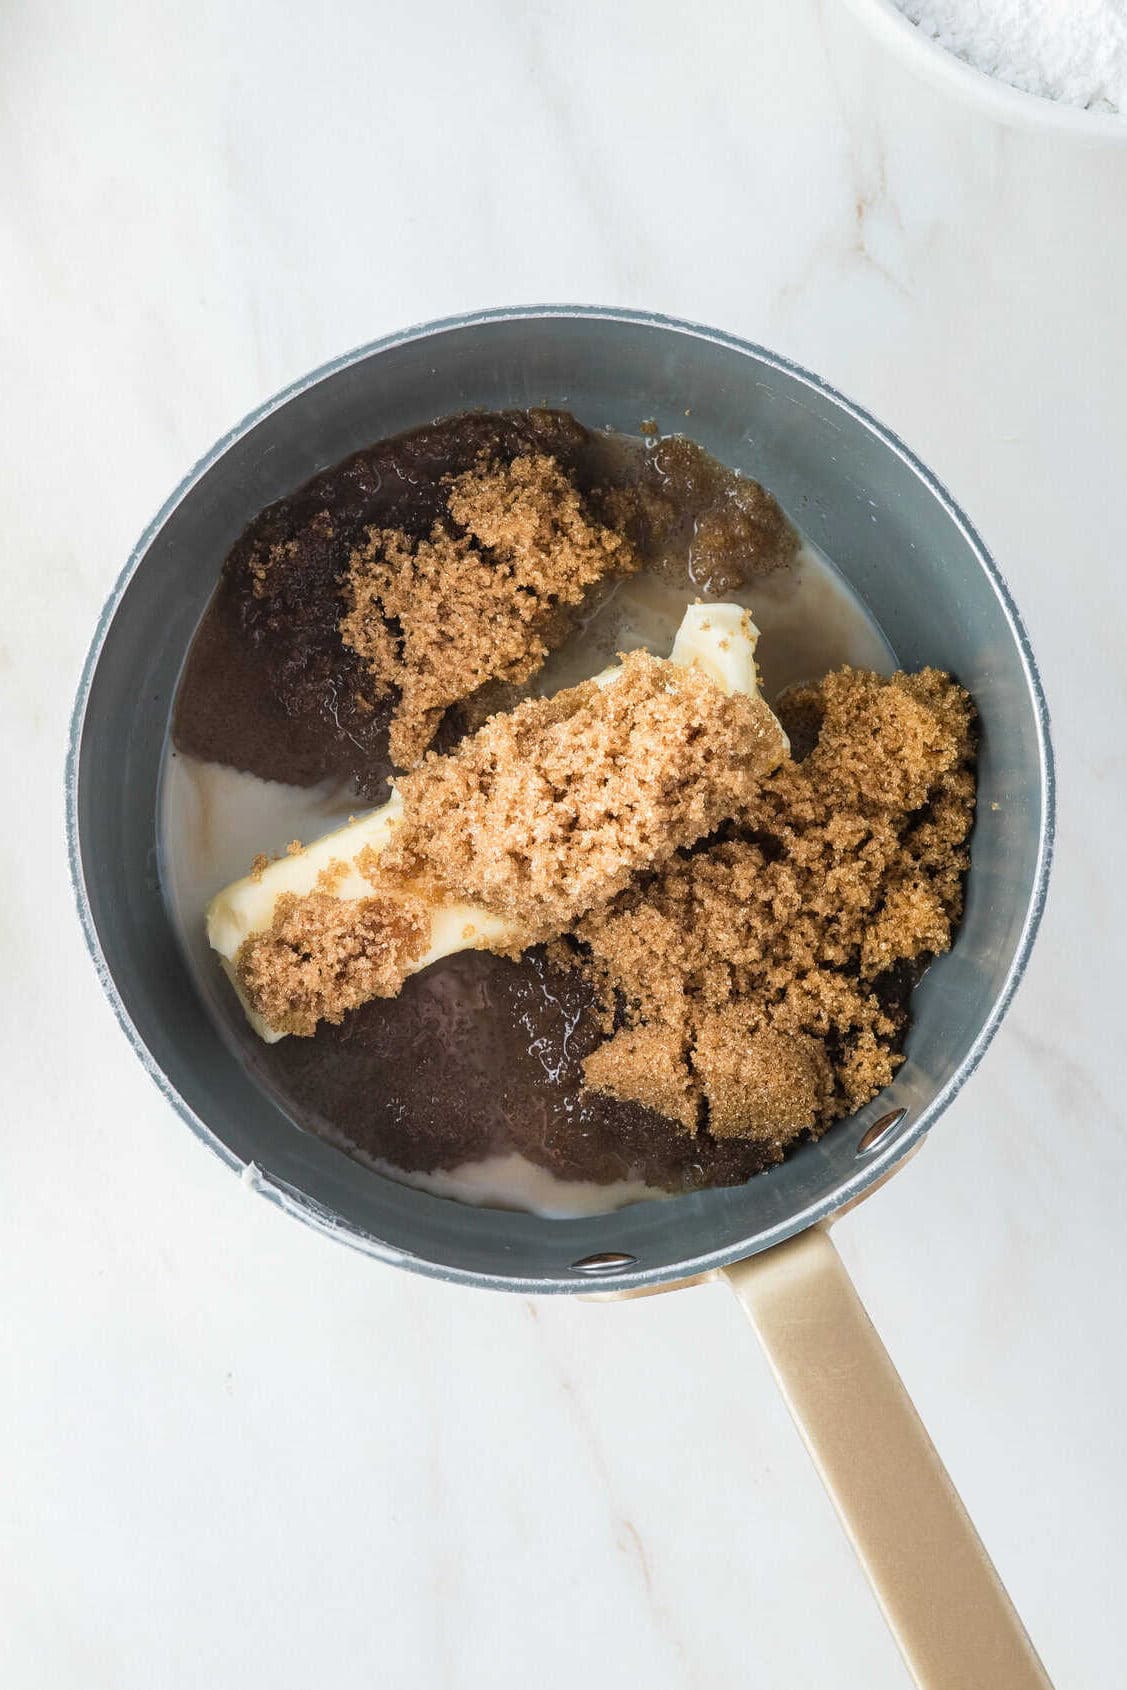
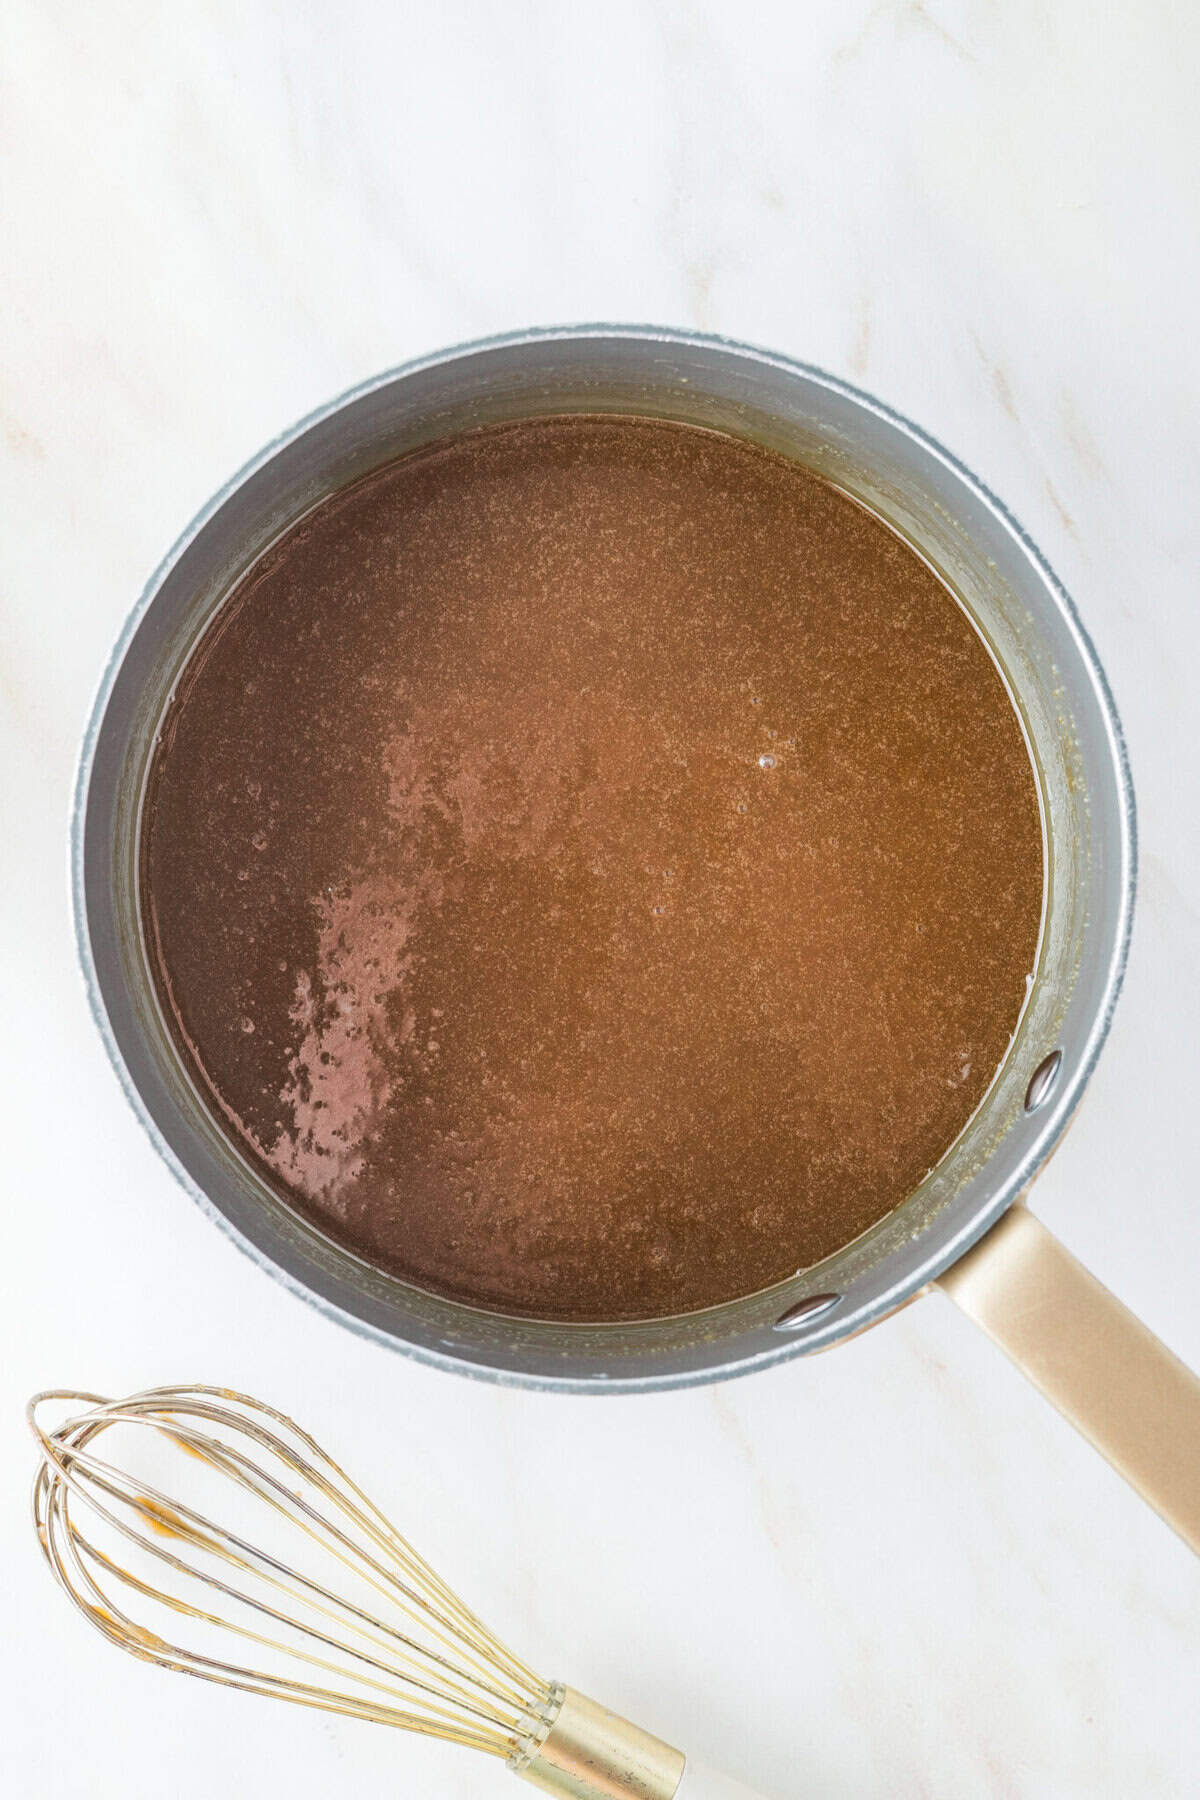
- Add the butter, brown sugar, and milk to a small saucepan.
- Heat until the butter melts and the sugar dissolves, about 3–5 minutes over medium heat.
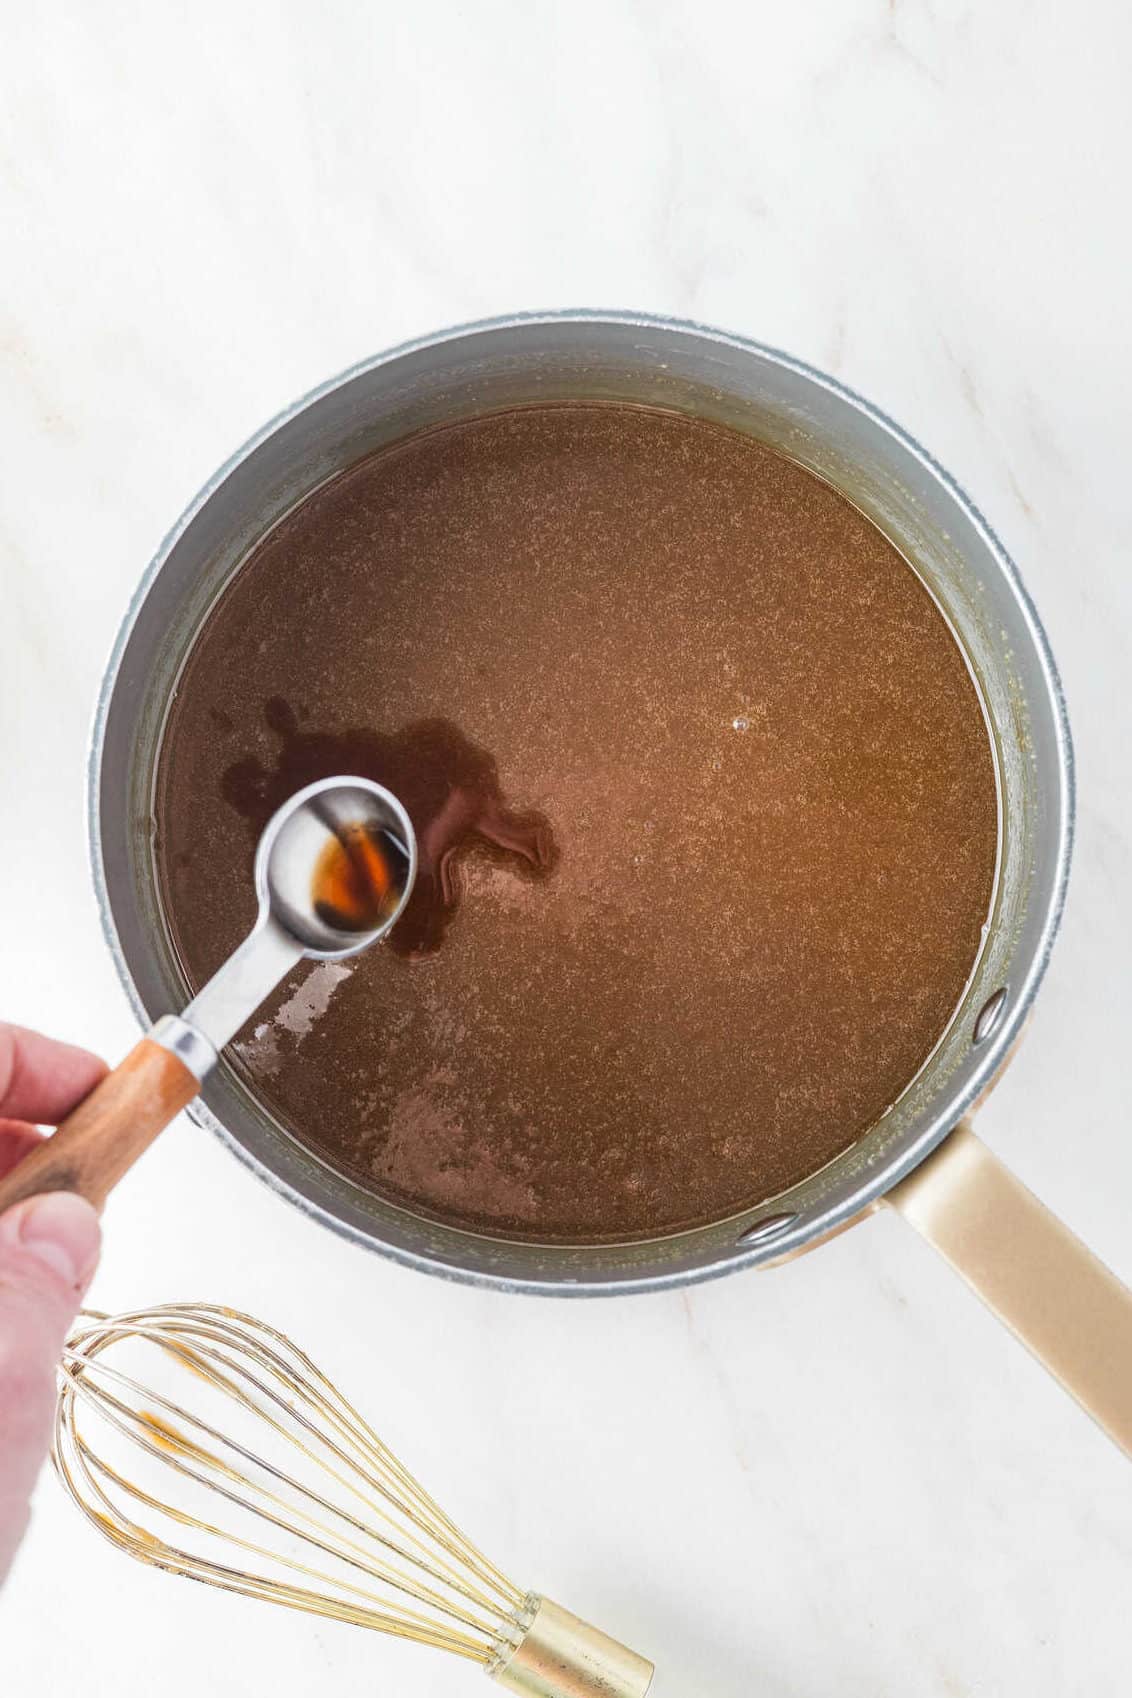
- Remove from heat and stir in the vanilla extract. Use immediately. *see assembling the cake below
Frosting Instructions
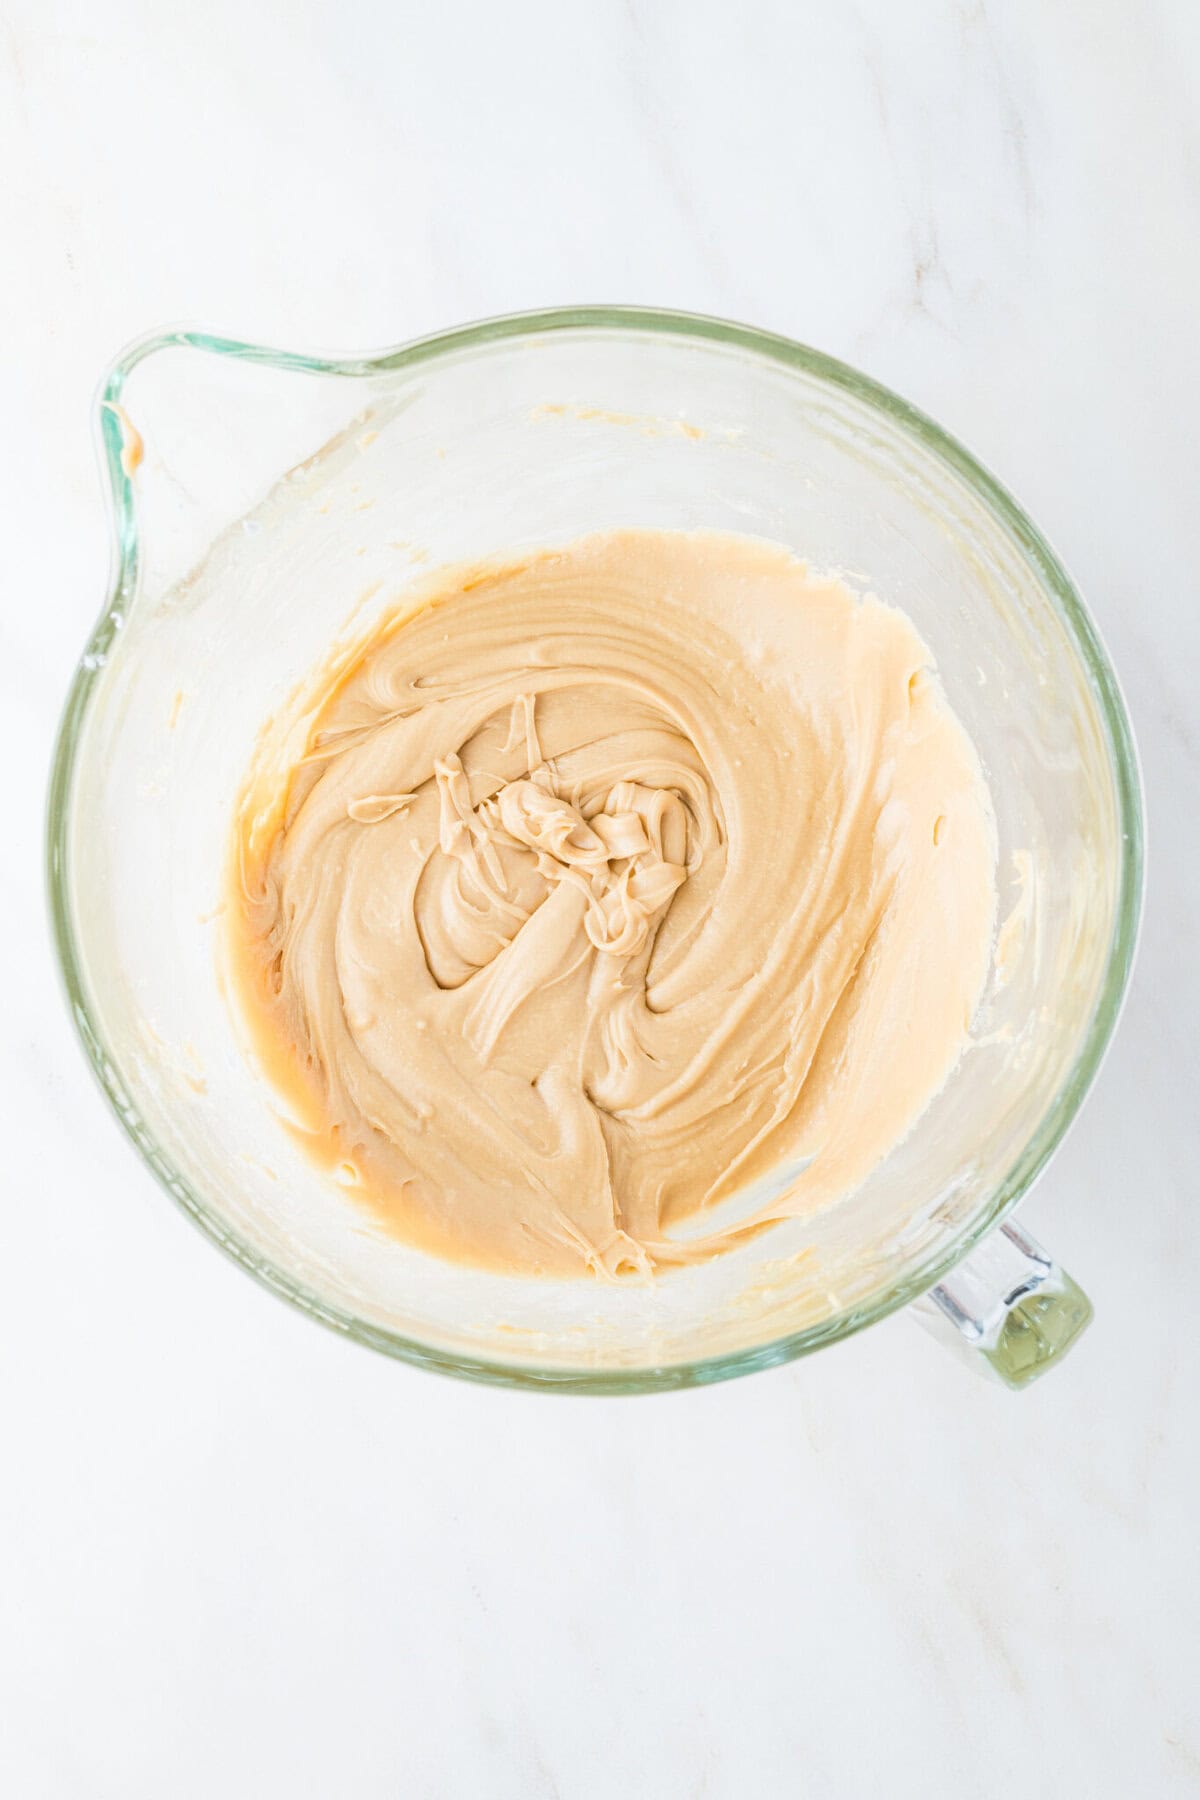
The decadent caramel frosting for this delicious recipe is the trickiest part. It is a bit temperamental and can take some practice. It changes quickly as it cools, so timing really matters. Don’t worry if it doesn’t look perfect the first time. It’s very forgiving in flavor, and the end result is still an irresistible cake.
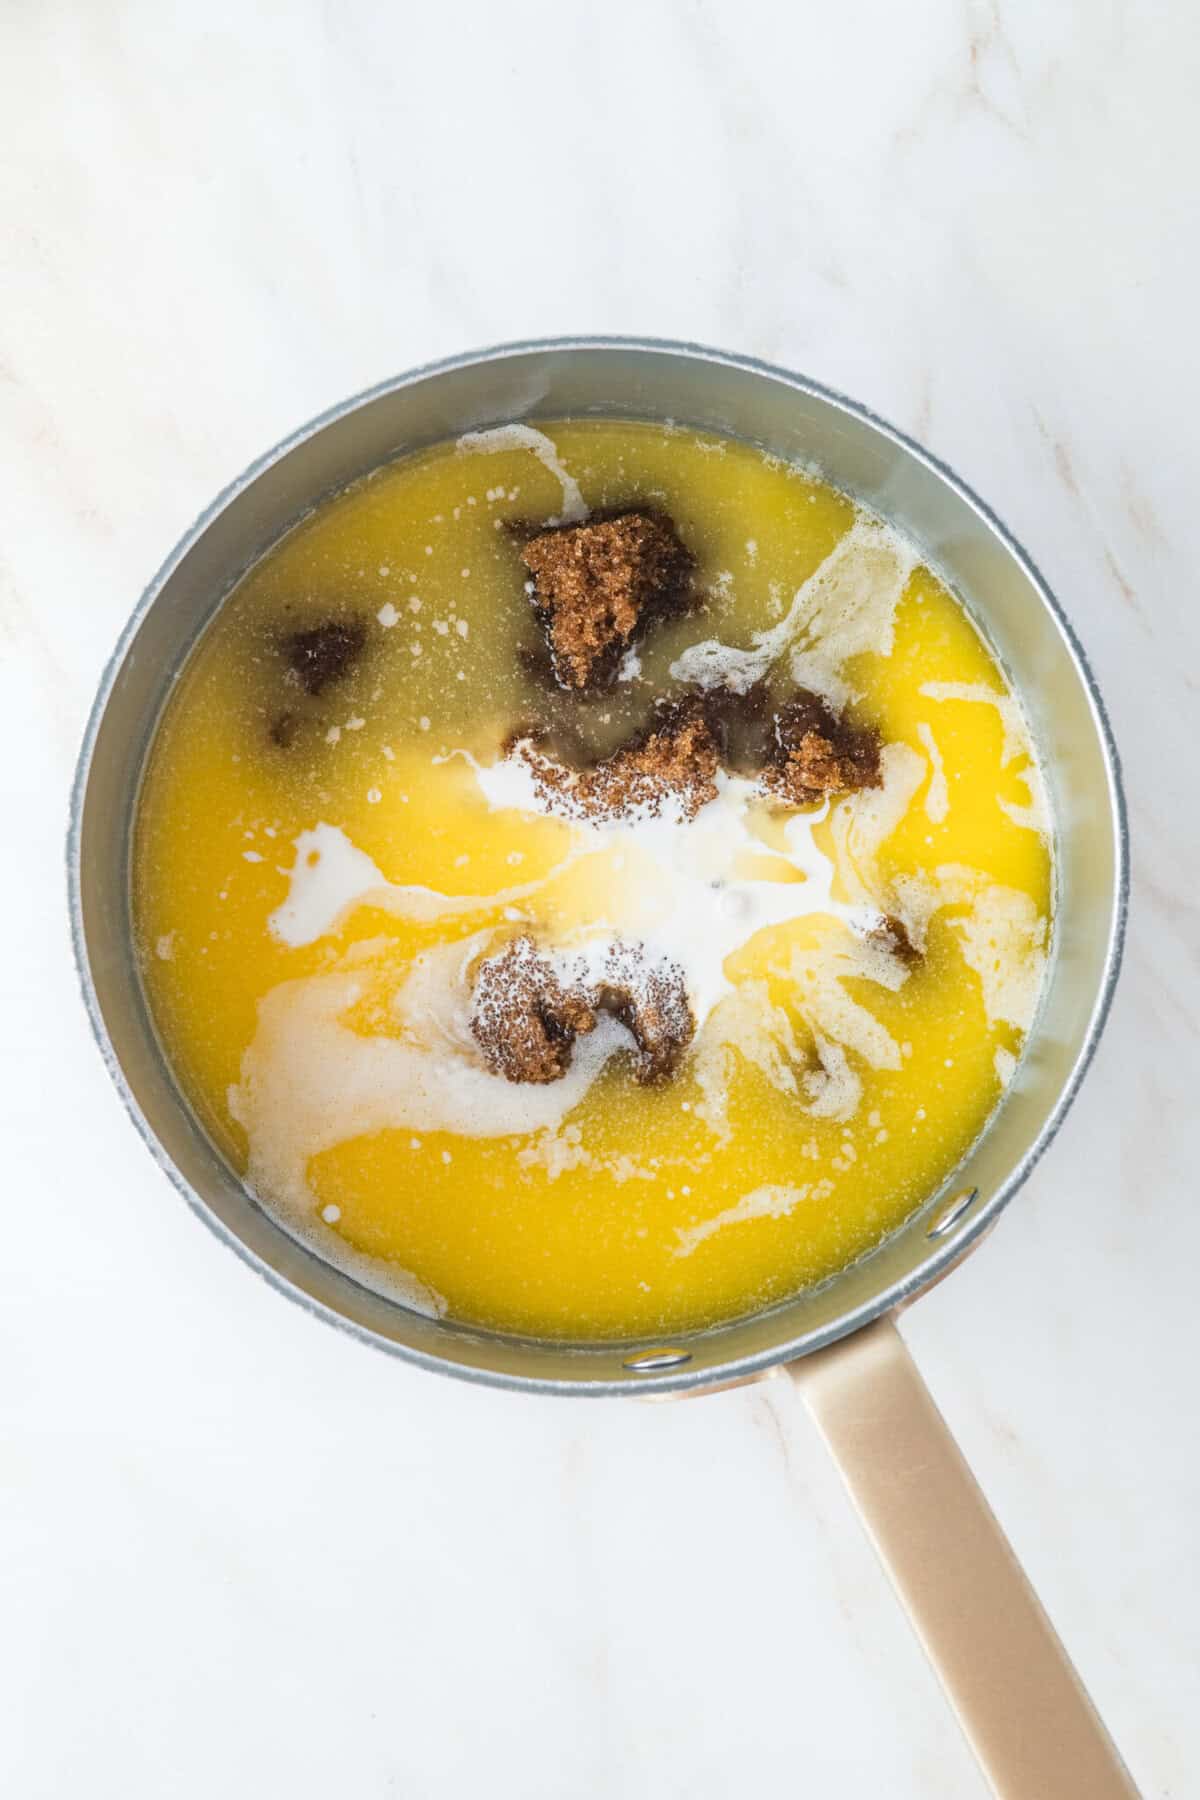
- Melt the butter in a saucepan over medium heat and add in the brown sugar and cream.
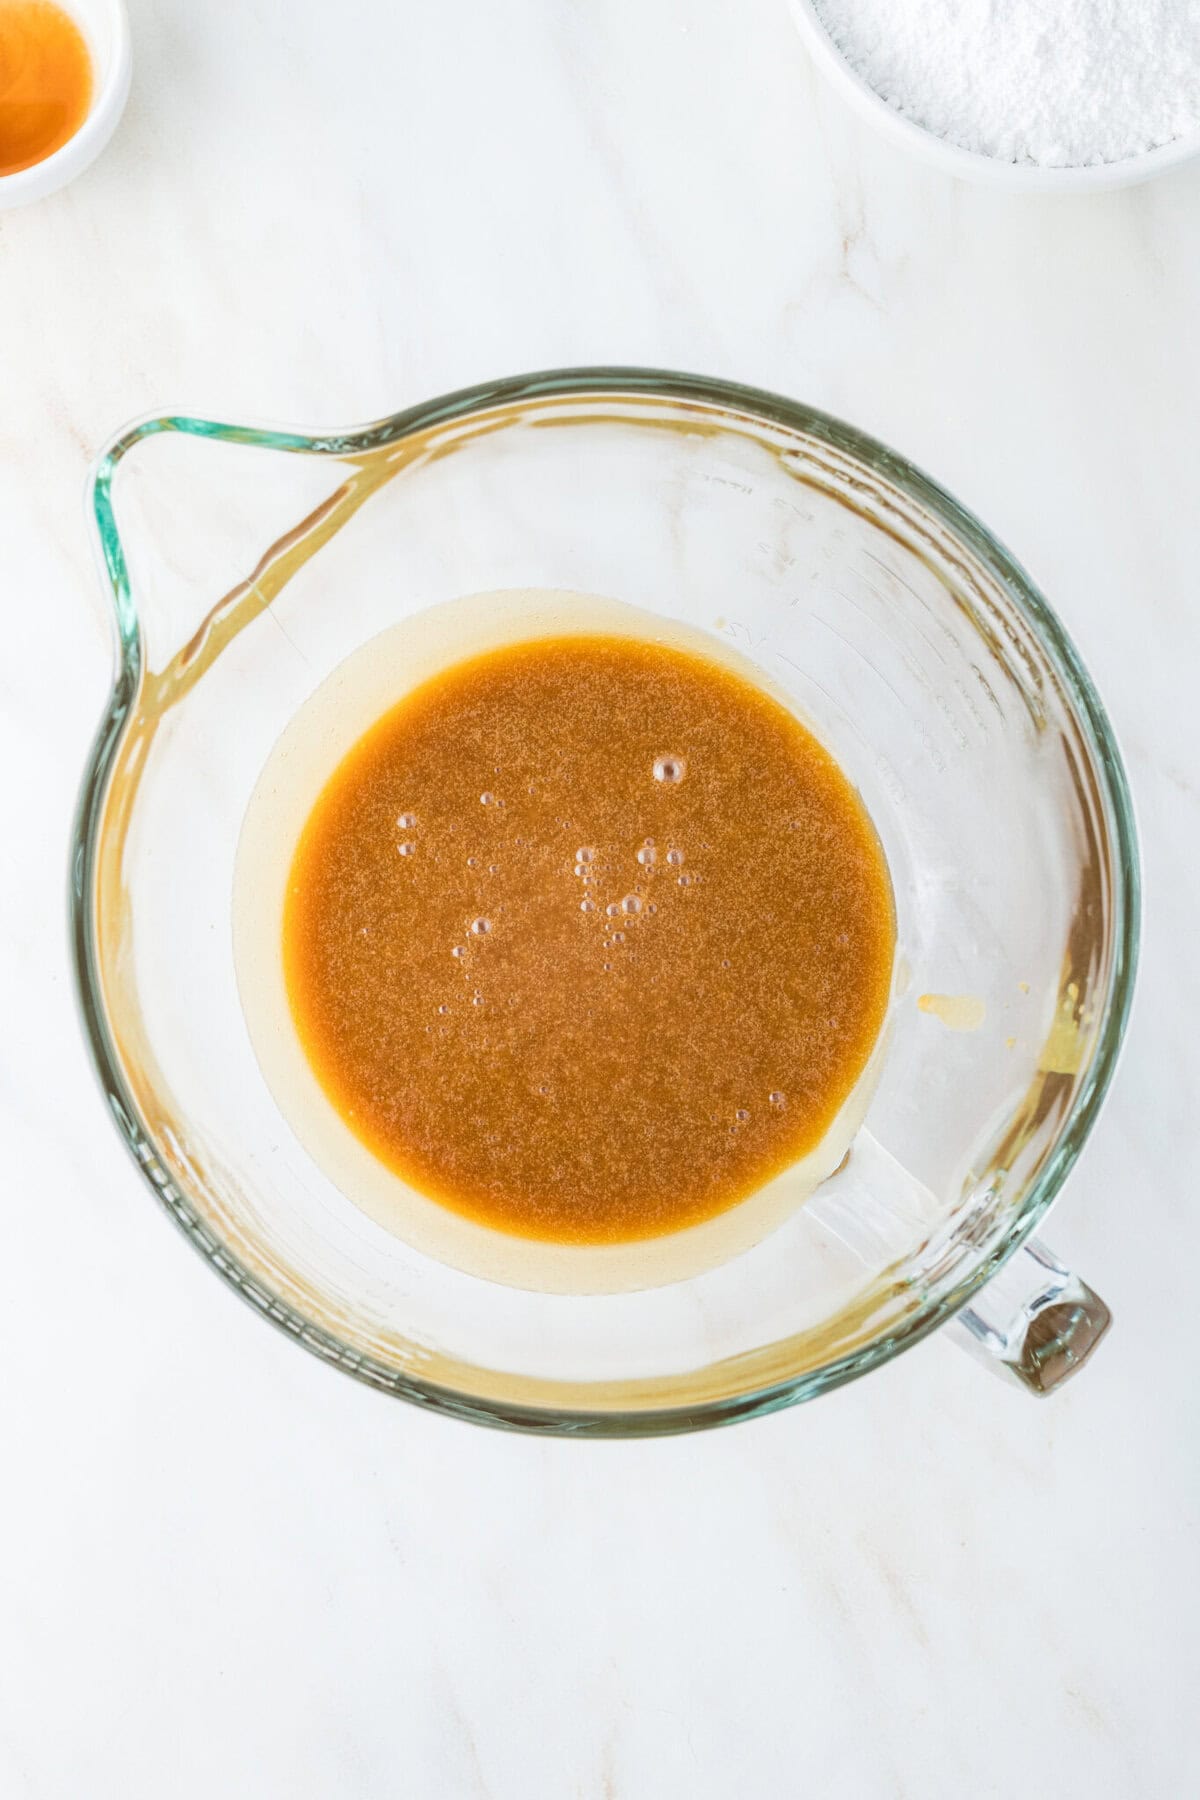
- Heat until it boils, then remove it from the heat and transfer to a mixing bowl.
- Slowly add in the confectioners’ sugar while mixing.
- Add the vanilla.
- Continue mixing until the frosting reaches the desired consistency.
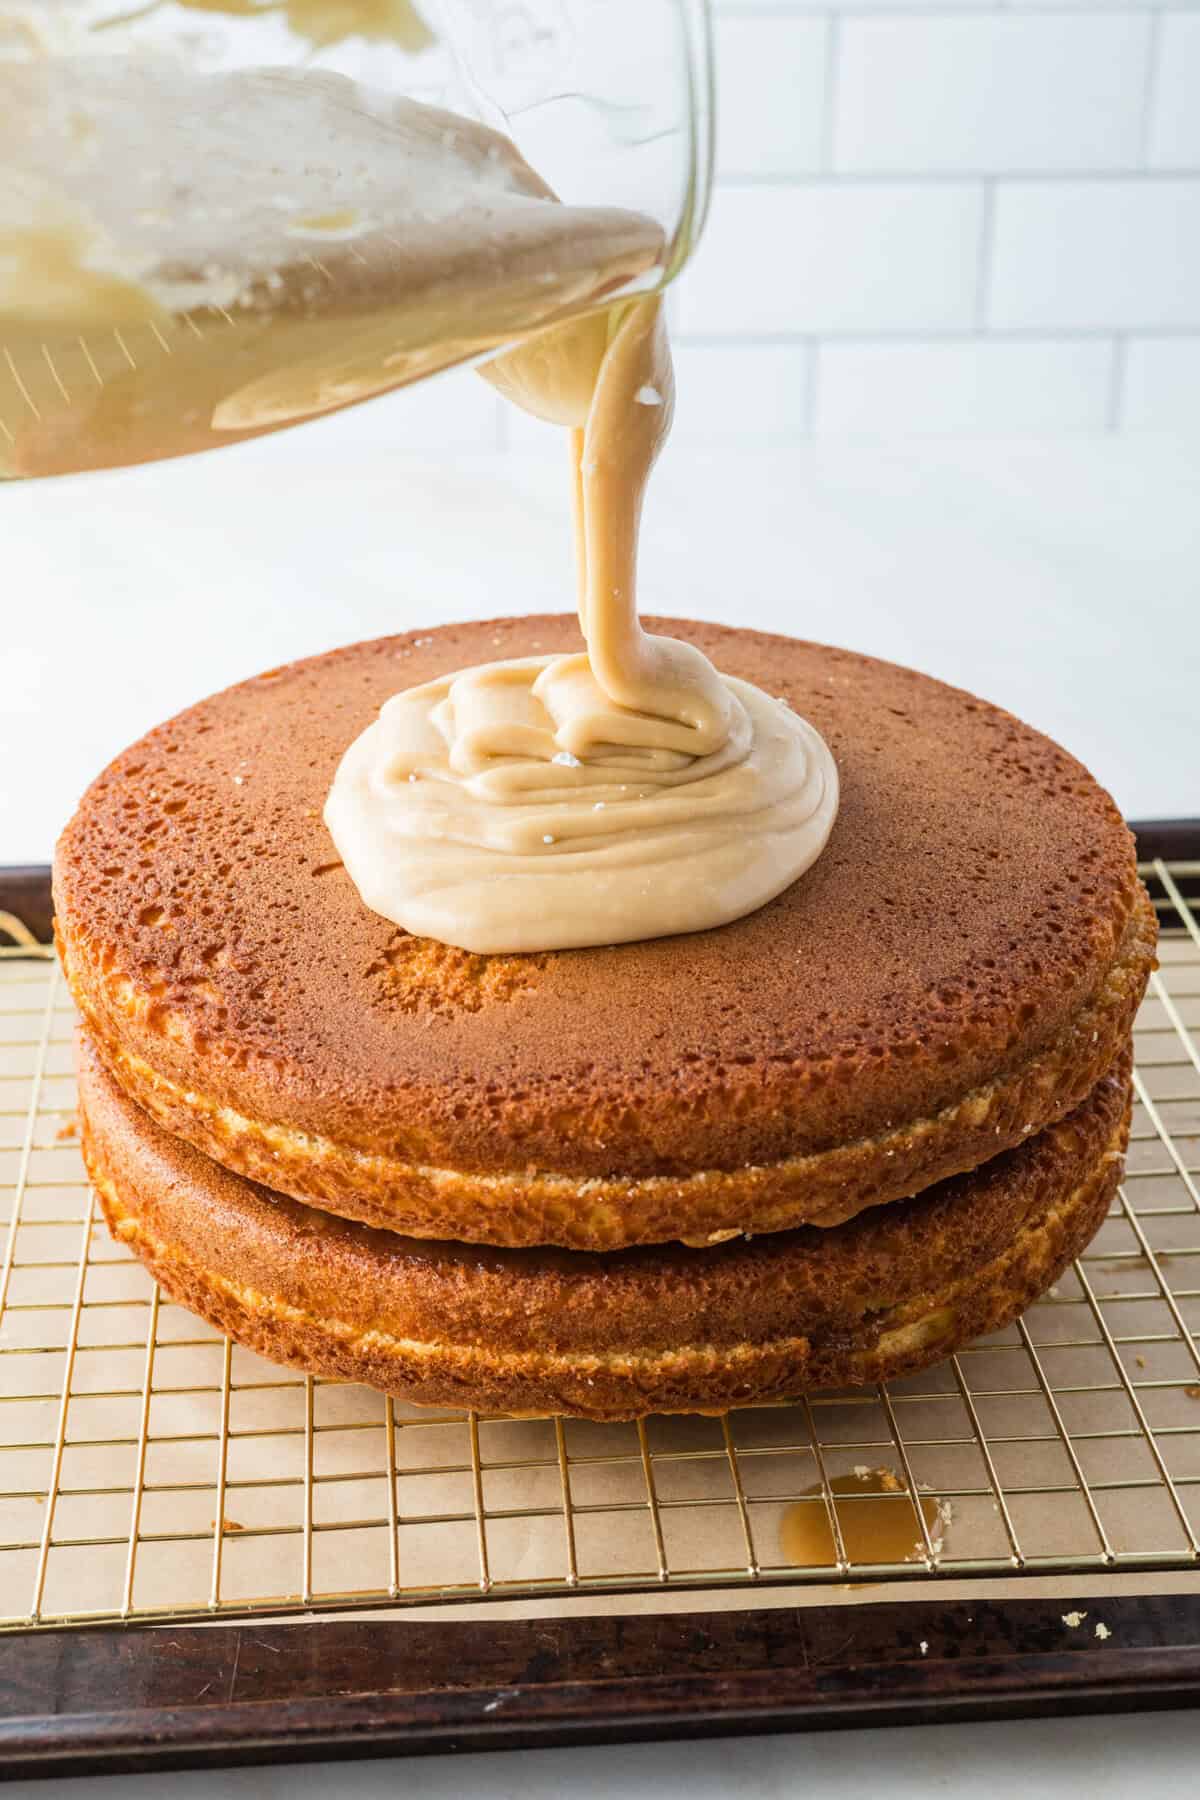
- If you’re planning to use the frosting warm (pouring it like i did), you’ll want to work quickly. If you want to use it to decorate, it will need to be completely cooled for a piping bag.
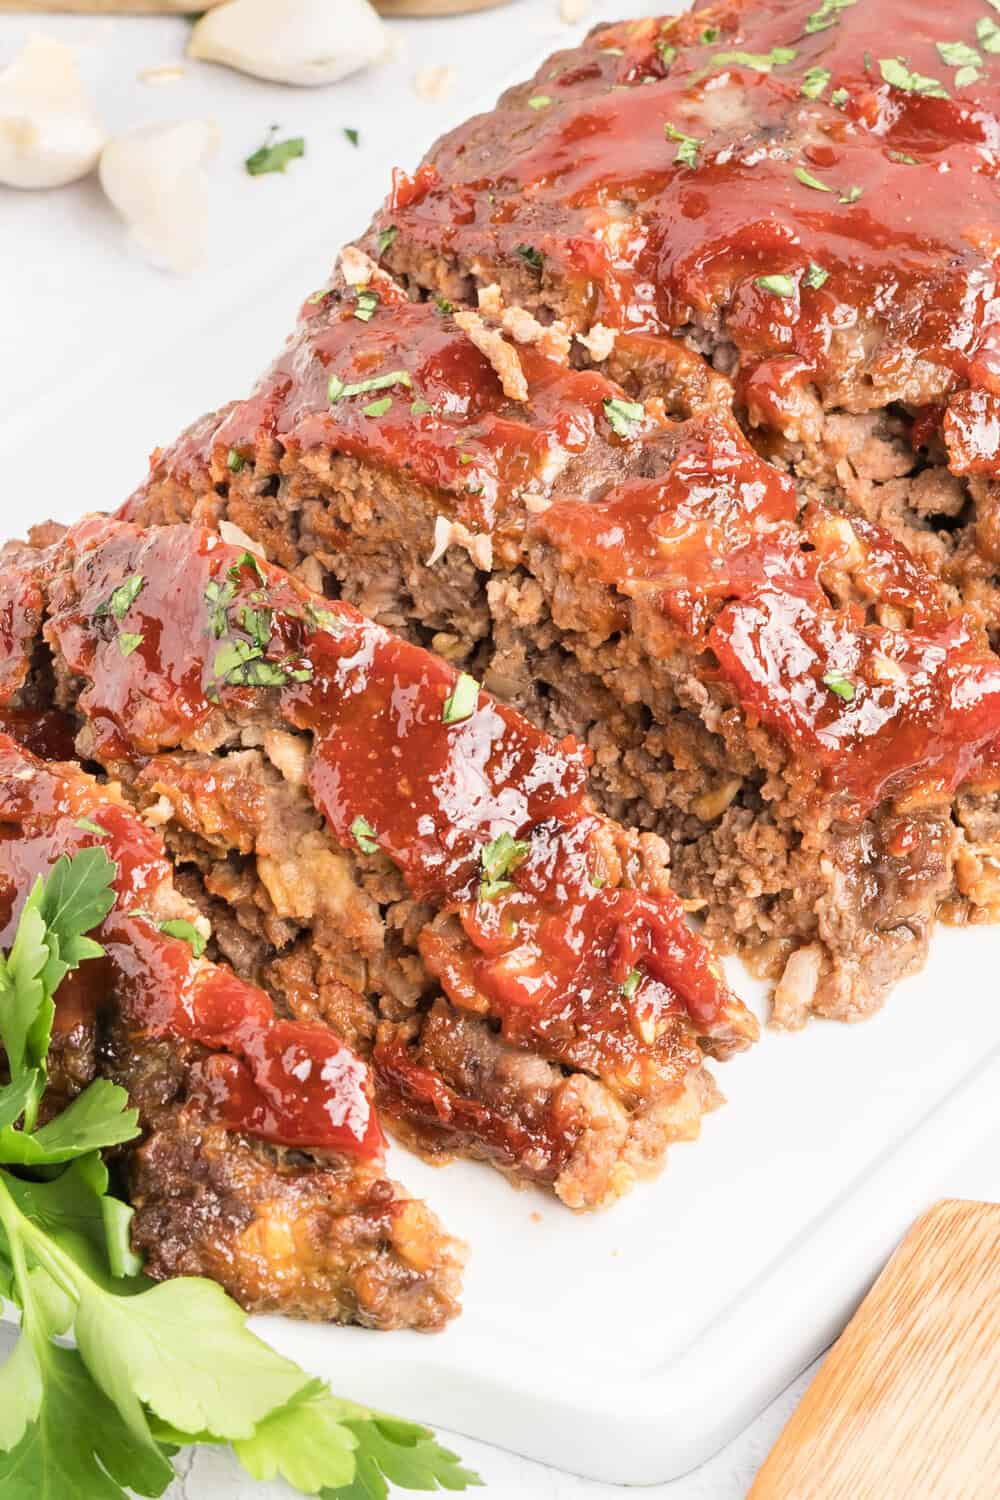
Assembling the Cake
For a cleaner cake, assemble the cake over a pan or larger plate to catch the frosting as it runs off. You may need to add small amounts of cream to get the right texture for pouring. I usually add about 1/4 cup of extra cream while it’s still warm so it’s perfectly pourable.
- Place the first layer of torted cake on a serving plate, cut side up. Tip: to easily transfer the finished cake from a wire rack to a cake plate, place a cardboard cake round underneath the layers while they’re on the rack.
- Spread one-fourth of the caramel filling evenly over the top of the cake, allowing it to soak into the cake. If you put uncut side up, you may want to poke holes in it with a toothpick or fork so it soaks in better. Note: if you put the filling on the cut side and try to spread it, be careful to not tear the cake.
- Repeat for all layers.
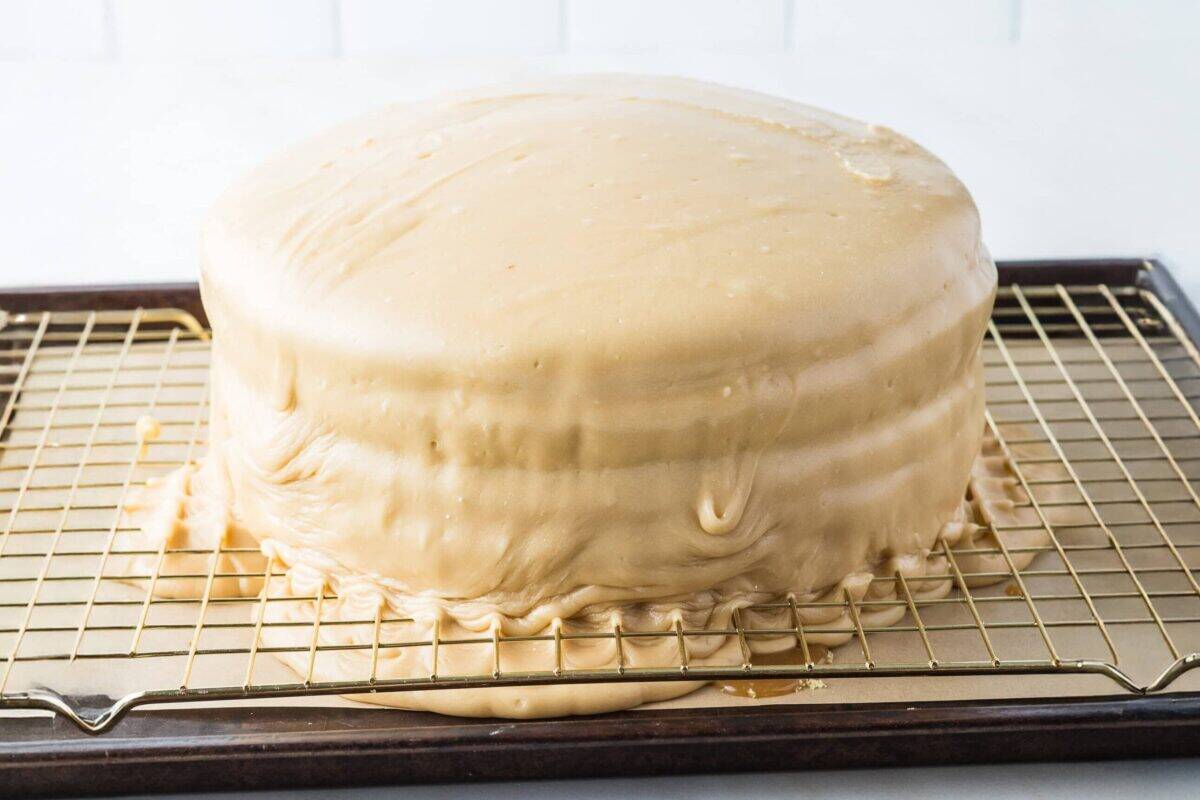
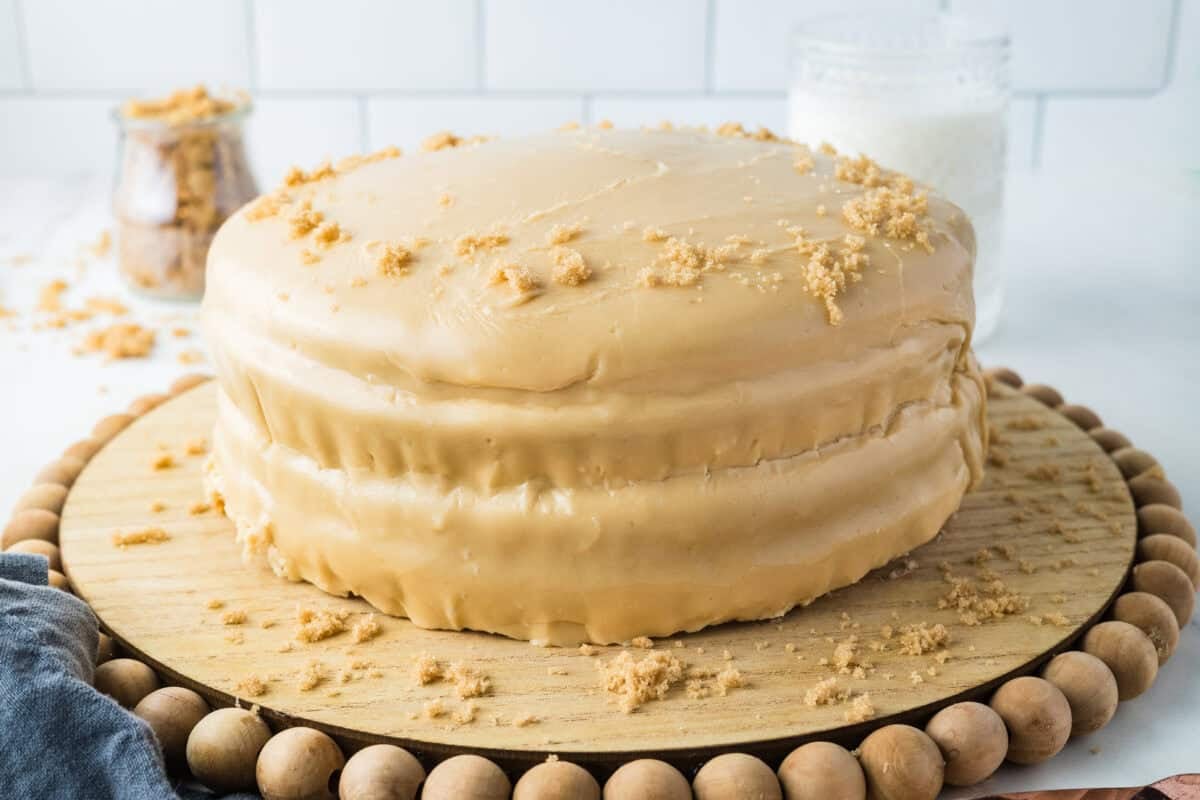
- Once all four layers are stacked, make and pour the warm frosting over the outside of the cake. Start on the top in the center of the cake and it will spill over the sides of the cake.
- To decorate, let the frosting cool much longer and whip it until it reaches a consistency that can be piped. See tips below.
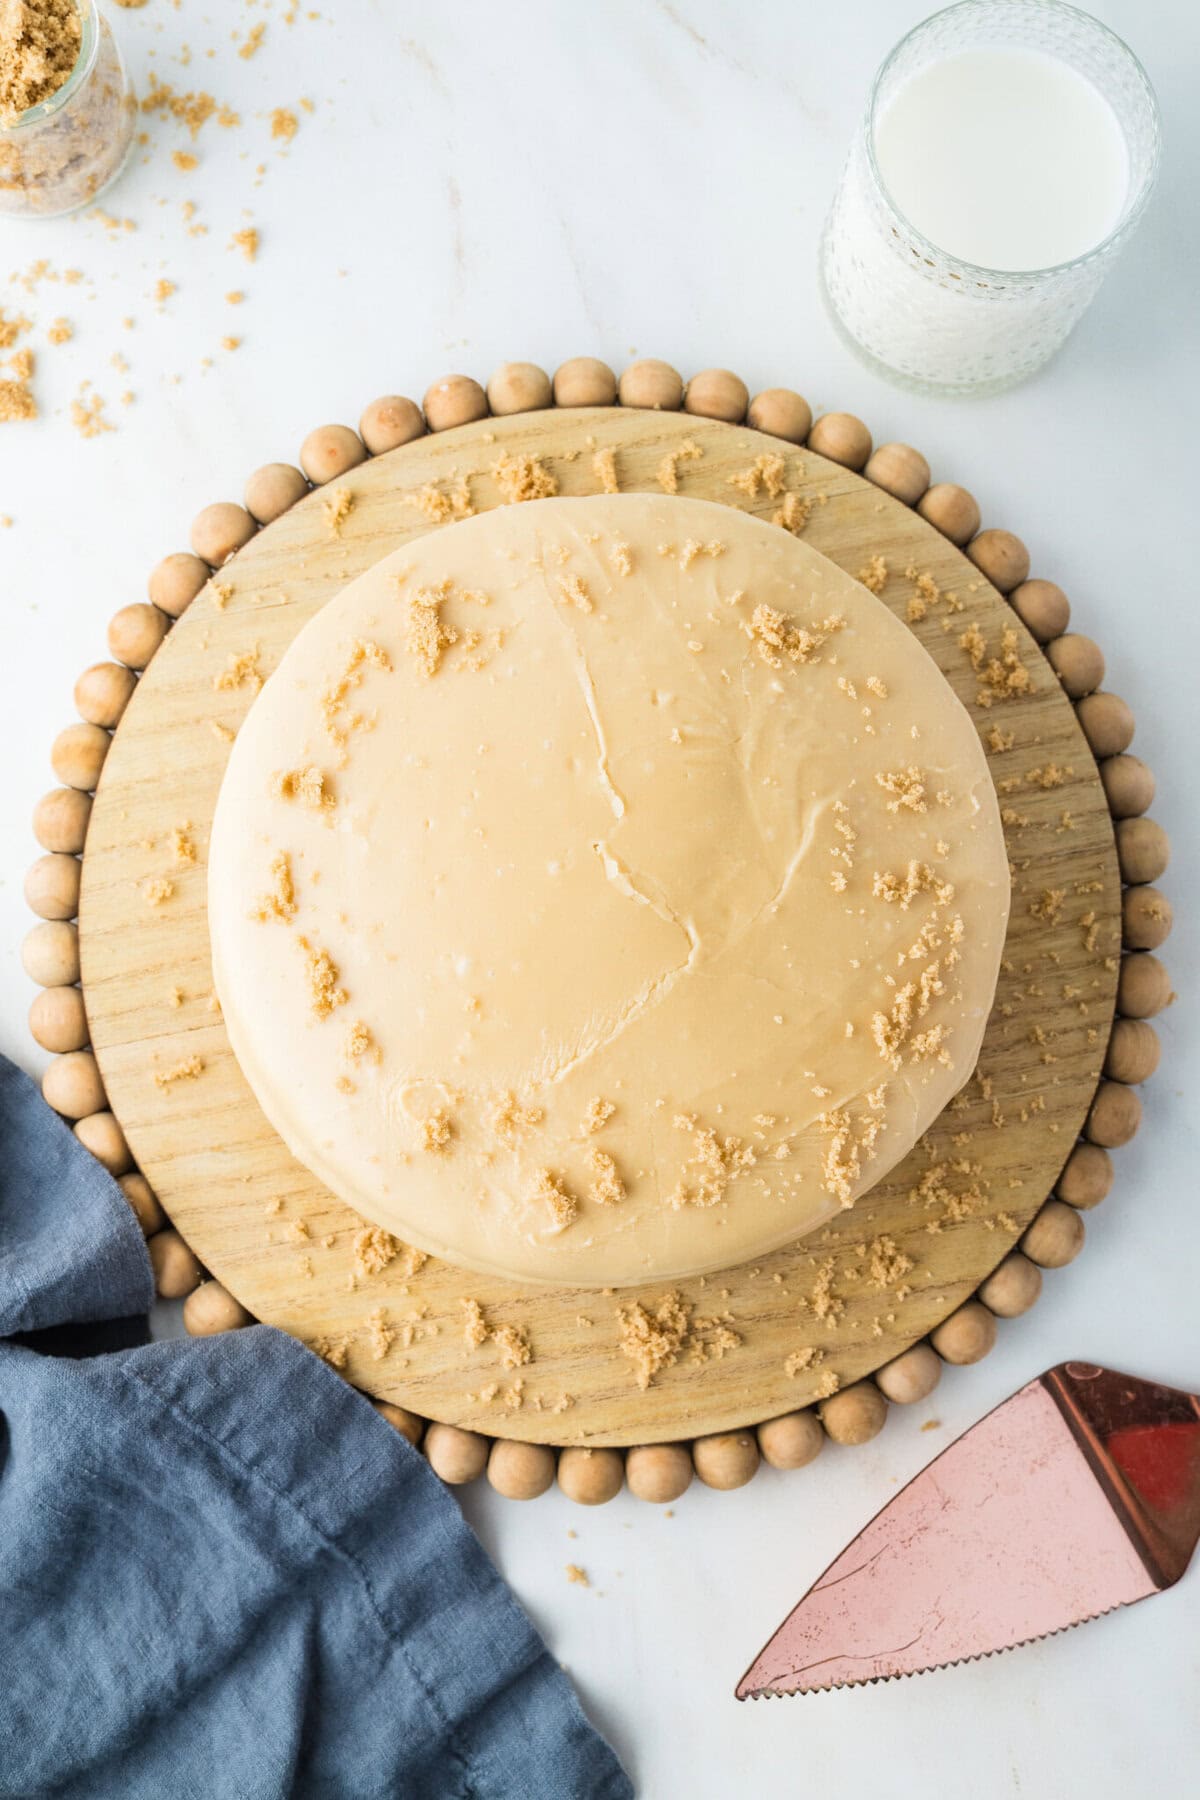
- Allow the frosting to completely set before moving it from the wire rack to a cake stand or plate.
- Enjoy!!
Pro Tips
Before you dive in to this recipe, I want to remind you that this frosting is tricky.
The caramel frosting will be thin and pourable when it’s warm. That’s actually how traditional caramel cakes are often done, just poured right over the layers and allowed to drip down the sides. But if you wait too long, it’ll thicken and become unpourable.
- Have your cake torted and prepped on a wire rack before you make the frosting.
- To easily move the finished cake from a wire rack to a cake plate, use a cardboard cake round underneath the layers on the wire rack.
- For the best pourable frosting, I add an extra 1/4 cup of heavy cream into the frosting and mix it on high speed just until it’s incorporated. Then pour the warm frosting over the cake immediately. Be sure to have something under it to catch the dripping frosting pool.
- For more of a decorating consistency, you will need to mix this frosting for a long time, maybe as long as 30 minutes, until it is completely cooled and thickened. I mixed mine for probably 20 minutes or more in my Kitchenaid before it was cool and thick enough to use in a piping bag and to smooth like buttercream.
- If you’re not in a hurry, you can also cover it in plastic wrap with the wrap touching the surface of the frosting to prevent a skin and let it cool on its own for an hour or so, then whip it and use it to decorate.
Storage
Store at room temperature in an airtight container for up to 3 days. Refrigerate for up to 5 days.
Make-Ahead Tips
To make the process go faster, you can prep ahead by baking the cake layers a day in advance. Once they’re completely cooled, wrap them tightly and store at room temperature overnight.
Variations
This decadent cake is perfect just the way it is, but you can certainly change things up if you need or want to! Here are some ideas…
- Add chopped pecans between the layers.
- Top with a sprinkling of brown sugar for texture.
- Add a pinch of sea salt to the frosting or on top of the cake for a salted caramel version.
- Garnish with piped decorations
More Delicious Recipes
- Cream Cheese Buttercream Frosting
- White Chocolate Raspberry Bundt Cake Recipe
- The Best Vanilla Cake Recipe!
- Fresh Apple Cake with Caramel and Pecans
- Chewy Caramel Oatmeal Cookies (with Cookie Mix)
Happy Baking!
Caramel Cake Recipe
Description
This Southern Caramel Cake recipe is rich, buttery, and surprisingly easy to make, thanks to a semi-homemade shortcut that still delivers incredible flavor. Made with a simple yellow cake mix base and layered with a luscious homemade caramel filling and frosting, this old-fashioned caramel cake has that classic, melt-in-your-mouth texture everyone loves.
Ingredients
CAKE INGREDIENTS
- 1 Yellow Cake Mix
- 1/3 cup all-purpose flour
- 3 large eggs
- 1/2 cup butter, melted
- 1 cup buttermilk (see buttermilk substitution here)
- 2 teaspoons pure vanilla extract
CARAMEL GLAZE INGREDIENTS
- 1/2 cup butter, melted
- 1 cup packed light brown sugar
- 1/4 cup milk
- 1 teaspoon pure vanilla extract
CARAMEL FROSTING INGREDIENTS
- 1 cup butter
- 1 cup packed dark brown sugar
- 1/3 cup heavy cream, or more if needed
- 16 oz. confectioners’ sugar (~ 4 cups)
- 1 teaspoon pure vanilla extract
Instructions
Cake Instructions
- Preheat the oven to 350° F.
- Spray two 8-inch cake pans with cake release spray or homemade goop.
- Place the cake mix, milk, melted butter, eggs, and vanilla extract in a large mixing bowl.
- Mix on medium speed for at least 3 full minutes, until the batter is well blended and smooth.
- Divide the batter evenly between the two pans, smoothing it out with the rubber spatula. Place the pans in the oven side by side.
- Bake the cakes for 25-30 minutes… until golden brown, and they spring back when pressed. Remove the pans from the oven and place them on wire racks to cool for 10 minutes.
- Remove from the pans and allow them to cool completely, 30 minutes more.
Caramel Filling Instructions:
- While the cake is baking, add the butter, brown sugar, and milk in a small saucepan.
- Heat until the butter melts and the sugar dissolves, about 3-5 minutes over medium heat.
- Remove from heat and stir in the vanilla extract. Use immediately.
Frosting Instructions
- Melt the butter in a saucepan over medium heat and add in the brown sugar and cream.
- Heat until it boils, then remove it from the heat and transfer to a mixing bowl.
- Slowly add in the confectioners sugar while mixing.
- Add the vanilla.
- Continue mixing until the frosting reaches the desired consistency (**and is completely cooled if you plan to use it in a piping bag).
- Place the cake over a pan or larger plate to catch the frosting as it runs off.
- You may need to add small amounts of cream to get the right texture for pouring.
- Pour over the cake. **SEE NOTE BELOW
Assemble the Cake:
- Place one layer of torted cake on your cake plate, uncut side up.
- Spread one-fourth of the caramel filling evenly over it and allow it to soak up into the cake (you may want to poke holes in it with a toothpick or fork. Note: if you put the filling on the cut side and try to spread, it may tear up the cake.
- Repeat for all layers.
- Once all 4 layers are stacked, make and pour the warm frosting over the outside of the cake.
- To decorate, you will need to let the frosting cool for much longer and possibly whip it to a consistency that can be piped. **SEE NOTE BELOW


Notes
-
- The caramel frosting will be thin and pourable when it’s warm. That’s actually how traditional caramel cakes are often done, just poured right over the layers and allowed to drip down the sides. But if you wait too long, it’ll thicken and become unpourable.
- Have your cake torted and prepped on a wire rack before you make the frosting.
- To easily move the finished cake from a wire rack to a cake plate, use a cardboard cake round underneath the layers on the wire rack.
- For the best pourable frosting, I add an extra 1/4 cup of heavy cream into the frosting and mix it on high speed just until it’s incorporated. Then pour the warm frosting over the cake immediately. Be sure to have something under it to catch the dripping frosting pool.
- For more of a decorating consistency, you will need to mix this frosting for a long time, maybe as long as 30 minutes, until it is completely cooled and thickened. I mixed mine for probably 20 minutes or more in my Kitchenaid before it was cool and thick enough to use in a piping bag and to smooth like buttercream.
- If you’re not in a hurry, you can also cover it in plastic wrap with the wrap touching the surface of the frosting to prevent a skin and let it cool on its own for an hour or so, then whip it and use it to decorate.
Nutrition
- Serving Size:
- Calories: 370
- Sugar: 43.4 g
- Sodium: 45.7 mg
- Fat: 20.4 g
- Carbohydrates: 46.4 g
- Fiber: 0.1 g
- Protein: 2 g
- Cholesterol: 80.4 mg


This cake looks DIVINE! You would never know what kind of sweet goodness is inside that cake until you take that first bite. Yum!
It is so, so good!
HI Rose,
I just love Caramel and I know that this cake will just be fabulous! Hope you are having a great week end and thank you so much for sharing with Full Plate Thursday.
Happy St. Patrick’s Day!
Miz Helen
Thanks so much!
Um, wow. *Swoon* LOVE it!
LOL…
Do u use the whip paddle, do you use heavy cream or buttermilk?
I use a scraper paddle and buttermilk.
Hi Rose! I have a question… I’ve made your caramel frosting three different times now, and I never can seem to achieve the gorgeous fluffy texture that you do. It always turns out sticky and very hard to spread (but tastes delicious!). Do you have any suggestions? I’m sure I must be doing something wrong…
Thanks in advance! Kate
I have a couple of questions regarding this recipe. First, would you be able to stack this cake at all for a tiered cake or would it be too unstable? Second, can you make this recipe into cupcakes? And if so how would you add the filling to them? Thank you in advance!
I do not believe it would be sturdy enough for stacking. I have made a version of these into cupcakes here: https://rosebakes.com/caramel-filled-cupcakes-with-whipped-caramel-frosting-recipe/.
Oh my Goodness, this sounds amazing! I love caramel. I can virtually taste this!
Thanks so much for sharing with Sweet Tea & Friend’s this month dear friend.