How to Make Easy Dinosaur Cookies
These Easy Dinosaur Cookies are perfect for a dinosaur lover! I’m sharing my perfect sugar cookie recipe, royal icing recipe, and a step-by-step tutorial for these super cute dino cookies! Perfect for dinosaur birthday parties (we love Jurassic Park) or even a dino party at school!
Originally posted August 2014, updated December 2023

Easy Dinosaur Cookies
I find it quite funny that I’ve written a tutorial that involves decorating cookies. I tell people all the time that cookies aren’t “my thing.” And yet… I continue to find myself in the middle of decorating them!
Having said that, if I’m going to write a cookie tutorial, you better believe it’s going to be a simple one… Ha!
There’s nothing complicated about these dinosaur cut-out cookies. It’s just a matter of jumping in and practicing your cookie skills until you perfect them. First up, let’s talk about the tools you’ll need to make these cookies.
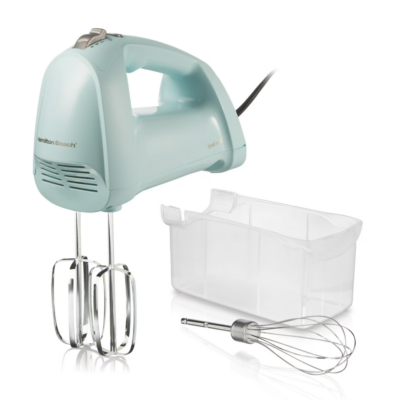
Equipment needed:
- Dinosaur Cookie Cutters (or just one cookie cutter if you want to keep it simple, like me). I used a t-rex cutter from this Wilton set)
- Gel food coloring … I prefer Americolor Gel Colors, and I used blue and green
- Baking sheet – these are my all-time favorite cookie sheets
- Wire rack for cooling (not 100% necessary but I prefer to cool them this way)
- Icing Bags
- #1 and #3 round icing tips
- Boo-Boo Stick (or toothpicks)
- Food Marker
Note: you could use different color palettes depending on the color scheme for the party or dinosaurs that you’re making. I kept all of mine in this one color scheme but mixing it up with different colors would be super cute too for these sweet treats!
Cut-Out Sugar Cookie Ingredients
These from-scratch cookies are made with very simple ingredients that almost any baker will already have on hand. But this is no standard sugar cookie; they hold their shape perfectly when baked and are delicious!
- Butter (softened to room temperature)
- Sugar
- Salt
- Egg
- Egg yolk
- Vanilla extract
- Almond extract
- All purpose flour, sifted (aka plain flour)
How to Make Cut-Out Cookies
For this recipe, you want to prep your cookie dough a day (or more) ahead of time to allow for the chill time and the time it takes the royal icing to dry. Now – here are the instructions to make the cookie dough:
- In a large mixing bowl, cream together the butter, sugar, and salt. Mix until light and fluffy with mixer at medium speed.
- Next add the egg yolk, beat it some more, then add the whole egg. Mix in the vanilla and almond.
- Add plain flour and beat on low until well combined. Do not overbeat. The dough will be sticky! PS – I love it that I don’t need a separate bowl for this recipe!
- Divide the cookie dough in half and wrap it in plastic wrap. Chill dough for at least an hour, but I usually do mine the day before.
- When you’re ready to bake, allow the dough to come to room temp for at least 10 minutes, then knead it until it gets back to a smooth texture.
- Preheat oven to 375°.F Sprinkle your work surface and rolling pin with flour. For best results, roll the sugar cookie dough to ¼ inch thickness.
- Continue sprinkling flour when needed to prevent dough from sticking. Use your cutters to cut the cookies into the desired shapes. Then place them on an ungreased cookie sheet lined with parchment paper.
- Now don’t skip this step! Stick the cookies (on the sheets) back in the freezer for exactly 10 minutes to allow them to re-chill. This will keep your cookies perfectly shaped! When they’re chilled, bake cookies for 8-10 minutes (depending on size) for the perfect cookie!
- The great thing about this recipe is the edges of the cookies are rarely brown – they hold their shape, taste yummy, stay pretty, and are not crunchy! After trying multiple recipes, I’ve found the most success with this simple recipe!
Ingredients for the Royal Icing
- Meringue Powder*
- Water
- Powdered sugar (sifted, if needed)
- Light corn syrup
- Clear extract (I used vanilla… you could use almond, lemon, etc.) This is so you start with a really white icing so all of your colors stay true. If you use pure vanilla extract, you will have a slight tint (which is honestly not all that noticeable, but I still like to use clear extracts when I can)
How to Make Royal Icing
- In a large bowl, add the meringue powder and 3 ½ tablespoons of water.
- Beat with an electric hand mixer until it’s foamy.
- Add in the powdered sugar, mix slowly until combined. I should note here that I used Great Value powdered sugar from Walmart and I never sift it. However, I’ve bought other brands that did need sifting. If you’re unsure – sift!!
- Add the corn syrup. Then add extract, if desired.
- Increase speed to high and beat for around 5 minutes, until you get stiff glossy peaks.
- Do not overbeat!
- If not using immediately, cover tightly with plastic wrap – make sure it touches the icing or the icing will harden!
- I prefer Americolor Meringue Powder or CK Products Meringue Powder.
How to Decorate Dinosaur Cookies
For this tutorial, I assume that you already have the dino cookies baked and cooled (per the recipes above and below). I listed the tyrannosaurus rex cutter that I used above, but you could use any dinosaur shapes – making small adjustments for different shapes.
This is a cute set of dinosaur-shaped cutters that I love. So I’m gonna share the photos of my decorating process and I think you’ll find these dinos to be really easy!
In this recipe, I’m going to refer to stiff icing and flood icing. Also, I used a #3 round tip for all borders and flooding on these cookies. You could go a little smaller or bigger, but #3 is perfect for me!
So, are we ready?
- To start, place cookies on a flat surface. Then fill your piping bag with your first color of stiff icing, and outline the t-rex’s belly. I made a simple oval shape with stiff icing.
- Fill in the belly with flood icing – be careful not to overfill it! You don’t want the icing to spill over the edges – sometimes it takes a few minutes for this to happen!


Note: The best way to keep the cookies consistent is to work in stages, doing 6-8 cookies at a time. So I piped the belly outlines on my first 6-8 cookies, then I went back to the first one and started flooding them. The outline icing only needs a few minutes to set up a little bit and it’ll be ready to hold the flood icing.
- Outline the rest of the body of the dinosaur with green stiff icing. I like to start at a sharp point if possible – or a corner where there would be a natural ending place.
- Again, working in groups of 6-8 dino cookies, after I had them all outlined, I went back to the first one and began to flood them.
- Don’t worry about getting in all the small spaces or if bubbles appear – we’ll fix that in a minute. Just be sure to flood with enough icing to spread it out and fill in the edges.
- While the flood icing is still wet, use a toothpick or my favorite cookie tool, a Boo-Boo Stick, to spread out the frosting and pop any bubbles.


Note – here’s a full picture of the Boo-Boo Stick (I can’t remember where I bought these but here’s something similar on Amazon)… or you could use a cookie scribe like this.

The flat end is perfect for spreading icing into small spaces – the pointed end is perfect for popping any air bubbles!
- To add the blue spots – there are two options – smooth or raised. I wanted my spots to be smooth, so I immediately went back and started adding them while the green flood icing was still wet. The wet on wet allows them to settle and be smooth with the green.
- In the first photo you can see they are still settling but they will end up flat and smooth with the green. But if you wanted them raised, you could wait and pipe them after the green icing had dried for 15-20 minutes. You can see the difference in the third photo after they’ve both dried.


That’s pretty cool, huh? I think either way it looks very neat!
- At this point, you want to let the cookies dry for at least a couple of hours (maybe even with a fan blowing on them). I let them dry overnight.
- If you’re using royal icing for the eyes, nose, and mouth, you’ll want to wait for the other layers to completely dry so you don’t have to worry about the black bleeding into the green. If you’re going to do that, I recommend using a tiny #1 piping tip.
- I also went back and added claws on the feet using the blue stiff icing.
- Alternatively, you could also draw on the eyes, mouth and nose with a black edible marker, which is what I did! The food marker is easier than piping (for me!), however, if you don’t have the marker, the icing works! Below are the finished dinosaur cookies:
If you use icing, you’ll want to let that dry another couple of hours (or overnight if you can) before boxing or packaging them up!
And that’s it – only a few steps and you can have some super cute, yet simple T-Rex Dinosaur Cookies for your dinosaur-themed party!
If you’re just learning to do cookies, start with simple designs (like these colorful dino cookies) and get comfortable with cookie techniques and before you know it, you’ll be moving on to fancier and more details cookies!
Serving Suggestions
Again, I made all dinosaurs but it would be really cute to mix in some dinosaur footprint cookies or dinosaur egg cookies with these t-rex cookies! These could be party favors, the star dessert, or a side item next to a dinosaur cake or dinosaur cupcakes.
Storage
At room temperature: These cookies are best when kept at room temperature in an airtight container for up to one week. Technically they will keep just fine for 2-3 weeks but I find them to be more crumbly and dry after the first week.
Freezing: To freeze decorated cookies, wrap them individually in sealed bags or plastic wrap, then stack and freeze them in an airtight container. They can stay frozen for up to a month. Thaw at room temperature while still wrapped for 1-3 hours, then unwrap and enjoy!
How to Make Easy Dinosaur Cookies
Description
These Easy Dinosaur Cookies are perfect for a dinosaur lover! I’m sharing my perfect sugar cookie recipe, royal icing recipe, and a step-by-step tutorial for these super cute dino cookies! Perfect for dinosaur birthday parties (we love Jurassic Park) or even a dino party at school!
Ingredients
For the cookies:
- 1 cup salted butter (softened)
- 1 cup sugar
- 1/2 tsp. salt
- 1 large whole egg
- 1 egg yolk
- 3/4 tsp. vanilla extract
- 1/2 tsp. almond extract
- 2 1/2 cups all-purpose flour, sifted
For the royal icing:
- 2 Tablespoons of Meringue Powder*
- 3 1/2 Tablespoons of water
- 1/2 pound of powdered sugar (sifted, if needed)
- 1/4 – 1/2 teaspoon light corn syrup
- A few drops of clear extract (I used vanilla… you could use almond, lemon, etc.)
Instructions
For the cookies:
- In a large mixing bowl, cream together the butter, sugar and salt until light and fluffy with mixer (I use my Kitchenaid) at medium speed.
- Next add the egg yolk, beat it some more, then add the whole egg. Mix in the vanilla and almond.
- Add flour and beat on low until well-combined. Do not overbeat. The dough will be sticky!
- Divide the dough in half and wrap in plastic wrap. Refrigerate for at least an hour, but I usually do mine the day before.
- When you’re ready to bake, allow the dough to come to room temp for at least 10 minutes, then knead it until it gets back to a smooth texture.
- Preheat over to 375°. Sprinkle your work surface and rolling pin with flour. For best results, roll the dough to ¼ inch thickness.
- Continue sprinkling flour when needed to prevent dough from sticking. Use your cutters to cut the cookies into the desired shapes then place on cookie sheets covered with parchment paper.
- Now don’t skip this step! Stick the cookies (on the sheets) back in the freezer for exactly 10 minutes to allow them to re-chill. This will keep your cookies perfectly shaped! When they’re chilled, bake for 8-10 minutes (depending on size) for the perfect cookie!
- I rarely get browned edges with these cookies – they hold their shape, taste yummy, and are not crunchy! After trying multiple recipes, this has to be my favorite!
For the royal icing:
- In a mixing bowl, add the meringue powder and 3 ½ tablespoons of water.
- Beat with a mixer until it’s foamy.
- Add in the powdered sugar, mix slowly until combined. I should note here that I used Great Value powdered sugar from Walmart and I never sift it. However, I’ve bought other brands that did need sifting. If you’re unsure – sift!!
- Add the corn syrup and any extract, if desired.
- Increase speed to high and beat for around 5 minutes, until you get stiff glossy peaks. Do not overbeat!
- If you’re not going to use it immediately, cover it tightly with plastic wrap – make sure it touches the icing or the icing will harden!

Notes
I really prefer Americolor Meringue Powder or CK Products Meringue Powder.
Nutrition
- Serving Size: 1 cookie
- Calories: 187
- Sugar: 17.1 g
- Sodium: 111.2 mg
- Fat: 7.9 g
- Carbohydrates: 27.3 g
- Fiber: 0.3 g
- Protein: 1.8 g
- Cholesterol: 34.3 mg


Perfect timing! I’m about to do my first-ever decorated cookies for a baby shower, and I am nervous about pulling it off!
You’ll do great Megan!
now I will have those cookies to go with that cake-a-saurus-rex cake that I want to attempt from Craftsy and they will be a lot more doable. I am not so good at plumbing parts. Cookies, I can handle, especially with your instructions. Thank you once again. Hope your son is mending.
Thanks so much Joanne! Best of luck with your cake and cookies!
I would love to see more cookie tutorials!
Thanks Cheryl!! I’ll remember that!
Would love more cookie tutorials! Just starting out with cookies and always searching for new recipes.
Hi Rose, did you use ur sugar cookie recipe to make these cookies?
Yes!
When you leave the cookies out to dry overnight, do you put them in any type of container or cookie tin? That is, do the cookies get too hard left out overnight?
I use your roll out sugar cookie recipe. Its my first time doing it and usr a different icing recipe. But Im not sure if they are good. I did had to add a lot of flour the next day when I was going to bake them.
Rose, I love your cookies and your explanation is wonderful as always.
how long do the cookies keep good for?
how do you keep them before and after they are decorated?
thank you!!!
Ana
If I bake them more than 2 days in advance, I freeze them. Once they’re decorated, they can also be frozen but usually I just keep them in a cookie sheet with a lid until time to box them up.
Hello, I would like to ask what green Americolor to use. There are several, mint, avocado, leaf green, forest green, electric green, etc. Thank you!
I used Electric green.
I would love to see more tutorials! Just started playing with royal icing so I love how simple and step by step this is! I’ve never used gel colors before I started doing royal icing so this is probably a really silly question, but the colors seem very “true”- ie if I get a,bottle of red, just one drop makes red, and I can’t get it to make pink without adding a toooon more white icing. So I guess my question is, do you mix colors or do you have to buy each color you want?
I buy lots of colors but I also mix them when needed.
My daughter is a culinary student in High School and I’m trying to help her start a little business and I thought cookies would be fun! Thank you so much for all of the great information!
Very good explanation, however the recipe for flood icing was not given. IS it the same with more water?
Yes.