How to Make a Candy Cane Wreath for Christmas
With Christmas just around the corner, now is the perfect time to grab some candy canes and make this easy Candy Cane Wreath to hang on your front door for Christmas!
Originally published November 2015, updated September 2024.

Candy Cane Wreath
This a pretty and inexpensive way to bring some cheer to your front door this holiday season. Bonus… it’s a great craft to make with kids!
You will only need a few simple supplies that you can find at your local dollar store or Walmart.

Candy Cane Christmas Wreath
Around 9 years ago, my son Caleb made this DIY Candy Cane Wreath for me. He’d seen the candy cane wreath tutorial in a magazine (I think) and asked if I could buy candy canes so he could make it.
Of course, I said yes because I always try to encourage my kids’ creativity!
Well, I posted the wreath here, and my assistant recently pointed out to me that that post seemed to get a lot of traffic due to the wreath being pinned.
So – on her recommendation, (thanks Susan – you ROCK!!) I asked Caleb if he remembered how to do it and he did! I asked him to make another wreath and shoot a tutorial for me and he was excited to do it!
So all of the pics from here forward are thanks to my very talented (then) 14-year-old son Caleb.
Materials Needed for
You can find all of these materials at the dollar store or your local Dollar Tree.

- Approximately 20-24 real candy canes
- OR plastic candy canes
- Hot glue gun and hot glue sticks
- 1/2″ ribbon – I like red!
- And scissors
If you’d like to keep this wreath year after year, I recommend making it with plastic candy canes instead of real ones.
We learned the hard way (I’m not sure what we were thinking) that after a year in storage, candy canes melt and get sticky and it wasn’t pretty anymore!
Besides, you can’t eat the candy canes after this project – the glue could easily melt through the plastic wrapping and be ON the candy.
Shopping for Candy Cane Wreath
 Buy Now →
  Buy Now →
How to Make a Candy Cane Wreath
I have written instructions and step-by-step photos below for the candy cane wreath tutorial.
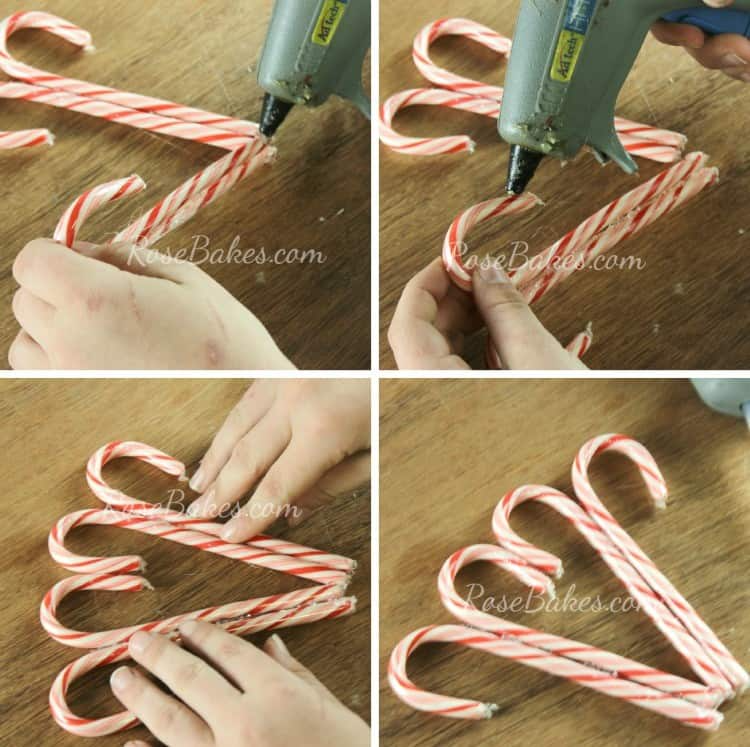
- Take two candy canes and lay them down together with the long sides back to back.
- Use a little bit of hot glue to attach them to each other.
- Repeat this process again (and again and again)… but Caleb did them one set at a time. Then he laid the pairs next to each other to make sure they’d line up.
- Attach the pairs together by gluing the “hooks” together at the very bottom.
- Let those dry before moving on (it only takes a minute!).
- Cut off small pieces of ribbon (5-6″ long) and begin tying them around the pairs of candy canes. You can tie small bows or knots – whichever you like best. As I’m editing these pictures, it also looks like Caleb started out doing bows, then decided to just do small knots. Really it’s up to you and how you want your wreath to look!
- Tie on a long circle of ribbon at whichever side you want to be the top of the candy cane wreath to hang it with and you’re done!


Note: As you can see on the left side (there’s a gap) – these candy canes weren’t quite as uniform as the previous ones we used.
The candy cane wreath form wasn’t a fully closed circle this time. That’s okay though – he made it work anyway! 🙂

More Candy Cane Wreath Ideas
- You can use any color of candy canes that you like… blue or rainbow or yellow or even all-white candy canes.
- Switch up the ribbons for different colors or maybe go with jute twine for a rustic look. Or if you have pipe cleaners on hand, you could use those to wrap the candy canes.
- As mentioned above, you could use plastic candy canes for a wreath that will last for years.
- Skip the ribbons/bows around the pairs of candy canes and you’ll just need one piece of ribbon or string to hang the wreath. You could even add a bow if you have wider ribbon.
- Fancy it up by gluing an ornament, some pine cones, or a snowflake in the middle for a centerpiece.
Pro Tips
- Extra or leftover candy canes make the best tree decorations! We always have a few hanging on our trees.
- You’d think all candy canes would be made the same, but he ran across a few irregulars that threw off his overall pattern. If this happens, try to use the ones with the most regular shape.
And this is the wreath he made for the tutorial:

You can see slight differences in this wreath versus the original one on the door below, but both “work.”
I think I like the trimmed version better than the loose knots, but either way – it works, it’s a lot of fun, and it’s such an easy project for a pretty, “sweet” wreath!

We have a red front door it’s really pretty and festive hanging for this Christmas season and a cheap way to add to your holiday decor. This Candy Cane Wreath DIY would also make a lovely, inexpensive homemade gift for someone special.
Do you like to do craft projects at Christmas? Check out some of my other crafts for holiday decorations:


Your son did a great job with the wreath. I work with 8-14 year olds in 4H cake decorating and I am always amazed at the way they can accomplish what they set out to do.
Thank you – yes, kids really do well when we let them be creative!
I used popsicle sticks to secure the candy canes together. Helps cover gaps and its a lot easier to make sure they are straight and even
Love this! I’m going to have a go myself…may try fitting some tinsel and a bauble in the middle too!
Thank you – that would be really pretty!
My residents love this, but ours all turned out unsteady and easily broken? It’s like the glue just wouldn’t hold tight enough? I read something about a kind of glue called G6300? In another post. I guess it’s a hardware store thing?
Mine is unstable too, I used hot glue as well.
Seems the middle ring isn’t “tough” enough so guess I’ll be looking for a “stabilizer”. Maybe a firm doily or a big center bow?
This wreath is for an elderly friend that really can’t store anything so I chose Candy Canes because I really think it will be ok in her head to throw it away after Christmas season is over.
I make these all the time. if you use E6000 and hot glue together it is awesome. <3
Very pretty and yet dimple.
Very nice. To stabilize the center, I took apart a ribbon spool and used the cardboard circle with the tube attached and placed it under the center circle. I used hot glue to secure the ends of the canes to the cardboard, then filled the tube with hot glue and placed a poinsettia in the middle.
Love this idea!
I tried to make the candy cane wreath and I thought I had every thing glued right and when I picked it up some fell off. I don’t know what I did wrong. Do you have a video that I could watch?
Love this
Thank you!
Rose this is such a cute idea! My kids would love this for their bedroom door. I hope you will check out my weekly link party and share some of your ideas for a chance to be featured. https://www.ourtinynest.com/2022/11/30/weekly-wednesday-link-party-324/
Have a great weekend!
what type of surface do you create the candy cane wreath? won’t the canes stick of the underlying surface?
Hot glue (once hardened) cleans up easily so we made ours on the table and on the floor.
Excellent post!