How to Put a Picture on a Cake (Everything You Need to Know!)
If you’re new to using edible images, you may wonder how to put a picture on a cake. In this post, I’ll cover everything you need to know about edible images: where to get them, how to print them, how to store them, how to apply them to cakes, and more! Read to the end to see several cakes and other things I’ve created using edible images!

How to Put a Picture on a Cake
Decorating cakes with edible images is a fantastic way to add a personal touch or fancy details to a cake. . Whether it’s a birthday, anniversary, or any other special occasion, edible images can transform your cake into a masterpiece.
The use of sugar sheets, which are essentially edible paper, allows for intricate designs and vivid photographs to be easily transferred onto your cake. In this guide, we will explore the step-by-step process to apply edible images to cakes effortlessly, ensuring you achieve professional-looking results at home.
Video of Book Cake with Edible Images
For the book cake in the video above, I printed the spines of the clients’ favorite books on edible sugar sheets, cut them, and applied them to individual strips of coordinating fondant with shortening, adding the edges and pages to the top of the cake.

How to Apply Edible Images to a Cake
First, a little background. A few years ago I didn’t use edible images often, mostly because getting my hands on them was difficult. No local grocery stores offer them (I live in rural Mississippi), and I rarely planned far enough ahead to order them online.
Then, another local home baker started offering to print sugar sheets for local cake decorators, and I was able to use them more often. I fell in love with how easy it was to get an intricate design or picture on a cake without hours of work.

Buy an Edible Image Printer
So when she decided (a couple of years later) to get out of the business and offered to sell her edible image printer to me, I jumped at the opportunity.
I’m unsure how I lived without an edible image printer for so long. Now I use it several times a month and print and sell frosting sheets to local cake artists. The only other thing I needed was practice to learn all the details of how to put a picture on a cake.
Actually, I’ll sell an edible image sheet to anyone who needs one because I also ship them to anywhere in the United States. Email me at rose@rosebakes.com if I can help you with one!
Still need help? Find out how to put a non-edible image on a cake here.

What are Edible Images?
Edible images for cakes are designs or photographs printed on a special type of sugar-based or rice-based edible paper using edible ink.
These images are safe to consume and are commonly used to decorate cakes, cupcakes, cookies, and other desserts. These sheets come in various sizes, and some are precut to fit specific cake shapes.
Common Names for Edible Images:
- Edible Icing Sheets
- Sugar Sheets
- Edible Photos
- Icing Sheets
- Edible Frosting Sheets
- Frosting Sheets
- Edible Paper for Cake
- Edible Pictures

Common Materials Used for Edible Images
- Edible paper (icing sheets or wafer paper): Icing sheets are thin layers of sugar, while wafer paper is made from potato starch, water, and oil. Icing sheets provide more vivid colors and are smoother, while wafer paper has a more translucent look. Icing sheets always have a plastic backing sheet for stability. Rice paper is another type of edible paper for cakes, but I have not been able to get good-quality prints on rice paper. I prefer these Supreme Icing Sheets.
- Edible inks: Special food-grade inks, usually made with edible food colors, are used to print the images. These inks are safe for consumption.
Where to Print Edible Images for Cakes?
You can get edible images printed at several places, including:
- Bakeries: Many local or chain bakeries offer edible image printing services.
- Grocery Stores: Some large grocery chains and big box stores (e.g., Kroger, Walmart, Safeway) provide this service in their bakery departments.
- Online Stores: Websites like Etsy, Amazon, and specialized cake decorating sites allow you to upload your image and have it printed on edible sheets, then shipped to you.
- Specialty Cake Supply Shops: Stores focusing on cake decorating supplies often offer edible image printing services.
- Print-at-Home Kits: You can purchase an edible printer and edible ink to print images at home.
If you plan to use a local store, it’s best to call ahead to verify that the store provides edible pictures for cakes. You’ll also want to ask what image formats they accept (.jpg, .png, .doc, .pdf, etc.).
Where to Order an Eible Image Online?
Etsy, eBay, Amazon, and several privately owned websites offer edible images. Some pre-designed and some custom.
Rose Bakes (that’s me!) offers this service as well. If you have a custom image already edited and ready to print, you can order from me, and I’ll print and ship it to you. If you need your image edited or resized, I can do that as well.
I don’t have this in an automatic online ordering format, but you can email me to place an order. Please email me at rose@rosebakes.com.

Can I Print an Edible Image at Home?
Yes, you can print an edible image at home, but you’ll need specific equipment and materials.
Specific instructions for how to print edible images will somewhat depend on the type of printer and paper you’re using but here are some general things you need.
Tools Needed to Print Edible Images
- Edible Printer: A dedicated printer for edible printing is required. You cannot use a regular printer that has been previously used with standard ink. Brands like Canon or Epson often have models suitable for edible printing. There are also brands of edible printers specifically for cake decorating but I have no experience with those. I have this Canon model and can absolutely recommend it as a reliable, quality printer. This model is also very popular.
- Edible Ink Cartridges: These are special ink cartridges made from food-safe coloring. They are designed specifically for use in edible printing. I order edible ink on Amazon here.
- Edible Paper (Frosting Sheets or Wafer Paper): You’ll need edible paper, such as frosting sheets or wafer paper. These are made from starches and sugars and can be safely placed on cakes and other baked goods. I love the Supreme Frosting sheets here. I only use wafer paper for burn-away cakes.
- Software: You’ll need image editing software to size and adjust your images before printing. Some edible printer systems come with software, or you can use general photo editing tools. I use Picmonkey and Photoshop. Neither are specifically for cake decorating.
- Edible Printer Maintenance: It’s essential to clean and maintain your edible printer properly to avoid clogging and ensure the ink remains food-safe.
If you plan to do a lot of edible image printing, buying your own printer is probably the best option. It will quickly pay for itself, and if you offer edible image printing to clients, it’ll pay for itself even faster!
Tip: if you begin selling edible sheets for cakes, be sure to include instructions for how to put a photo on a cake so your clients don’t damage them.

How to Store an Edible Image?
This answer is pretty straight-forward. First, do not refrigerate edible cake images.
Store an edible image flat in a sealed plastic bag at room temperature. Keep out of direct light. Shelf life is around 12 months in an airtight bag.
I keep my sheets in these mylar bags.
What Types of Cakes are Best for Using Edible Cake Toppers?
You can use an edible sheet on buttercream, fondant, whipped cream, cookies,Oreo cookies (dipped in chocolate), flat hard candies, chocolate ganache, or ice cream cake. See tips below for each specific type of cake.

Edible Cake Decorations can be Applied to Various Frostings:
- Buttercream – Frosting sheets work great with buttercream frosting (don’t forget the corn syrup)! Buttercream works well if it is well-chilled and firm to the touch. Apply a thin coating of corn syrup to the back of the image so it will adhere to the frosting.
- Whipped Cream – Since whipped cream has a high-water content, apply the image as close to serving time as possible to avoid bleeding. Alternatively, back the image with a thin piece of fondant and then place onto the cake. This is my least favorite surface to apply an image to because it easily ruins the image.
- Cookies – Apply with buttercream, royal icing, or corn syrup thinned with a little water.
- Dipped Oreos – Brush corn syrup thinned with a little water onto the cookie then apply. This is best for OREO cookies that have been covered in chocolate using an OREO mold so that they’re smooth.
- Flat Hard Candy Lollipops – Brush corn syrup thinned with a little water onto the lollipop or candy, then apply.
- Chocolate or Ganache – Brush corn syrup thinned with a little water onto the cookie then apply. You can also warm the chocolate for about 20 seconds with a hair dryer, and then apply.
My favorite buttercream recipes: Vanilla Buttercream and Cream Cheese Buttercream.

How to Put a Picture on a Cake
- Set up a clean, flat surface where you can apply the image without any interruptions. The top of your cake surface (or the side if that’s where the edible icing images are going) should have a smooth frosting layer that has not crusted, whether it’s buttercream, fondant, or ganache, to ensure the image adheres well.
- Remove the image from its sealed envelope and allow it to rest at room temperature for 10-15 minutes. Then to easily remove the image from the backing, place in the freezer for 15-20 seconds (no longer).
- For best results, start at a corner and gently pull backing sheet from the image after freezing and place the edible topper face down on a very clean, dry surface or plastic cutting board.
- Apply corn syrup or edible glue. Paint a very thin coat of corn syrup over the back of the image.
- Make sure the edible photo is centered and aligned correctly. Starting from the center of the image, gently press it onto the cake and work your way outward. This method helps to avoid trapping air bubbles under the image. Smooth out the edible image making sure the edges are touching the frosting and no bubbles are caught underneath. This can be done by laying a paper towel over the image and smoothing with your dry fingers or use a fondant smoother or other clean, flat tool (like the edge of a bench scraper).
- For cakes and cookies, add a buttercream border or edge decoration around the edible sugar sheets to finish it off! This border could also be royal icing (for cookies) or fondant.

Pro Tips
- Set up a clean, flat surface where you can apply the image without any interruptions. Your cake should have a smooth frosting layer, whether it’s buttercream, fondant, or ganache, to ensure the image adheres well.
- Make sure you have clean, dry hands before you handle a printed sheet.
- Do not let water come in contact with the frosting sheet before or after application. Even a small amount of water will melt the frosting sheet and damage the print. I have seen suggestions to apply a fine mist of water over the surface of a cake before adding edible image prints but I do not recommend this.
- If needed, edible images can be trimmed with the backing still on them with sharp scissors or a craft knife.
- If the frosting sheet is sticking to the backing, do not try to peel it off. You may cause it to tear.
- Try the freezer first (as described in the step-by-step guide above). If the freezer trick doesn’t work, try pulling the backing sheet over a sharp edge of a table or counter a couple of times to pop the image off.
- If you live in humid conditions or have high moisture content in the air for other reasons and the edible cake image is still sticking to the backing, as a last resort, place it in the oven at the lowest temperature (100°F on mine) for 5-10 minutes to dry it out.
- If any air bubbles appear, you can smooth them out using a clean, dry hand or a fondant smoother. Press lightly and push the air bubbles toward the edges to release them. Take your time to ensure the image is flat and free of any wrinkles or bubbles. You can also use a sharp pin to poke a hole and press the air out but this may leave a wrinkle behind depending on the size of the air bubble.
- Any unused edible images can be placed in a sealed bag to save for future use.
- Sometimes, color bleeding can occur, especially if the cake is exposed to high humidity. To prevent this, keep your cake in a cool, dry place. If possible, do not refrigerate your decorated cake after applying the edible image. If refrigerating, you are more likely to have air bubbles develop under the edible pictures. If you must refrigerate the cake (such as during the summer months), apply the edible pictures to the cake at the last possible minute for better results.

FAQ
Yes! A fondant cake (or sheet of fondant) is my favorite surface to apply a printed edible image to.
Yes! When applying to buttercream, edible prints are best painted with a thin layer of corn syrup on the back of the image before placing on the buttercream OR applying a to a thin layer of fondant, then placing that on the buttercream.
This will help prevent bubbling. An edible picture is best applied to light-colored frosting. Dark colors underneath (frosting, chocolate or fondant) may show through the thin frosting sheet’s design. If the frosting is dark, we suggest applying the frosting sheet onto a thin piece of white fondant to be placed onto the cake.
Apply the sugar sheet to the cake no more than 48 hours prior to the event. Images will fade or bleed with too much moisture. For high moisture frosting, wait to apply as close to serving time as you can, or back with a thin piece of fondant.
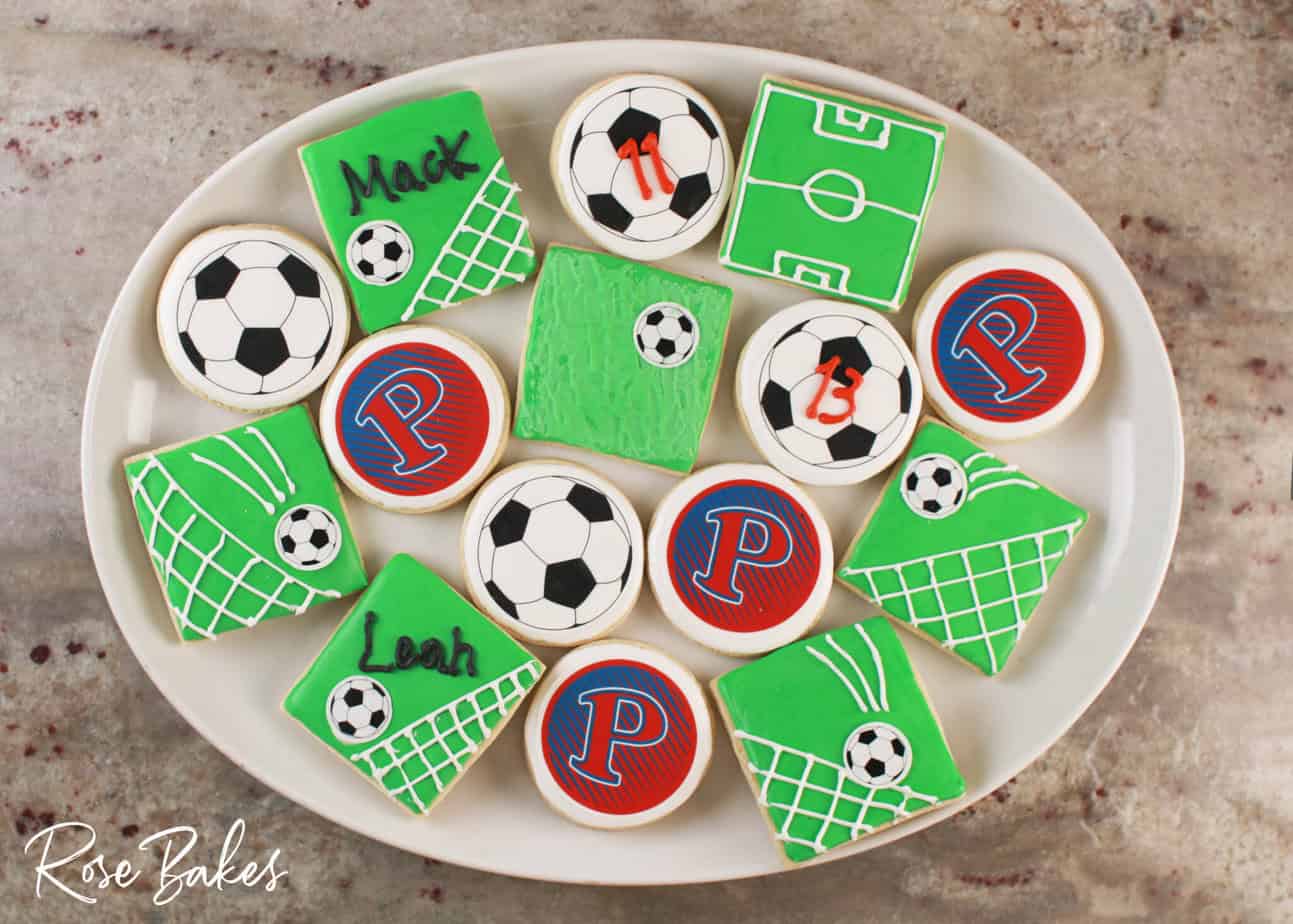
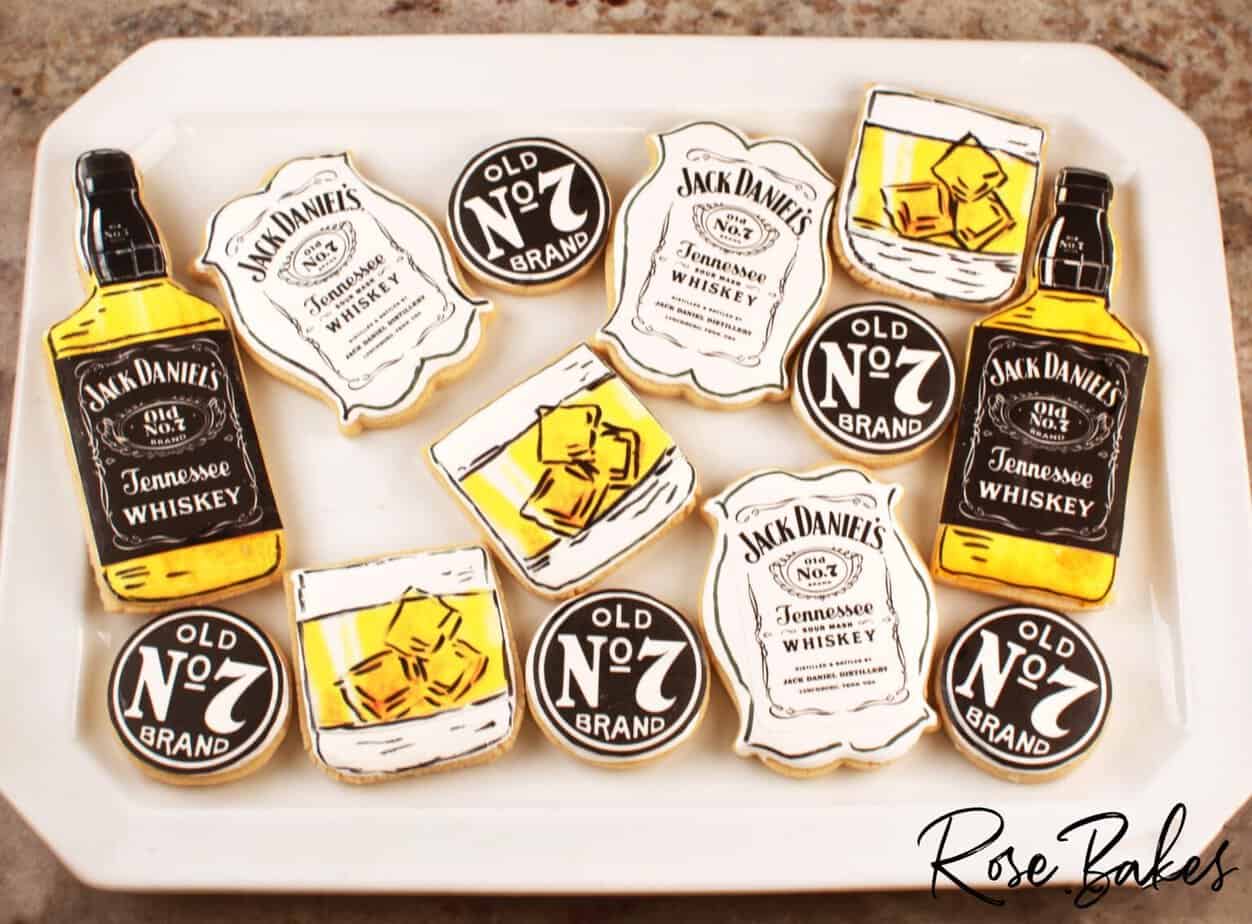
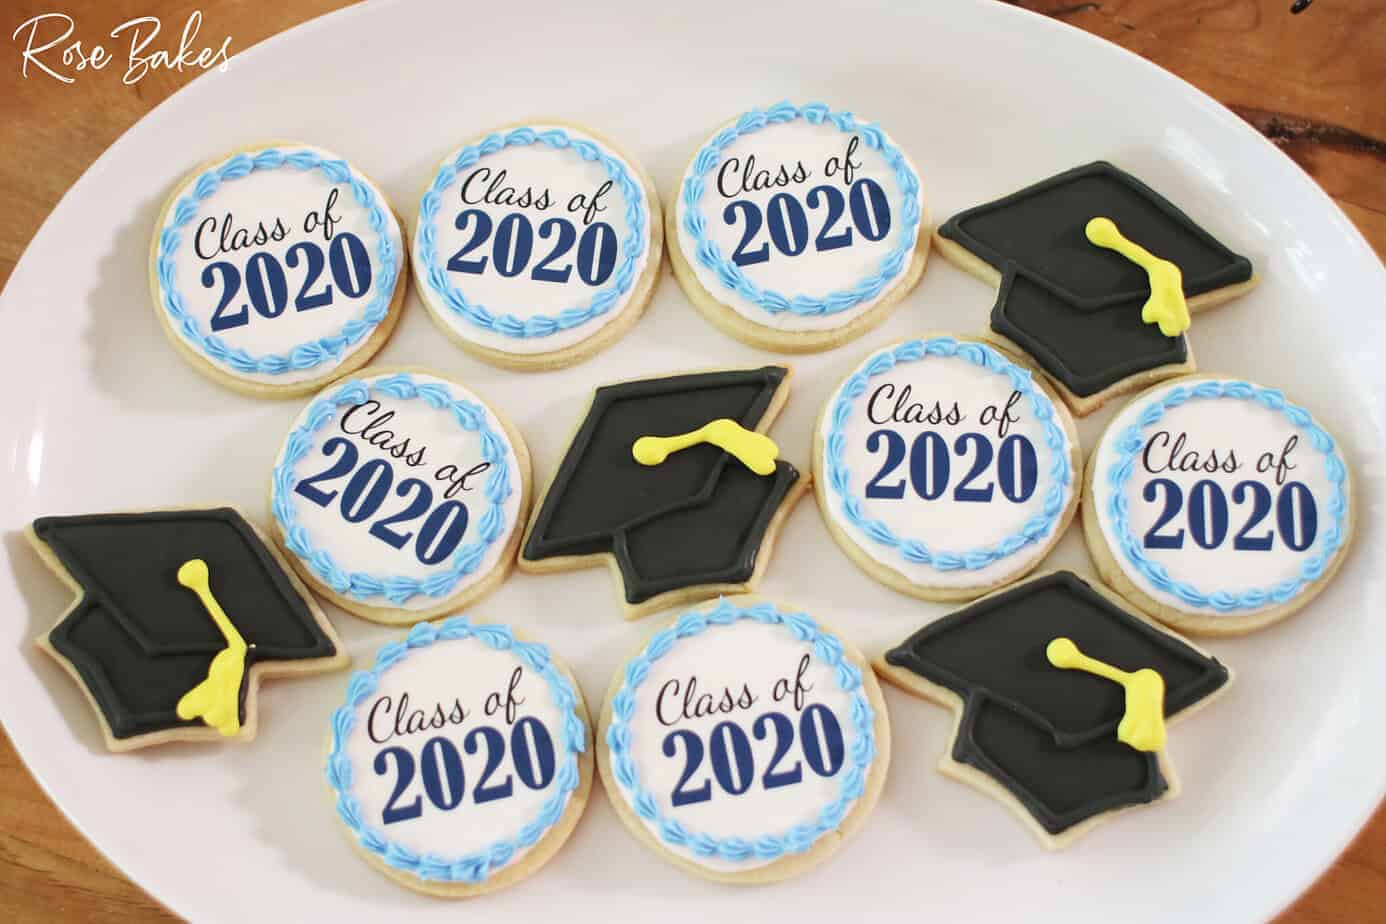
I love to use edible images on royal icing-covered cookies. I let them dry completely, then I used corn syrup on the back of the edible images to glue them to the dried royal icing. Sometimes, I pipe a border over the edges; sometimes, I don’t.
Okie-dokie! That is all the information I can think to share with you about using edible images on cakes. If I missed anything or you have any questions, please let me know in the comments!
More Cake Tutorials


Thank you! This has been very helpful.