Spine Cake & Cookies
Spine Cake & Cookies. This cake is perfect for an orthopedic doctor or chiropractor cake. Click over to get details for this Spine Cake and Chocolate Dipped Oreos (with Spines).

When I first got the request to do this cake and cookies, I wasn’t certain I could pull it off. I mean… making a spine? out of sugar? Eeeh… I never even took an anatomy class!

But then when I started searching for images and I dug out the bones book I have for the kids for homeschooling, I realized that maybe it wouldn’t be too bad. Of course, they don’t make cookie cutters for the spine and all it’s parts, so I knew I’d have to do it by hand.
I didn’t take step by step pics, but I’ll tell you what I can about my process…
OH – the occasion. This was done for a retirement party for an Orthopedic doctor. He had a small staff so they didn’t need a big cake or lots of cookies… just enough for them!
Spine Cake and Cookies
So, the cake is a 6″ round vanilla cake, baked in my favorite Magic Line Pans. It was filled and frosted with vanilla buttercream before covering with fondant.

The cake and board were completely covered in Black Satin Ice Fondant. I did a small rope round the border to cover the seam. I also added black ribbon to the border (as I did in this tutorial). The staff
After covering the cake, the first thing I did was cut out the pelvic bones. I don’t know their proper names but I looked at several pics and hand cut them. I used a small round piping tip to cut out the holes, then I laid them in small bowls to give them some curve while I worked on the other pieces. For that center piece, I laid it over a corner of a folded piece of cardboard to dry with that crease.

The main center part of the spine was just a roll of fondant. I think I made it about the same size as a small 9″ Wilton Rolling Pin. I sort of smooshed it flat on the backside then used melted black candy melts to attach it to the cake in the curved shape.
The top that was taller than the cake wouldn’t stand up on it’s own (I hadn’t let it dry at all before shaping it on the cake), so I used a lollipop stick behind it to hold it in place:

With it in place, I rolled out a long skinny rope of fondant, then cut it into pieces long enough to curve around the front side of the spine from top to bottom. I had to use a little bit of sugar glue to keep them in place. I went back and cut tiny pieces from the same rope to place between each of the curves.
And that was it… it really wasn’t hard at all when it was all said and done! It did take some time to get everything just so, but I was very proud of it in the end.
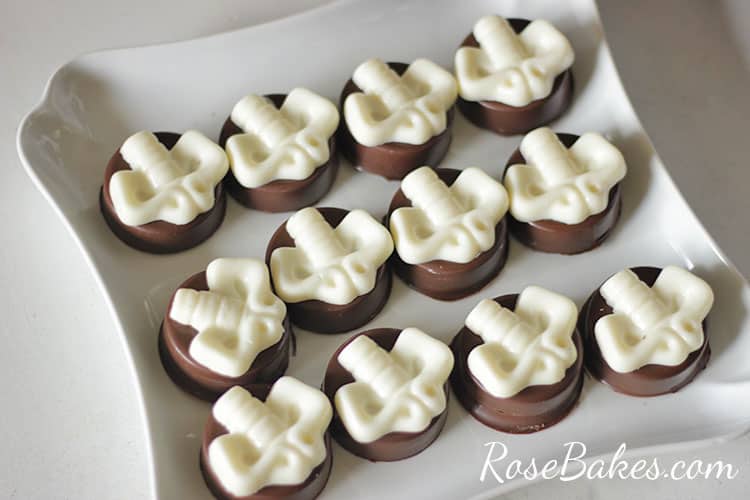
In addition to the cake, she wanted a dozen Chocolate Dipped Oreos – also with a spine & pelvic bones. I found this mold that was perfect for the job and easy-peasy! First I used this plain cookie mold to cover the Oreos in chocolate, then I made the spines separately and glued them on with a little dot of melted white candy melts. **Note: the Wilton Skeleton mold looks a little different from when I bought it but I still think the size would be perfect for Oreos.
I loved the way these came out!!
And that was it… a Spine Cake and Cookies!


So cute! Great job!
Thank you!
Wow, great job
Thank you!
Very nice cake! Thanks for linking up to Merry Monday! Pinned! Have a great week!
Kim