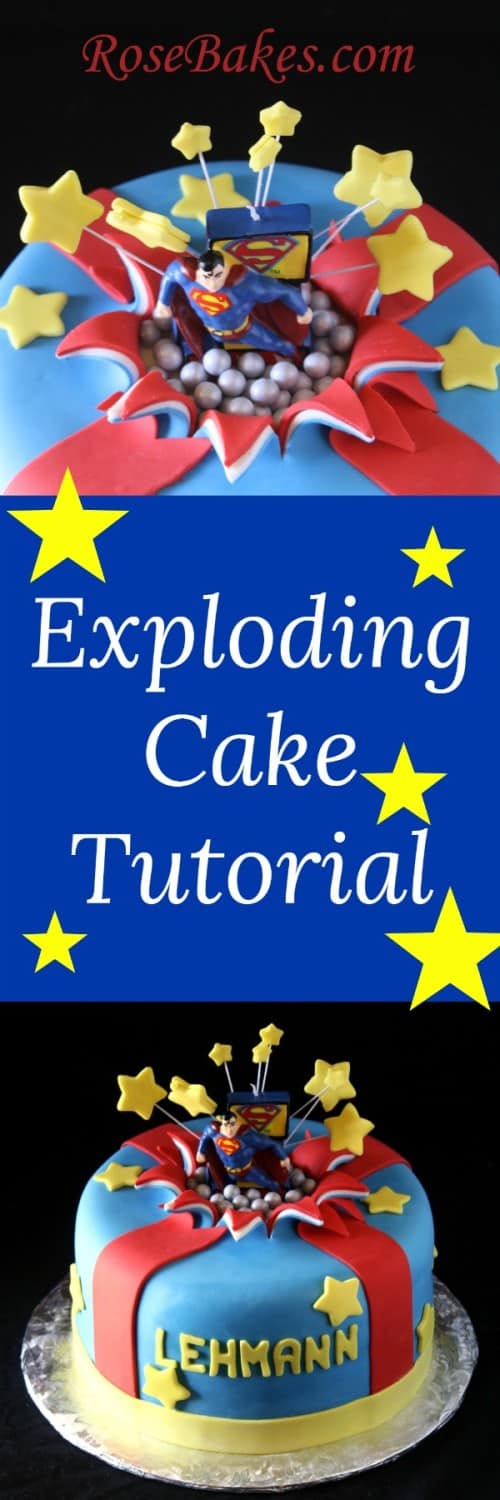
Superman Bursting Out of the Cake (Exploding Cake Tutorial): Part 1
Last week when I wanted to do the tutorial on stacking but my tiered order got canceled, I still really wanted to get a tutorial out of my day of work, so I decided to photograph my step-by-step process of putting together this Superman Bursting Out of the Cake.

This is also called the “Exploding Cake” and you could use this technique for lots of other designs… here are a few I found searching… here, here, and here.

I’ll give you a few general ideas first… then I’ll start part 1 of the tutorial. I got the Superman Candle on Amazon. This is a 9″ round cake. It’s all vanilla cake with vanilla buttercream and all decorations are homemade marshmallow fondant. The silver balls are actually silver Sixlets!

For the name I used these Ateco Alphabet cutters… and these Wilton Star Cutters for all the stars. I made the ribbons with my FMM Ribbon Cutter. Did I miss anything?
And let me warn you… there are dozens of photos, so I’m going to break this process up into at least 2 posts… maybe 3. That means you will not see the whole tutorial today… so don’t be mad when you get to the end… okay? okay.
Oh and the blue and purple hands? Yeah… of the 8 cakes I had last week… 2 had blue bows (the Pregnant Belly Cake and the Converse Shoes Baby Cake). Then there was this Superman cake – which was a lot of blue… and I also had 2 purple cakes. A Mermaid Cake and a Dora the Explorer Backpack Cake.
I tried to use gloves to mix all that fondant but they kept tearing (kneading color into fondant is hard work) and getting the blue and purple all over my hands anyway, so I gave up and went bare-handed… hence the blue and purple hands, fingernails, etc.
Okay… onto the tutorial….
First up, you’ll want to start with a 9″ cake, filled and frosted, and covered in a thin layer of buttercream. Here’s mine:

You’ll also need enough fondant to cover a 9″ cake (approximately 30 oz.). Mine was blue… you could use whatever color. You’ll also need enough of a second color to have on the “inside” of the explosion. My recipe makes about 45-50 ounces… that should be enough for the whole project.
Here are other supplies/equipment you’ll need to complete this cake:
- 4.5″ cookie cutter
- rolling pins
- parchment or wax paper
- cornstarch
- pizza wheel
- Xacto knife

So first, you’re going to want to cut a round of parchment paper (or wax paper) about 5″ round. I used the largest 4.5″ cookie cutter from this set to measure and made it just a little larger.

Then I rolled out my red fondant and also cut a 4.5″ round of it.

Lay the parchment in the center of the cake, then the red fondant circle on top of it. The parchment keeps the red fondant from sticking to the buttercream. That way when we cut it open to fold it back, it’s a nice clean fondant showing… not a buttercream smeared mess!

Then you’re going to roll out your main color. It’ll need to be about 18″ across. I usually roll mine around 1/4″ thick. If you see the reflections in all of these pictures… I use The Mat to roll out my fondant and I love it! If you’re just rolling it out on a smooth surface, you’ll need cornstarch to keep it from sticking… lots and lots of cornstarch!

Now you’re going to drape that fondant over the cake, centering it as best you can.

This next part takes practice and you’ll get better the more you do it. You’ll want to first smooth the fondant on the top and try to make sure there are no air bubbles underneath it. Then you’ll want to put the cake on a turntable and start smoothing around the top edges with your hands.
Put some cornstarch on your hands if your fondant is sticky to keep it from sticking. You’ll smooth down a bit, turn, smooth, turn smooth. You’ll want to simultaneously be working down and around the cake. In the above picture you can see that I’ve worked all the way around, and about an inch or two down.

Just keep doing this until you get it smoothed all the way down the cake. When you get near the bottom, you’ll have to smooth, turn and stretch the fondant (just a little at a time) to get it all the way to the bottom edge without any creases.

Once that’s done, you’ll want to take a pizza wheel and cut off the excess. Just be careful to not cut too high. I try to keep the blade of the pizza wheel parallel to the edge of the cake and cut down, versus cutting toward the cake. Does that make sense?

Now you see that little “lip” around the bottom… you’ll just want to smooth that down (and any other little bumps).

So grab some fondant smoothers and smooth it all out really nice.
And that’s it! Don’t be mad… I forgot to take a picture of the totally smoothed cake (duh!), but you’ll see it in Part 2 of the tutorial (in the next step!).
Stay tuned and I’ll get that posted sometime tomorrow!
For the next steps…
- Superman Bursting Out of the Cake (Exploding Cake Tutorial): Part 2
- How to Add Ribbons and Ribbon Borders to Cakes
- How to Stars (or other shapes) on Wires for Cakes


Awesome Rose!! I look so forward for Part 2 and maybe Part 3?…hahaha! But u got the info needed to make this!! Thank u soooo much for posting this!!
Thanks so much Yaneri!! I think I’m going to be able to finish it in 2 posts… stay tuned =)
Hi I love this cake and am goin to give it a try for my nephews 21st. I was wondering how far in advance can I make it and wud it travel well as I’m planning on takin it on a plane!! Tanx in advance.
You could probably make it 2-3 days in advance and it would hold up. As far as the plane – will you be able to hold it all the way? As long as it isn’t bounced around, it should travel just fine.
Thank you for getting back to me so quickly. Yea am holdin it all the way, wish me luck!! : ) x
Hi Rose, this cake looks amazing and great tutorial, so thanks. Just wondering if the final steps will be revealed before April 4 as that is when I plan to make the Superman cake.
Thanks 🙂
Thanks for great tutorial, my son loved this cake for his 4th birthday and not that hard with your instructions. Someone asked where I bought it, was delighted ! Only second time I have used sugar paste and wondering what to do next ! Thanks again x
Awesome!!! I’d love to see a picture – you can send it to rosebakes@live.com!! x
can you please post the link to part 2…….i would love to try this cake
Thank you
It is linked at the bottom of the post. 🙂
Thanks Rose
Your tutorials are lovely and well understood. 🙂
Thank you!
Hi Rose love the cake and the tutorial.
Can you please tell me is superman made from fondant or is it a toy superman figure.
He’s a candle I bought on Amazon. I’m not sure they have the exact one now, but I searched here: http://amzn.to/HqwKOl
Thank you I will check.
Thanks for the wonderful tutorial. Made the superman caje and it was a hit.
So glad to hear it!
Love these instructions and I am going to attempt an exploding “hulk” cake for my sons 6th birthday. I didn’t see it listed anywhere the approx. quantities of each color of fondant used?
Excellent tutorial – used on my first burst cake tonight very easy x
So glad to hear it!
Hi Rose,
Hoping you can help me with the 9″ cake part. What do you use to make this? Do you just do a few rounds and put them together? I’m hoping to put this awesome cake as the top layer of a couple superhero tiers (big hopes I can actually do it!) How would you suggest I keep it from tipping over or sagging?
Thanks SO much!
It’s (2) 2″ layers of cake, baked, then filled and frosted with buttercream.
Your cakes are gorgeous…I’m starting a cake business out of my home in Michigan and was wondering…do you have business insurance? I just started my business and got a letter from an insurance company offering me rates for it.
I don’t have business insurance at this time, but I have looked into it and I don’t think it’s a bad idea. I’ve also found that it is very affordable.
Loved the idea of this cake and you have inspired me to have a go I have been buying bits and bobs for it but if you don’t mind I am going to make a two tiered cake with your design but a white cake at the bottom with a new York skyline in black I see it in my head hope I get the cake right with your tutorial I am pretty sure I won’t thanks a lot bridget