Buttercream Palette Knife Painting Cake {Video!}
Buttercream Palette Knife Painting Cake. Using a buttercream painting technique that originated with oil painting, you can create a beautiful, textured cake design with buttercream, palette knives, and a few other basic cake decorating tools.

Keep reading for step-by-step instructions and a written explanation for how I made this cake. And also a video and some tips that will help if you choose to do this technique.
As you may know (or not?), Mississippi experienced a rare polar blast last week including temps in the 20s, snow, and lots of ice. This is so out of the ordinary for us that we are quite simply not equipped to handle it.
Businesses shut down, schools closed, and life pretty much came to a stand-still for a few days. And then… a lot of people lost electricity and/or water. One local power co-op had 98% of its customers without electricity. That included our church.

Why am I telling you this? Well, there was a bridal shower scheduled at our church on Sunday and without electricity, it couldn’t happen. To keep from canceling, I offered to move the shower to my home and host it here. It was a last-minute decision but I was truly happy to help – especially since the bride is my cousin.
Anyway… I was already scheduled to do the baking for the shower so that ended up being a blessing. Anytime one of my cakes doesn’t have to be transported, it takes a little pressure off.
Buttercream Palette Knife Painting Cake
Now… let me tell you about this cake. My sister-in-law Ariel was coordinating the shower and she knows I love to make a cake design I’ve never done before. So when she showed me what she wanted – I was ecstatic!
I had actually made one buttercream palette knife cake a couple of years ago but the design was a last-minute decision and I didn’t have the time to really figure out how to do it. It’s here:

The cake ended up being pretty, but also a little bit plain and certainly not a masterpiece. I wanted to do more. Do better. Make it prettier.
So this time… I prepared a little more by watching tons of Youtube videos and making sure I had the proper tools.
Now let me confess. I didn’t actually follow most of the Youtube advice or techniques. But I did get a better understanding of how the look I wanted was achieved. What I love most about this technique is that you don’t need a lot of precision – just an artistic eye and being comfortable with abstract flowers and blossoms.
With that in mind – I laid it out and went to work! My final product was certainly not perfect and I have not mastered Palette Knife Painting on cake by any means… but I loved the final result and my clients loved it too!!
With a cake for my canvas and buttercream as my “paint” – it’s just so, so much fun!
The Cake and Frosting
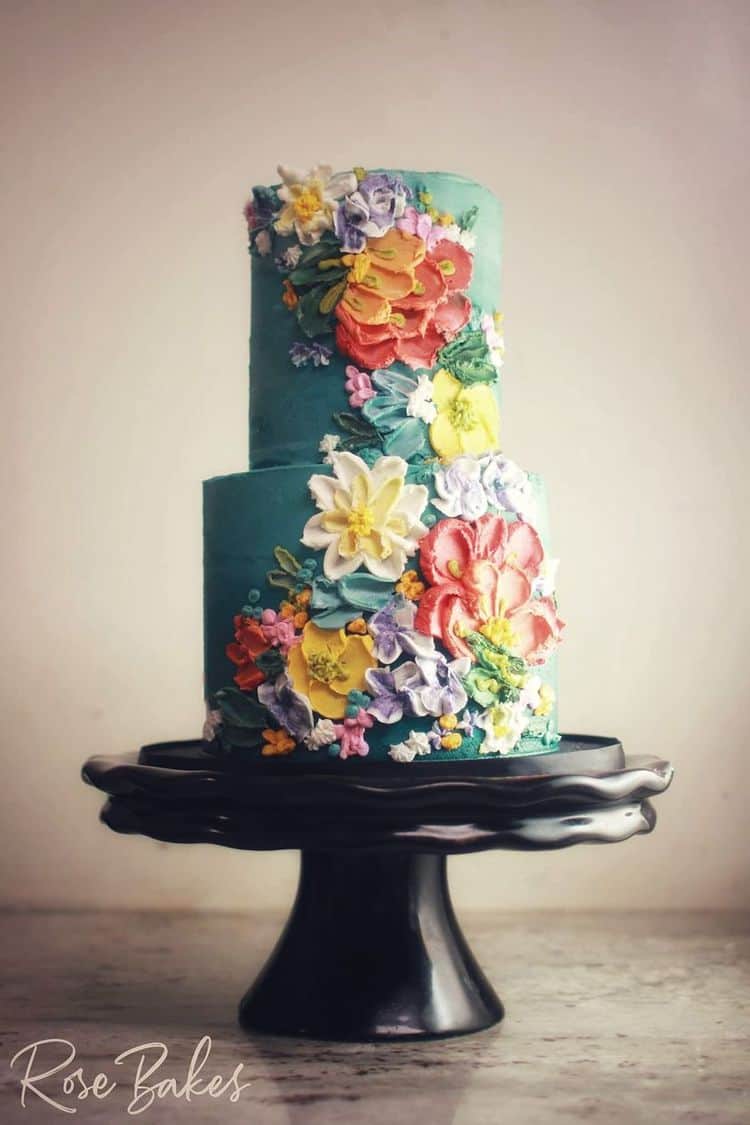
Quite literally any cake recipe that will stand up will work for one of these cakes. My most popular is this white almond sour cream cake or this from-scratch chocolate cake. Most of my painted cakes have been single-tier, but not all. Check out this wedding cake:
Having said that, the actual cake doesn’t matter nearly as much as the frosting.
You will need a large bowl of buttercream frosting that will hold its shape well. My favorites are this classic vanilla buttercream and my favorite Crusting Cream Cheese Frosting.
Both of these recipes are terrific for piping, smearing, sculpting, and holding their shape!
Tools Needed for Palette Knife Cake Decorating
There are any number of tools you could use to get these effects, but I’ll list a few of the ones I think are needed.
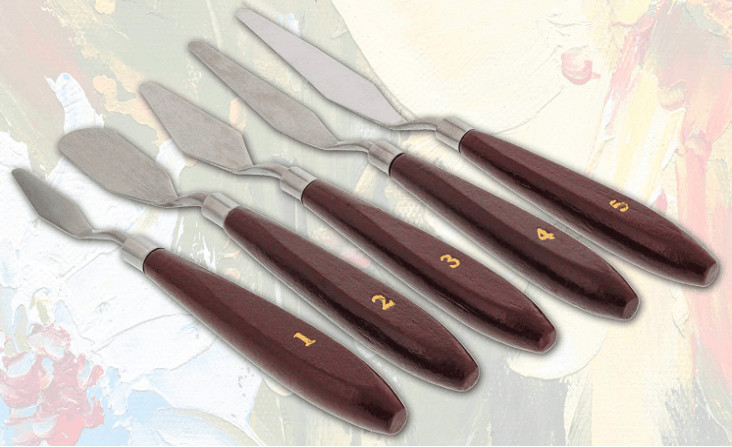
- Palette Knife Set – mine is almost identical to this one but I bought mine at a local hobby store. I also like this set from Amazon because of the variety of sizes and shapes. Having different shapes and sizes allows you to create different petals and textures on your cake.
- Small Spatula – just your everyday cake decorating spatula. I love a small offset spatula and a small straight spatula.
- Paint brushes – any clean new synthetic brushes will work… just keep your paintbrushes designated for cake work obviously. You wouldn’t want to cross-contaminate with makeup brushes.
- Piping Bags – Every time I’ve done a palette-painted cake, I’ve used a plain frosting bag and just snipped the end off (instead of using piping tips). So a few of these would be handy.
- Cookie sheet (or a plate or whatever you like)… I shared my favorite cookie sheets here OR a bowl for each color of buttercream.
- Gold Edible Paint, or you can use a gold luster dust mixed with lemon extract or some form of alcohol (I prefer vodka). That’s assuming you’re adding gold touches to your cake.
- Turntable – using a quality turntable will make this decorating technique so much easier and I think every baker needs one anyway 😉
- Paper Towels – these are helpful for cleaning your tools between different frosting colors and/or keeping your cake board clean.
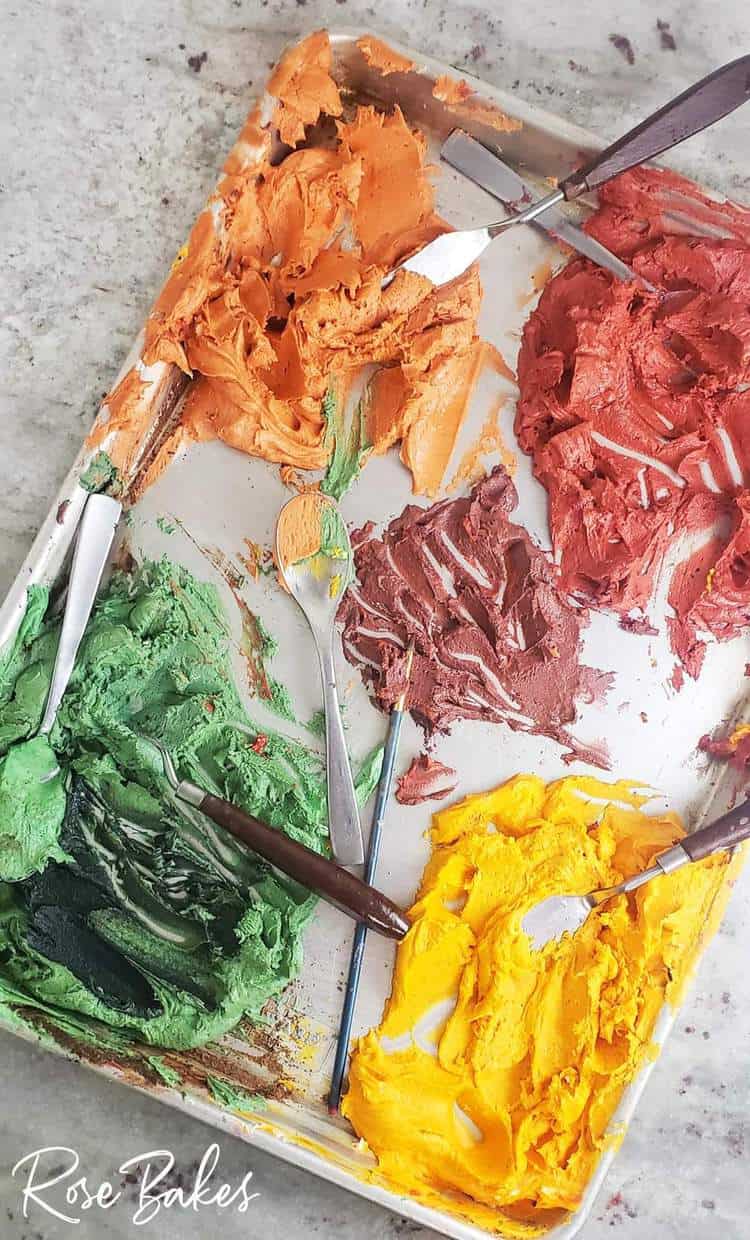
Multiple Colors of Buttercream
Obviously, you’ll need frosting in all of the colors you want to put on your painted buttercream cake. I like to mix my colors in paper bowls (easy cleanup!) or on a baking sheet.
I only make a small amount of buttercream in each color. You can make more as you need it and get varying shades to give the cake more interest. Just a dab of extra color here and there really makes these cakes shine!
TIP: I only use Americolor gel food coloring for my buttercream and that’s what I recommend. The colors are true and concentrated and do not have bad aftertaste.
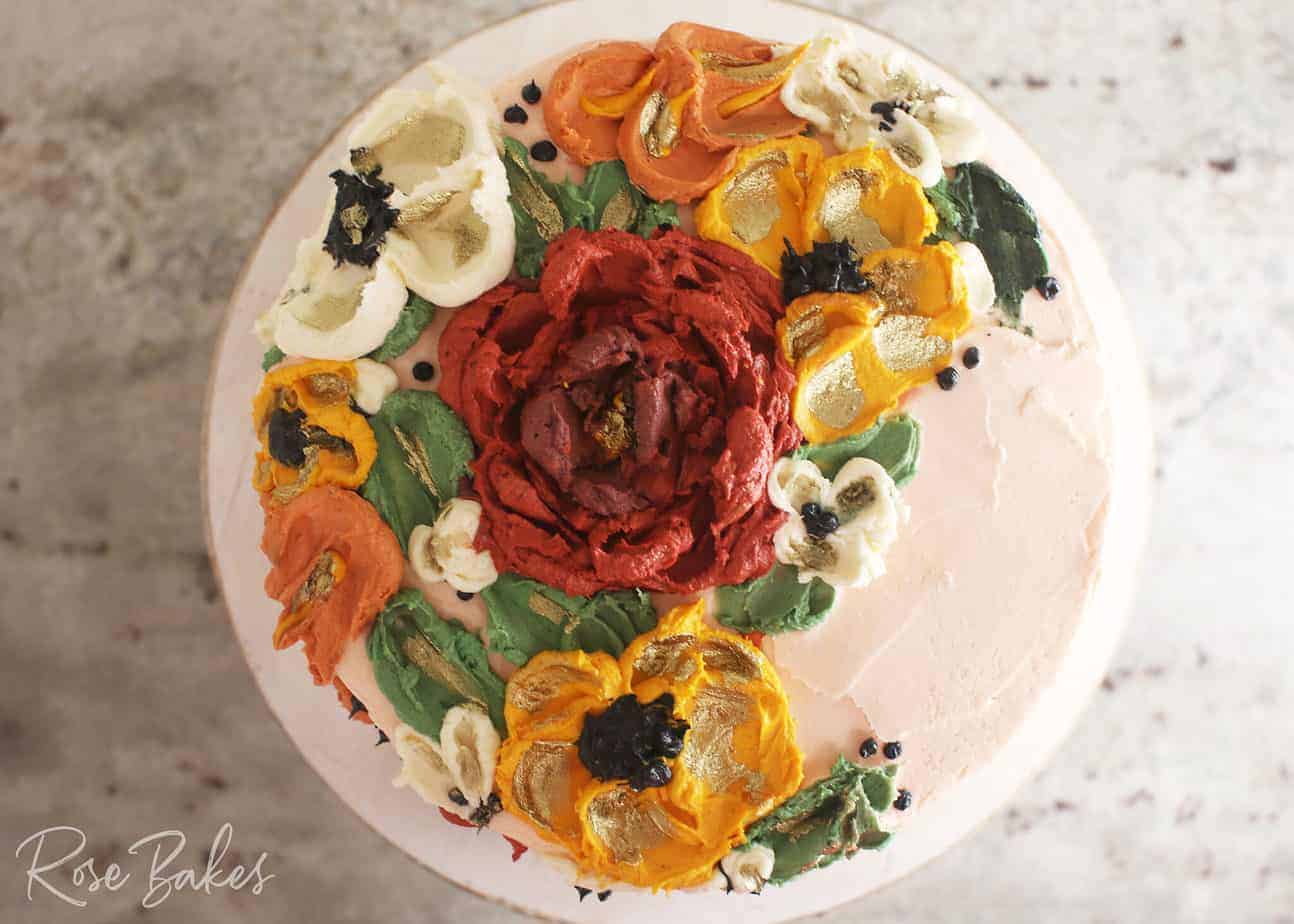
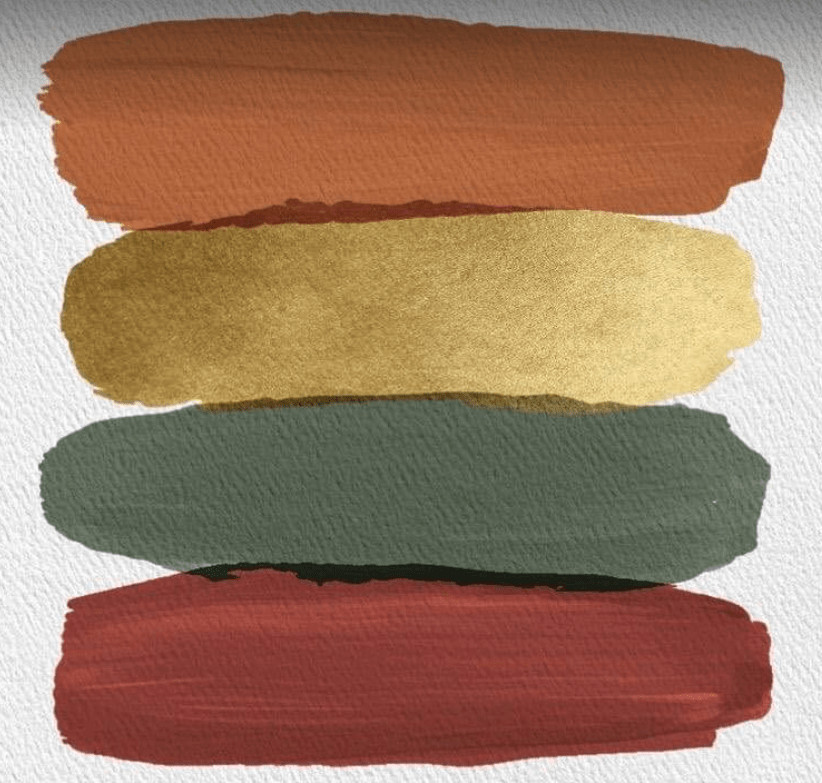
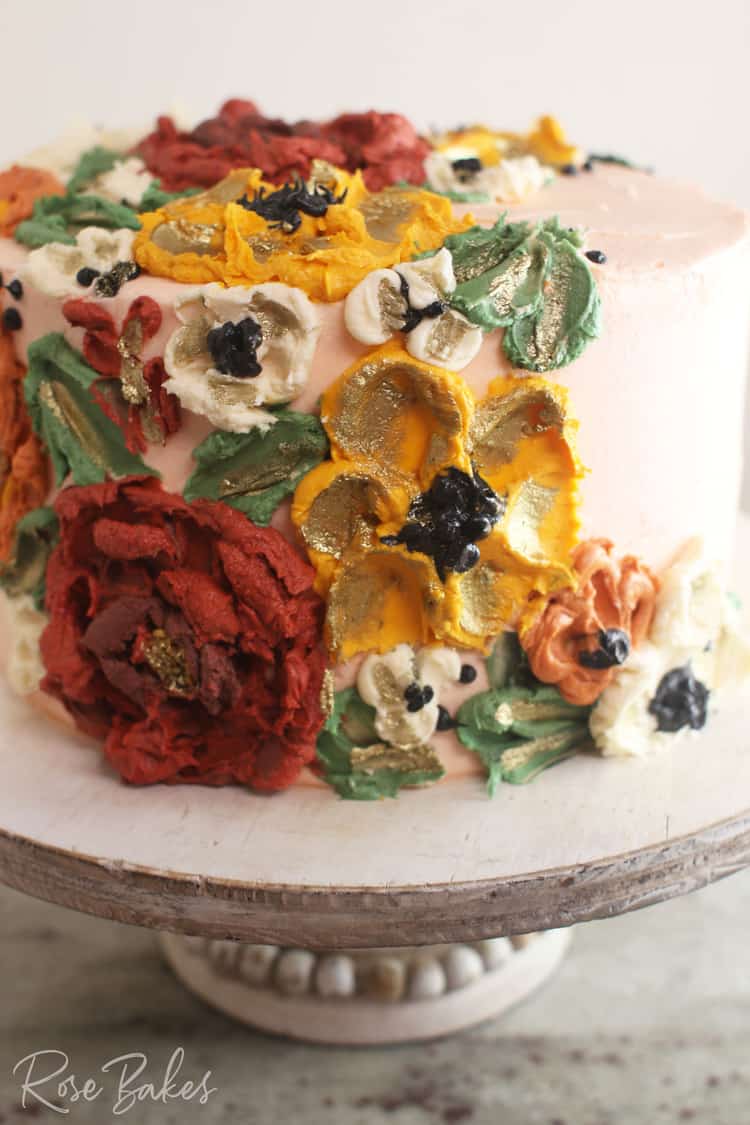
For the cake featured today, these are the bold colors the bride will be having for her wedding along with the buttercream palette I created:
I also had some black buttercream in a piping bag to add the flower centers and a few “dots”. that sort of resembled poppies. Since I couldn’t actually make a true metallic gold buttercream, I painted on the gold accents after the cake was chilled for about an hour.
Colors mixed for this cake:
I will list the base colors I used but there’s no way to tell you how exactly I achieved the exact shades and colors shown. I Just mixed and combined until I got colors I liked.
- Peach (I covered the whole cake in this color before I started decorating)
- Maroon
- Super Red
- Regal Purple
- Orange
- Terracotta
- Egg Yolk
- Leaf Green
- Forest Green
- Black
- Ivory
- Cocoa Powder (not gel color – actual cocoa powder)
Instructions: How to Decorate a Buttercream Palette Knife Painting Cake
Again – no step-by-step photos here… just a general summary of what I did.
- I baked two cake layers of Strawberry Cake and made a big batch of Cream Cheese Buttercream.
- I filled and stacked the layers, then put a crumb coat on the cake. It’s not necessary, but I chilled it overnight. I do recommend chilling the cake for at least an hour if you don’t have all night. You could even pop it in the freezer for a few minutes to firm it up if you’re short on time. The biggest tip is – cakes at room temperature are soft and harder to work with. Cold is better. You can see step-by-step photos of how to do this in my book, Cake Decorating for Beginners.
- I made peach-colored buttercream, then covered the cake and smoothed it (again, full tutorial in my book). Then I chilled the cake for an hour.
- While the cake was chilling, I mixed up all of the colors above.
- Using a variety of palette knives, I started on the top of the cake and began creating flowers (see the video below). Then I worked down the side of the cake, taking the cascade of sugar flowers to the bottom of the cake.
- After I finished all the buttercream flowers, leaves and embellishments, I chilled the cake again, then got it back out to paint on the gold accents with edible gold paint.
And that’s it! I decorated this cake in about an hour, not counting chill time. And it was a huge hit at the bridal shower!
Video Tutorial
I mentioned already that I didn’t have step-by-step pics of palette knife cake painting but I do have a video for you from when I decorated one of these cakes.

Here’s the palette knife cake decorating video for you:


Follow me on Instagram, Pinterest, Facebook & Twitter!
If you have any questions about this cake, please leave me a comment!


Hi Rose!
Glad you had fun in the snow and that you were able to host your cousin’s bridal shower; the cake is beautiful!! I’ll try this technique, on both cakes and cookies!!
I want to tell you, I own that cake stand!!
Thank you for sharing!!!
You are a true cake artist! Such beautiful cakes! I’m sure they are just as scrumptious as they are pleasing to look at. I really enjoy reading your blog and look forward to what you’ll have in store next. I really want to try and make your recipe for the vegan and gf chocolate cake. It looks divine! Where are you in Mississippi? I have family in Biloxi.
Thank you! I live in Franklin County, Mississippi; about 3 hours northwest of Biloxi!
Thank you for sharing. The cakes are beautiful.
Rose, you have outdone yourself. Absolutely beautiful. Thank you for sharing!