Carousel Cake
Back in January, I had so much fun making my very first Carousel Cake. And it was everything I’d want a carousel cake to be… buttercream, with pastel pink and gold and ribbons and horses, of course. Keep reading for all the details!
This carousel cake was just a dream for me. With a little touch of nightmare… as most amazing cakes are. Let me tell you about it.
The Carousel Cake
Overall it wasn’t so bad. Except the horses, of course. Because I love self-inflicted torture (NOT!), I ordered the most intricately detailed horse mold I could find. Because why not, right?
Even when the carousel mold arrived, I didn’t think it’d be that bad. But boy was I wrong.
I started by trying to fill the mold with melted candy melts. Well that was a complete and utter disaster. The legs and tail broke off over and over again. I’d pour in the melted candy, pop it in the freezer, wait 3 minutes, 5 minutes, 10 minutes… no amount of time was just right.
The legs and tail broke every.single.time. #fail
Next I tried modeling chocolate. The results were a little better, but when I’d pull the horse out, the chocolate was still a little flexible and it would stretch and some of the details would be lost. I really wanted to keep all the details, so …
#failagain
 Topenca Supplies 1/2 Inches...Shop on Amazon
 Wilton Fondant 9 Inch Rolli...Shop on Amazon
") Satin Ice Gum Paste for Cak...Shop on Amazon
Satin Ice Gum Paste for Cak...Shop on Amazon FMM Lower Case Funky Alphab...Shop on Amazon
Finally…
As a last resort, before closing down my business and deciding to never use another silicone mold in my lifetime (okay, it wasn’t that serious… yet), I tried gum paste. I kneaded it in my hands until it was quite soft and warm, then pressed it into the mold (which was dusted with cornstarch).
Then I used my small rolling pin to roll over it and get it mashed into as many crevices as possible (again the details, people – I wanted the details!). And once again, I froze it. And this time, when I pulled them out (by bending the mold), it held.
I repeated this over and over and and laid the horses out on a flexible cutting board dusted with tylose to dry. Cornstarch would work also, but I hoped the tylose would help them dry hard and dry fast.
At first they sweated a little as they thawed (don’t touch them when this happens!), but then they dried and began to harden. By the next morning, they were really hard and mostly sturdy. With hope in my heart, the next step was painting them.

The details were a little more daunting than I originally thought, but using a small paint brush and Edible Art Paint (love, love, love these paints!!), I was able to get a look that I was happy with. I painted horses over and over again that day… then left them to dry again.
By the next day I was confident I had horses I could use on the Carousel Cake. But I wasn’t 100% right.
When decorating day finally rolled around, I started working on the cake. But first…
A few details…
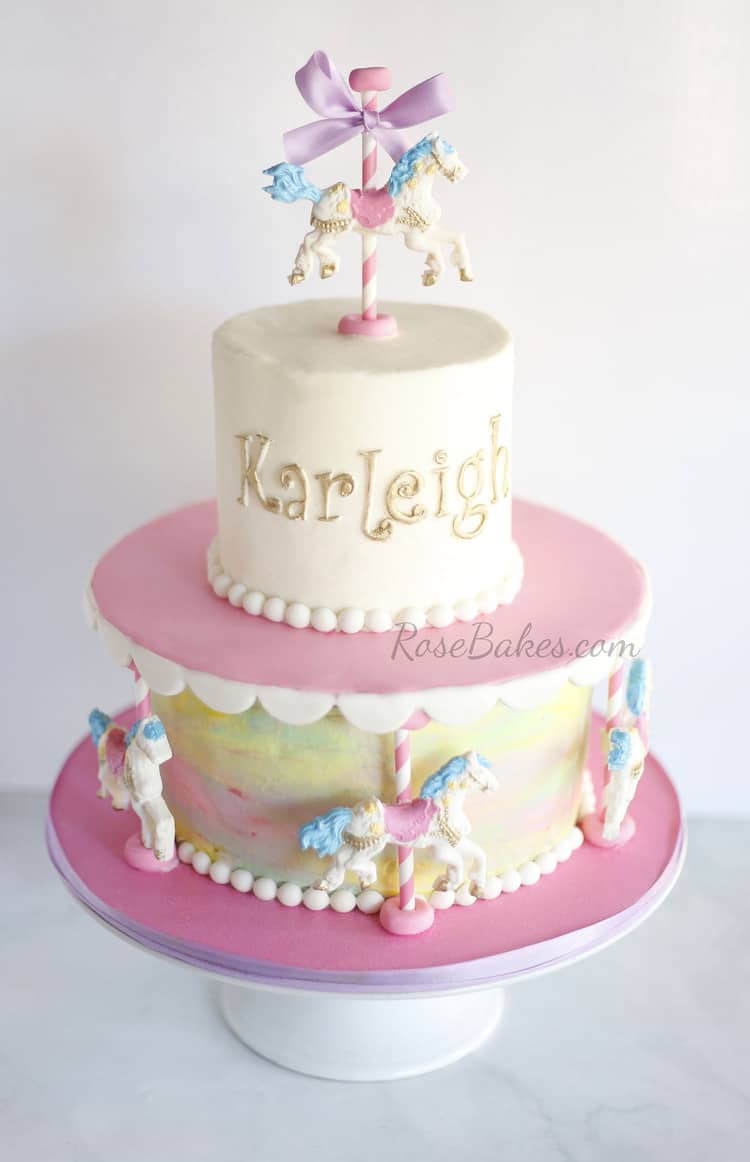
The tiers were 5″ round and 8″ round for approximately 30 servings. The top tier was chocolate chip cake and the bottom was wedding cake. I filled and frosted them with vanilla buttercream.

On the bottom tier, I did a watercolor effect with buttercream. It was pretty easy. The different shades of pastel buttercream spread on with a small spatula, then I used a bench scraper to smooth and spread it. I loved the way it turned out!
I went ahead and added the pearl border that I made with homemade marshmallow fondant and one of these pearl molds. Then I put in bubble tea straws (see my tutorial here) and added a 10″ board on top of the bottom tier.
That board was already covered in pink fondant to match the painted horses. After it was secure on the cake, I added the white scalloped border that was cut out with one of these frill cutters. It was “glued” on with melted candy melts.
 Wilton 10 Inch Round Cake B...Shop on Amazon
") FMM Sugarcraft Straight Fri...Shop on Amazon
FMM Sugarcraft Straight Fri...Shop on Amazon Wilton Candy Melts, Bright ...Shop on Amazon
 ColorBok 68261B Glitter Pap...Shop on Amazon
") Pack of 300 Thin Bamboo Ske...Shop on Amazon
Pack of 300 Thin Bamboo Ske...Shop on Amazon
Then was the tricky part. I glued the horses to the pink striped paper straws with melted candy melts, then stood them up on the sides of the cake. PS – I absolutely adore pretty striped paper straws!!
They werent’ actually touching the cake (as you can see above) but rather free-standing between the top and bottom boards. To get them there, I tilted the horses sideways and turned them back up straight (I’d already cut the straws to the desired length) then used more melted candy melts to glue the discs of fondant to the top and bottom on the end of the straws.
I know that’s a terrible description of how I propped them up, but I hope you get the idea. 🙂 Anyway – that’s when another round of trouble started.
Another problem…
As I tried to stand them up, I’d accidently bump them and a leg would break off. Or a tail would break off. And this happened probably half a dozen times. They were just so fragile.
I was able to “glue” them back together with melted candy melts and I eventually got them all to hold, but gosh… I was on the verge of tears many times with those darn beautiful horses.
Oh and before I forget – the bottom board was covered in matching pink glitter paper, then wrapped in lavender ribbon. I have a tutorial for how I do my boards here.

Okay – all that’s left is the top tier! I cut out the fondant letters with the Funky Alphabet Cutters, then painted them gold with the Edible Paints.
I made the carousel topper the same way I did the ones for the sides, except I added the matching lavender ribbon to the top.
To make sure it would stand, I slid the straw over a bamboo skewer that was long enough to go all the way through the top tier. Easy-peasy! I added the same pearl border to the top tier and it was finished!
And I was so, so happy with it!! Although I will admit to praying for this cake before I sent it on it’s way! Haha.. I was just hoping all of the legs and tails would make it to the party intact 😉
Thanks so much for reading til the end! And as always, if you find that I missed a detail, leave me a comment and I’ll answer if I can!
Happy Caking!
Rose


Beautiful Rose
I’d like to try like myself…but now I’m almost scared to,
Don’t be scared – just give yourself plenty of time and make extra horses 🙂
Could you use horse shaped cookies instead
I considered that, but again, I really wanted all the details from the mold. Plus I was afraid that cookies would break during delivery (but that fear could’ve been unfounded).
Hi Rose!!
First of all, I’m so happy to read that your daughter is doing well, please keep giving us updates!
Then the cake, oh my!! That’s beautiful!! And I really appreciate you telling us how you made it, I really want to try it, in fact, I was looking for the horse mold! Your post is just a sign, now I have to order the mold and make the cake!!
Thank you!!
Awesome! I hope this post helps and your cake turns out great!
The cake is beautiful!!
I am so sorry the horses gave you trouble, but I love that you are willing to share when you have difficulty with things. It makes me feel like I’m not the only one that sometimes struggles with things.
You are definitely not alone! 🙂
Beautiful.
Thanks so much!
So so beautiful!!
Thank you!
Is there anyway to make gum paste shine?
Yes, you can paint it with confectioner’s glaze and it’ll shine!
Thank you so much, I just placed the order!
Rose the cake is so beautiful… I am wondering if you would share how much you charge for a cake like this.
Thank you
Hi Margaret! Email me and I’m happy to share.
I’m awfully curious, too!
It’s absolutely beautiful! I love the detailed horses, the color, everything. It’s always encouraging to read your blog and know that not everything is perfect the first time. Thanks for sharing!
Thank YOU Kate!
Wow! amazing cake designs. every single design is so perfect and will be suitable for all type of occasions. Thank you so much for sharing these designs with us.
Wow!! I made a carousel horse cake a different way… I like yours, too!
I love it and will try to make it. I’ll share pics
Hi Rose. Im in love with the carousel cake. Im very interested in purchasing one from you. Would there be an issue having it shipped to NC? My granddaughters 1st birthday is next Saturday and Id like the cake to arrive on Friday at the latest. Please respond asap before I have to commit to a less appealing cake.The colors are on point as well. We will be using fuschia,turquoise,lavender and yellow as decor.
No – I’m sorry – I can’t ship cakes.
Rose, that cake is so beautiful and detailed. I had never heard of edible paint like the ones you used. If you want to make the bolder color a pastel, do you use white paint or thin with alcohol? Thanks so much!
I think mixing in white would probalby be the best way to change the color.