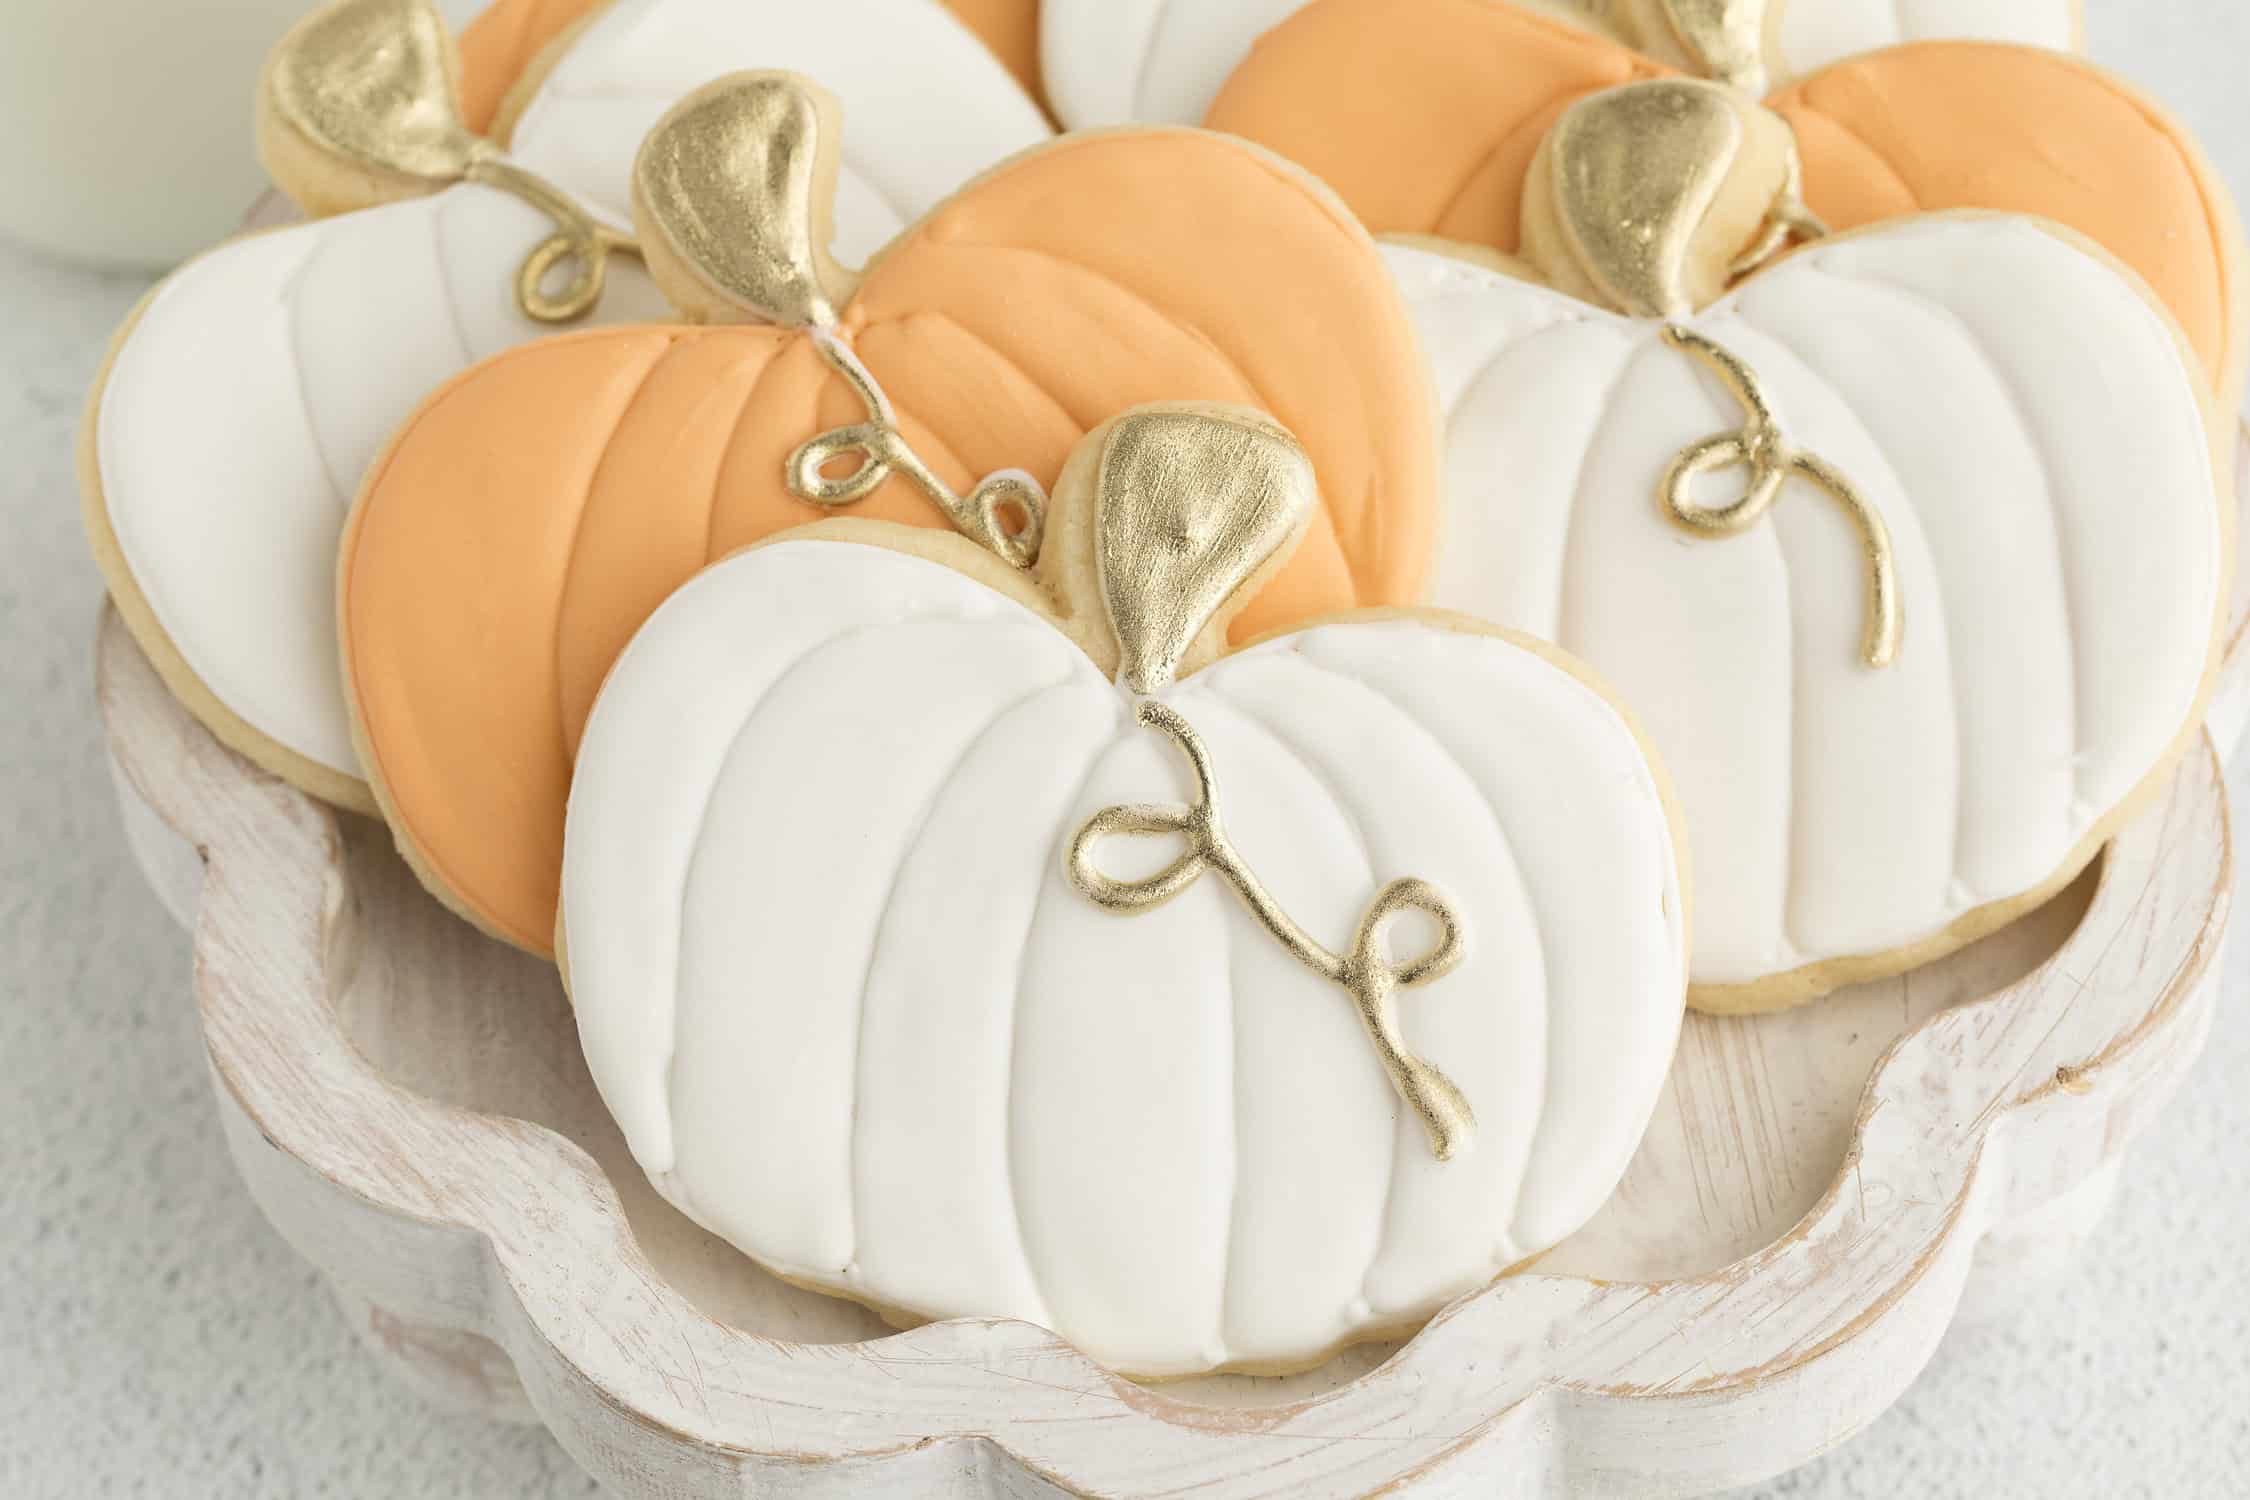
Decorated Pumpkin Shaped Cookies (Sugar Cookies with Royal Icing)
Decorated Pumpkin Shaped Cookies are easy, versatile, and perfect for Fall. Made with my favorite roll-out sugar cookie dough, then decorated with royal icing and a little gold “bling” instead of the traditional green or brown, these are perfect for Fall Festivals, Halloween, Thanksgiving, or simply enjoying with family when the leaves turn.
Decorating Pumpkin Cookies
A couple of years ago, I was invited to be a vendor at a Fairy Tale Fall Event, which featured pumpkins, fall decor, a visit from Cinderella, and more. That’s when I started looking for pumpkin cookie decorating ideas.
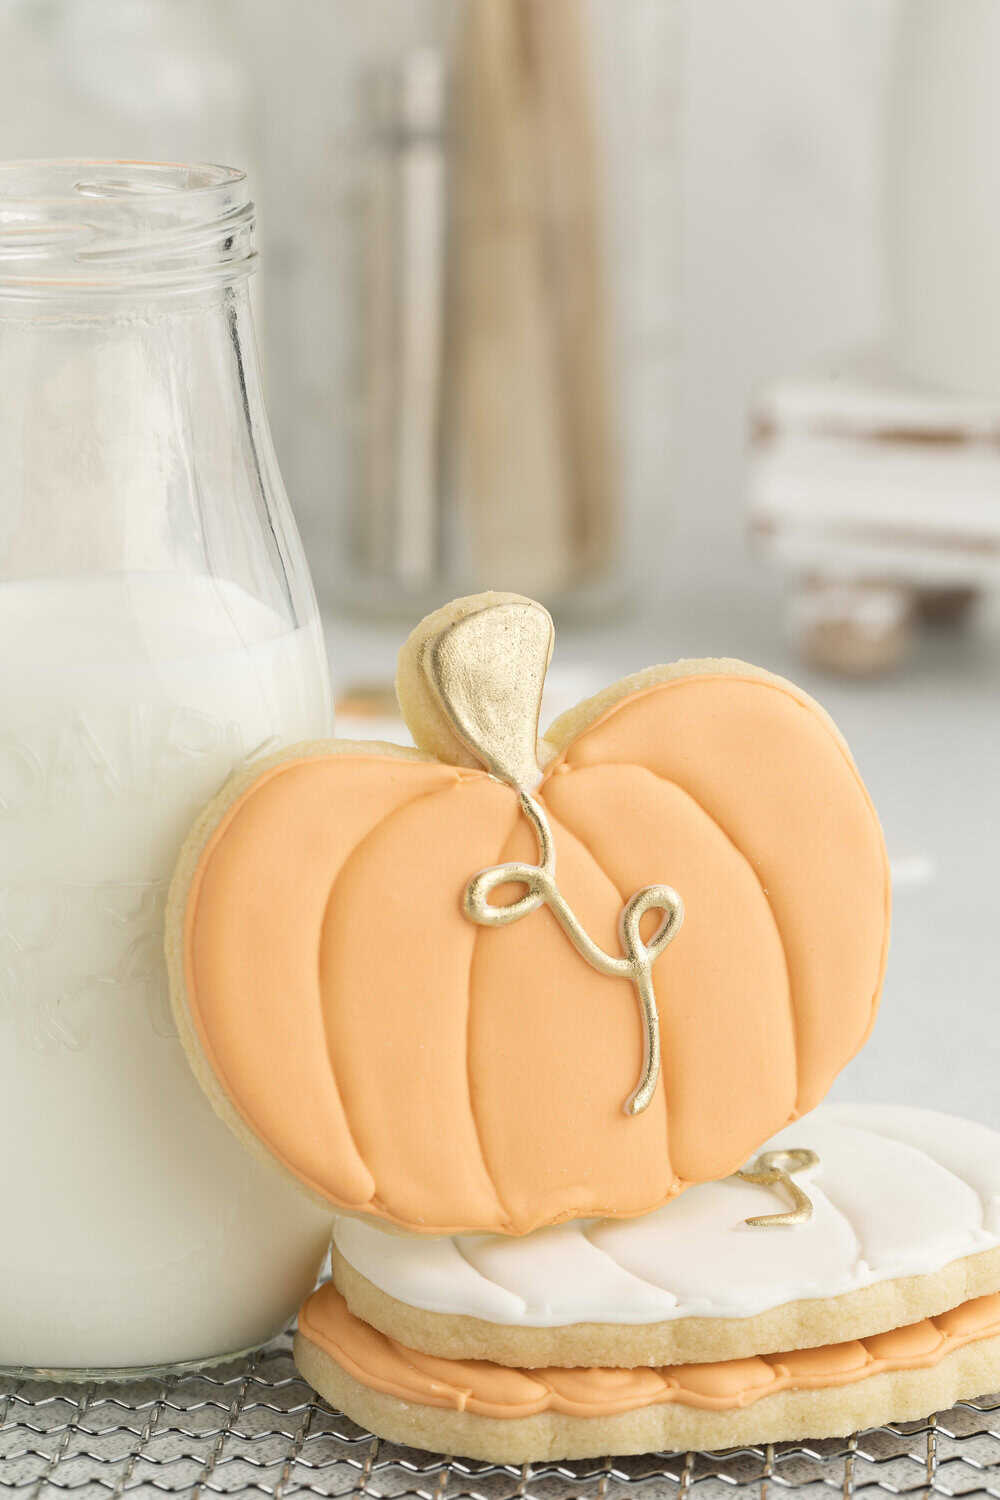
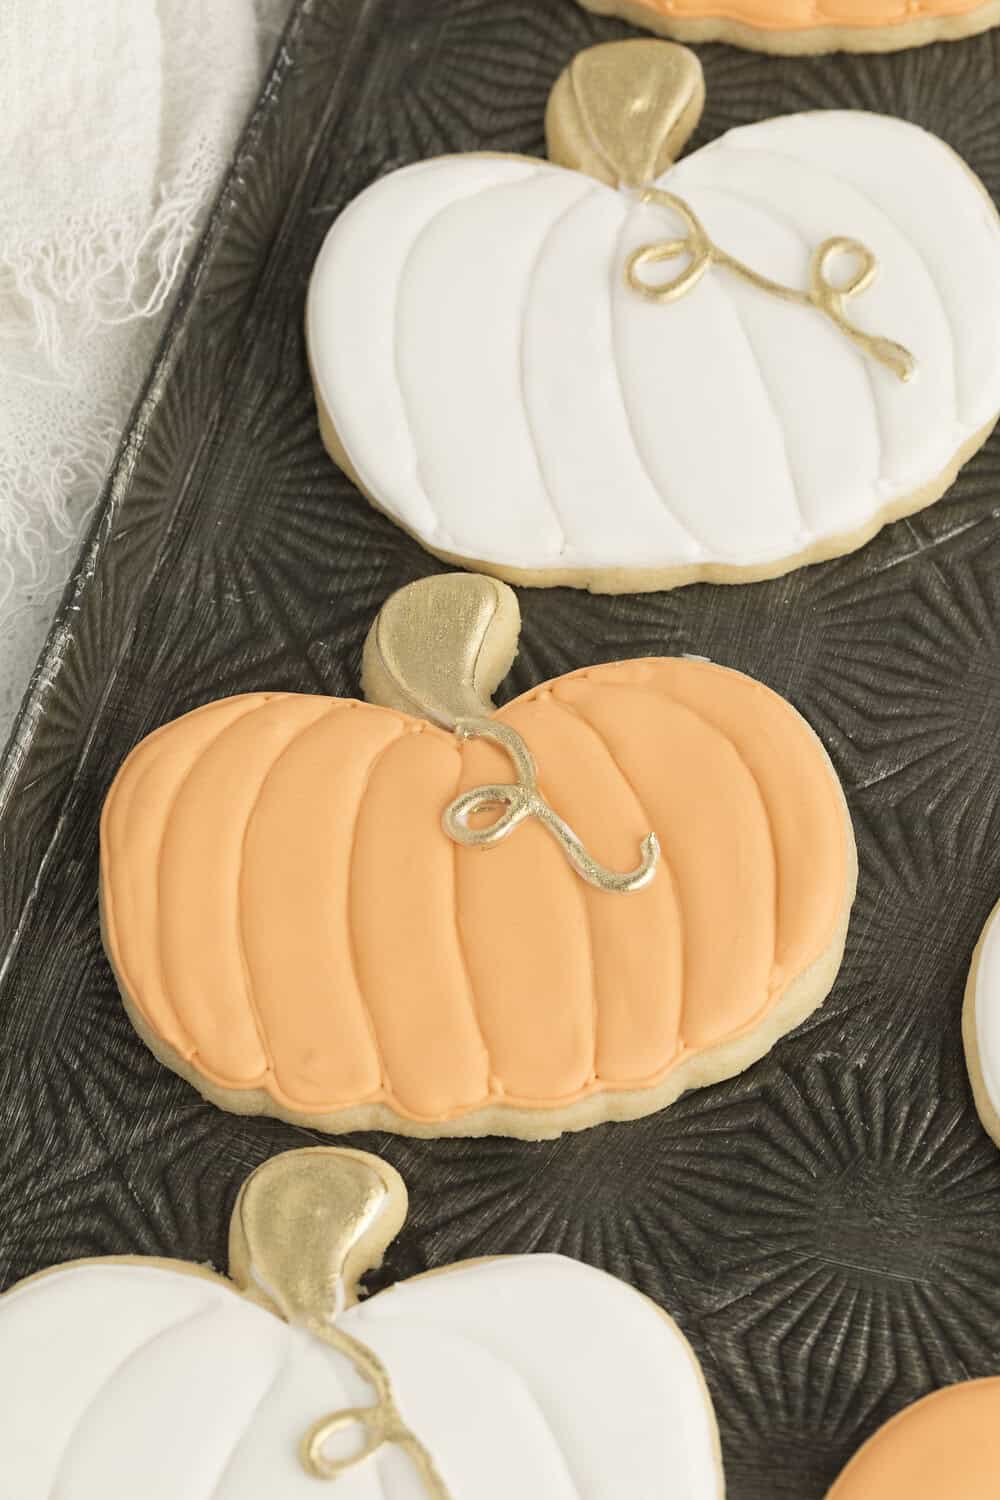
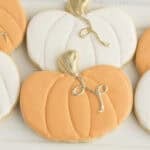
Instead of traditional decorated pumpkin cookies, I opted to make them unique and a little “extra” for all the little girls dressed up to see Cinderella & Prince Charming, so I added a touch of gold and made some of them with white royal icing. The kids and even the moms went crazy for them!
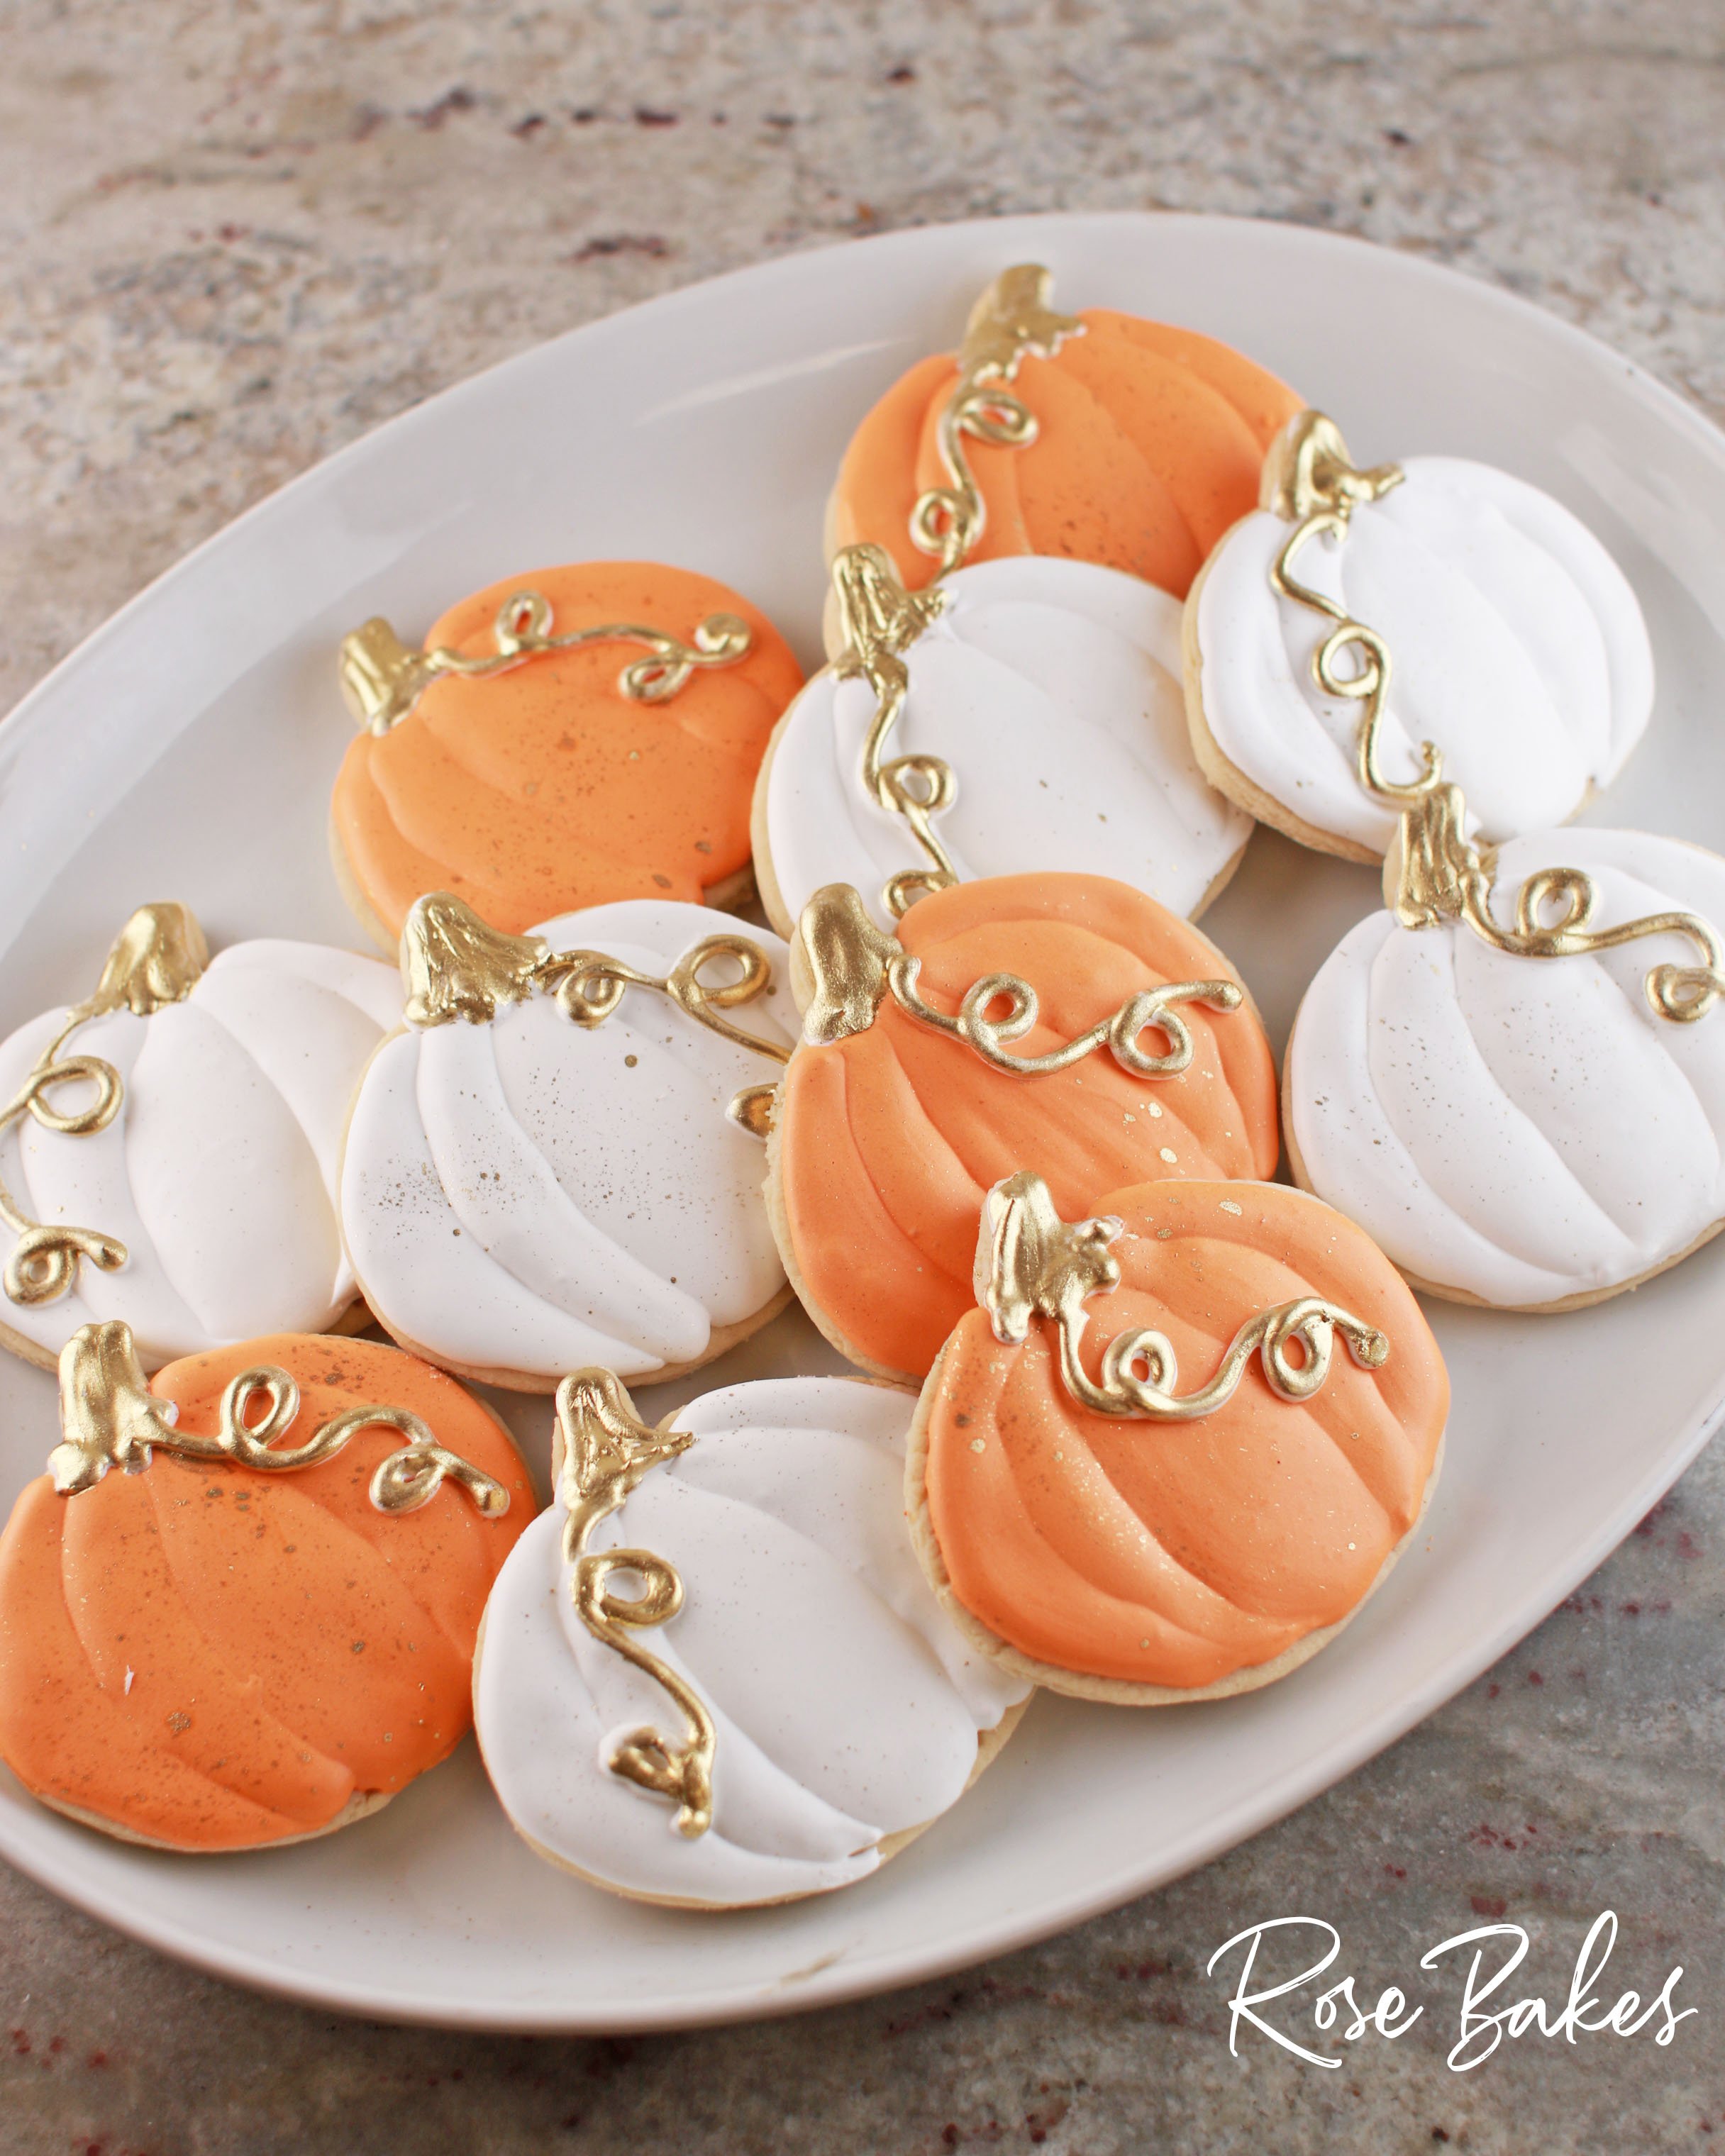
For my original pumpkin shaped cookies, I used a paint brush to also “splatter” some gold onto the pumpkins. This is optional, but I love how they turned out.
Oh, and I completely sold out! They were so popular that I ended up making more to sell to some local clients for various Fall events, and everybody loved them.
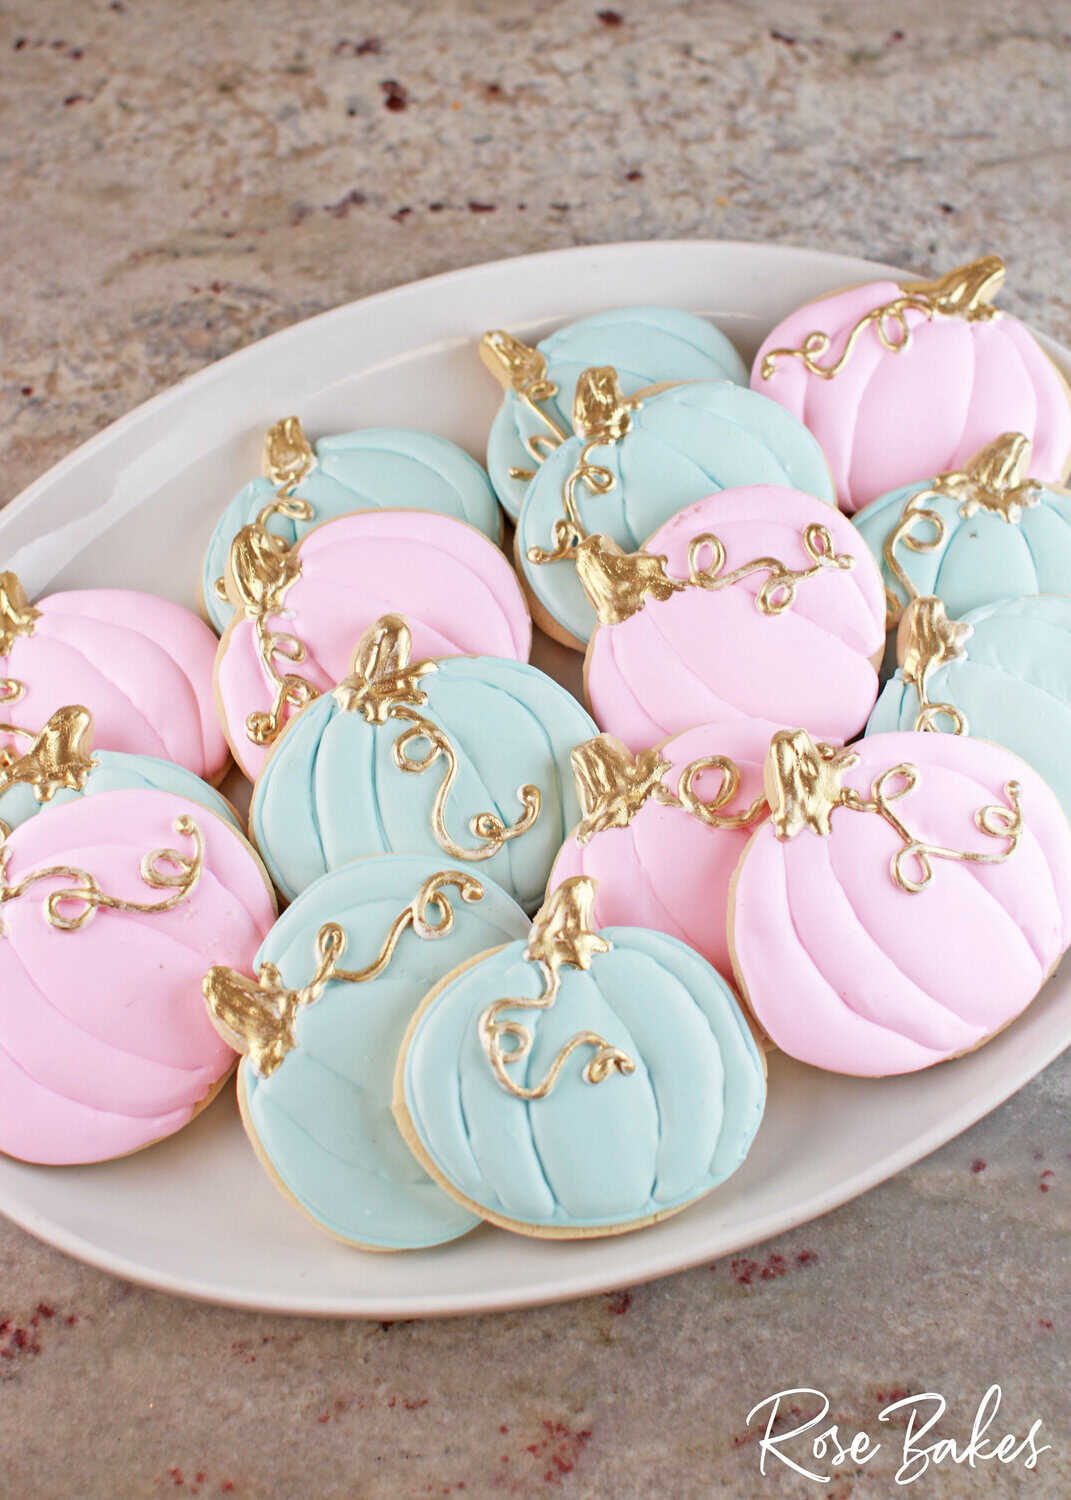
After that, I was asked to make the same adorable pumpkin sugar cookies in pink and blue for a “What Will Our Little Pumpkin Be?” gender reveal party. Again – so much fun and so popular!
A cute little pumpkin cookie is the perfect Fall cookie for school parties, a Thanksgiving dessert table, a trip to the pumpkin patch, or a Cinderella Fairy Tale party.
Tools You’ll Need
- Stand Mixer or Electric Hand Mixer
- Pumpkin Cookie Cutter. Or cookie cutters… if you want to make different shapes and sizes. I think mini pumpkins would be adorable!
- Rolling pin
- Parchment Paper
- Baking or Cookie Sheet
- Wire Rack
- Piping bag or tipless bags for decorating with royal icing
- Toothpicks
Ingredients
You can find all the ingredients for both the cookie dough and royal icing at your local grocery store.
The only ingredient on your shopping list that may not be in every grocery store is meringue powder. However, it can usually be found at big-box stores and hobby supply stores. And of course, in a million places online, but my favorite is Country Kitchen Sweetart.

Cookie Dough
This is my go-to recipe for all cut-out cookies. It’s simple, delicious and
- Salted Butter, at room temperature
- Sugar
- Salt
- Large Eggs: Whole Egg + Egg Yolk
- Vanilla Extract
- Almond Extract
- All-purpose Flour
Royal Icing
I list my favorite meringue powder brands below. Everything else can easily be found at any local grocery store.
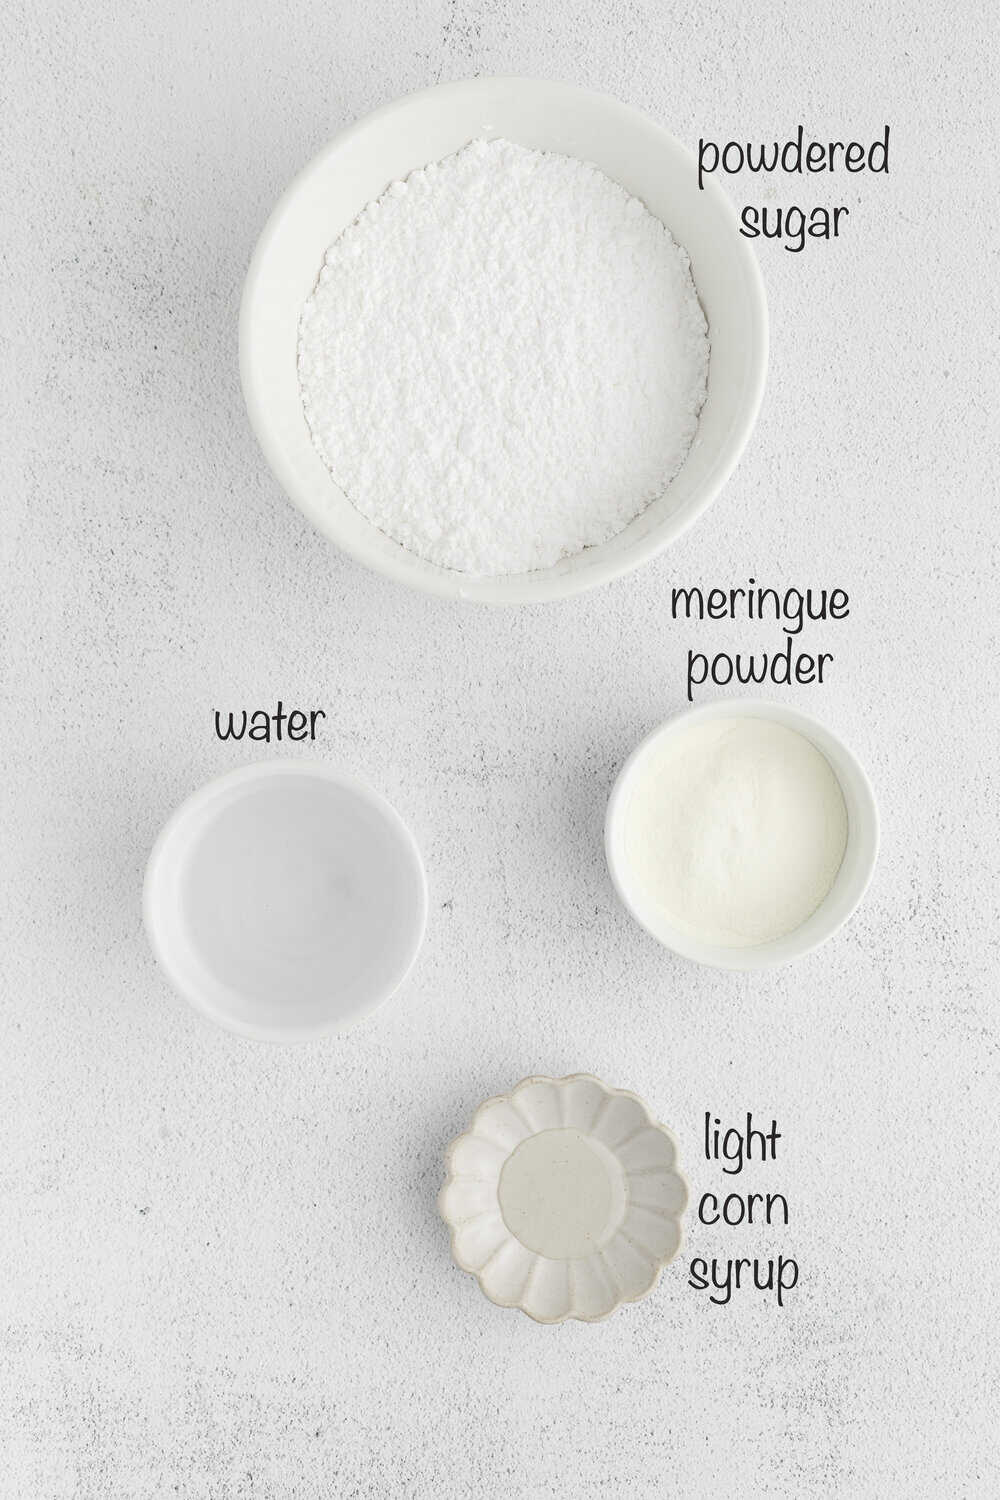
- Meringue Powder*
- Water
- Powdered Sugar
- Light Corn Syrup
- Almond Extract
- Orange Food Coloring, if desired (gel color is much preferred!)
- Edible Gold Paint (or Edible Gold Dust mixed with Vodka or Lemon Extract)
*Note: I prefer Americolor Meringue Powder or CK Products Meringue Powder.
Substitutions
Extracts. The easist substittution for these cookies is changing up the extract flavor that you use. I prefer almond extract in both the cookie dough and the icing, but you could also have a classic sugar cookie recipe with vanilla extract. If you want to really change things up, you could use a cinnamon extract or pumpkin spice emulsion to make pumpkin spice cookies!
Icing/Frosting. While this is an easy royal icing recipe, I understand if you’re intimidated to use it. So another option would be to use vanilla buttercream frosting or cream cheese frosting. This is my favorite frosting recipe.
You can still pipe pretty designs – but they will not dry like royal icing so you won’t be able to stack them or package them in bags.
Cookie Recipe. If this recipe doesn’t appeal to you for whatever reason, here are a couple of other options:
- No Chill Cut-Out Sugar Cookies
- Classic Sugar Cookies
- or you could make Chocolate Pumpkin Cookies
How to Decorate Pumpkin Cookies
For beginners, I’m going to break this recipe/tutorial down into three sections to explain each step thoroughly. First, let’s bake the Pumpkin Cookies! This cookie recipe is the same recipe I use for almost all of my cookie baking.
I’ve recently started using this no-chill recipe pretty often too, but I’m still a little partial to my original recipe.
Making Sugar Cookie Dough
- In a large bowl (or the bowl of an electric mixer), use an electric mixer on medium speed to cream together the butter, sugar and salt until light and fluffy
- Next add the egg yolk, beat it some more, then add the whole egg. Mix in the vanilla and almond.
- Add flour and beat on low until well-combined. Do not overbeat. The dough will be sticky!
- Divide the dough in half and wrap in plastic wrap. Refrigerate for at least an hour, but I usually do mine a day or two beforehand.


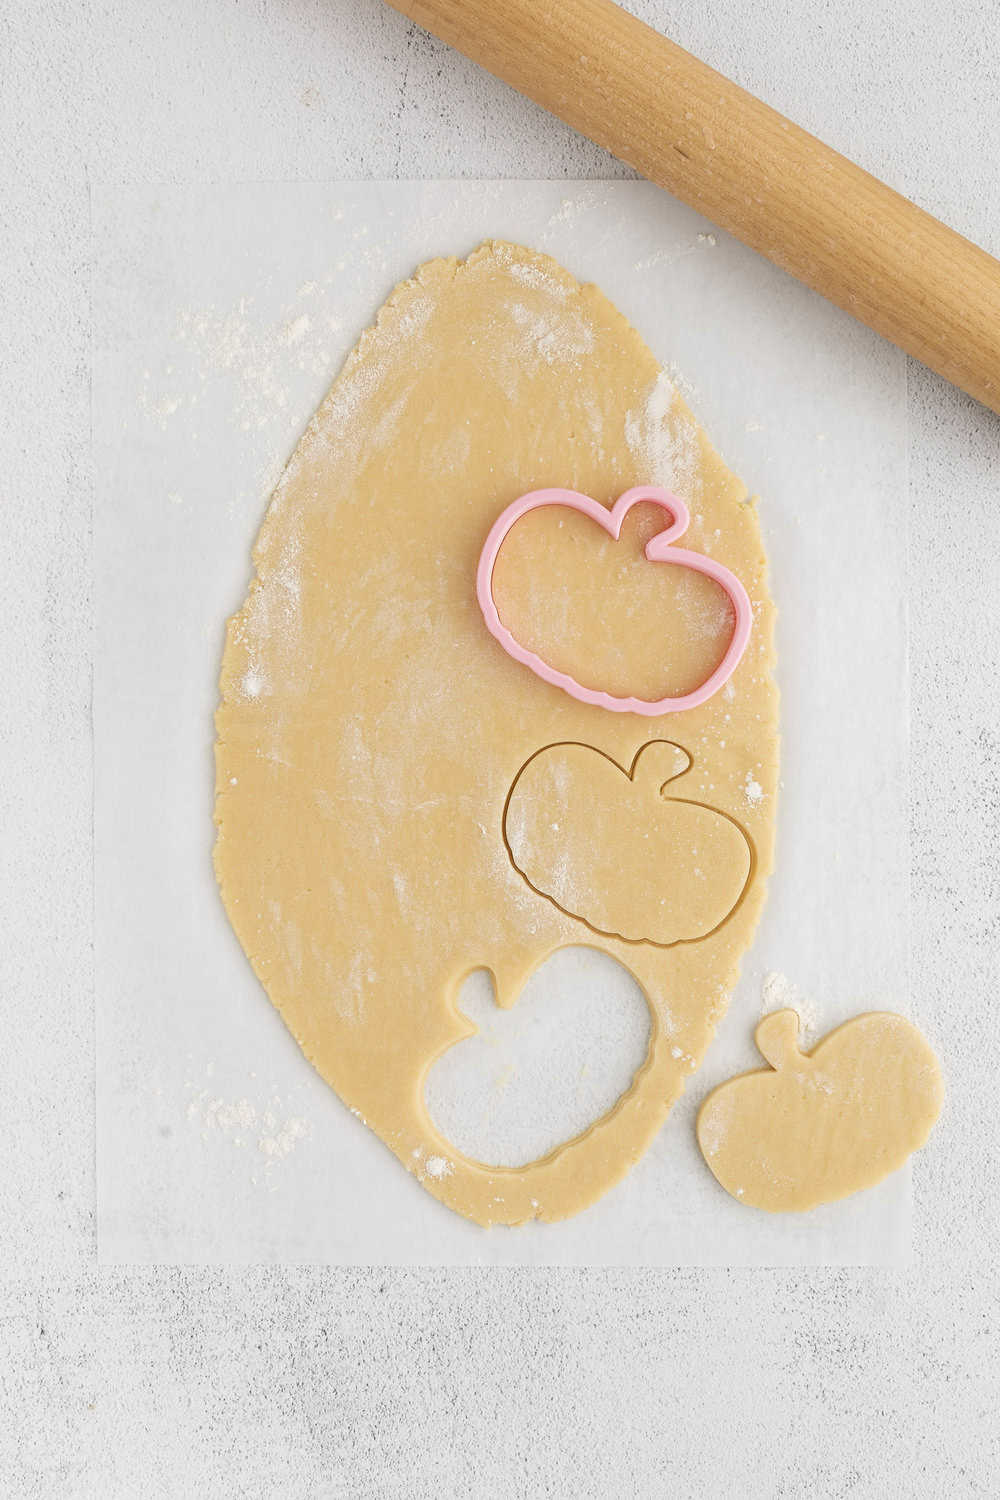
Rolling Out & Baking Cutout Cookies
- When you’re ready to bake, allow the dough to come to room temp for at least 10 minutes, then knead it until it returns to a smooth texture.
- Preheat over to 375° F and line a baking sheet with a piece of parchment paper.
- Roll the dough to ¼ inch thickness on a lightly floured surface.
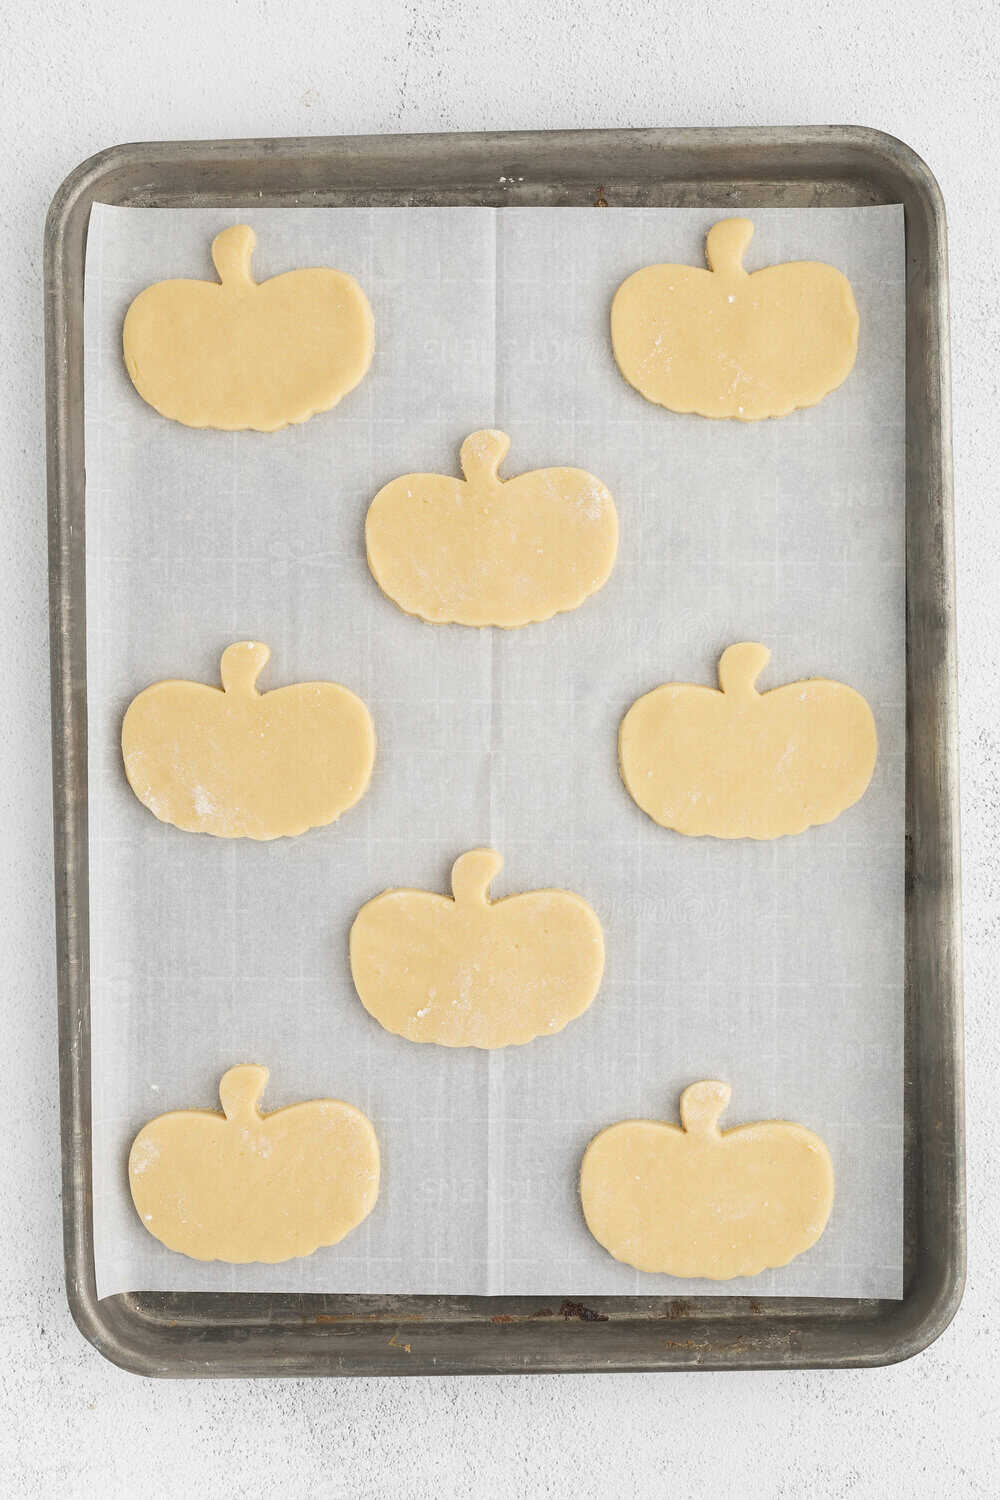
- Continue sprinkling flour when needed to prevent dough from sticking. Use your pumpkin cutter to cut the cookies into pumpkins, then place them on a prepared baking sheet lined with parchment paper.
- Don’t skip the chilling time! Stick the cookies (on the sheets) back in the freezer for exactly 10 minutes to allow them to re-chill. This will keep your cookies perfectly shaped! When they’re chilled, bake for 8-10 minutes (depending on size) for the perfect cookie!
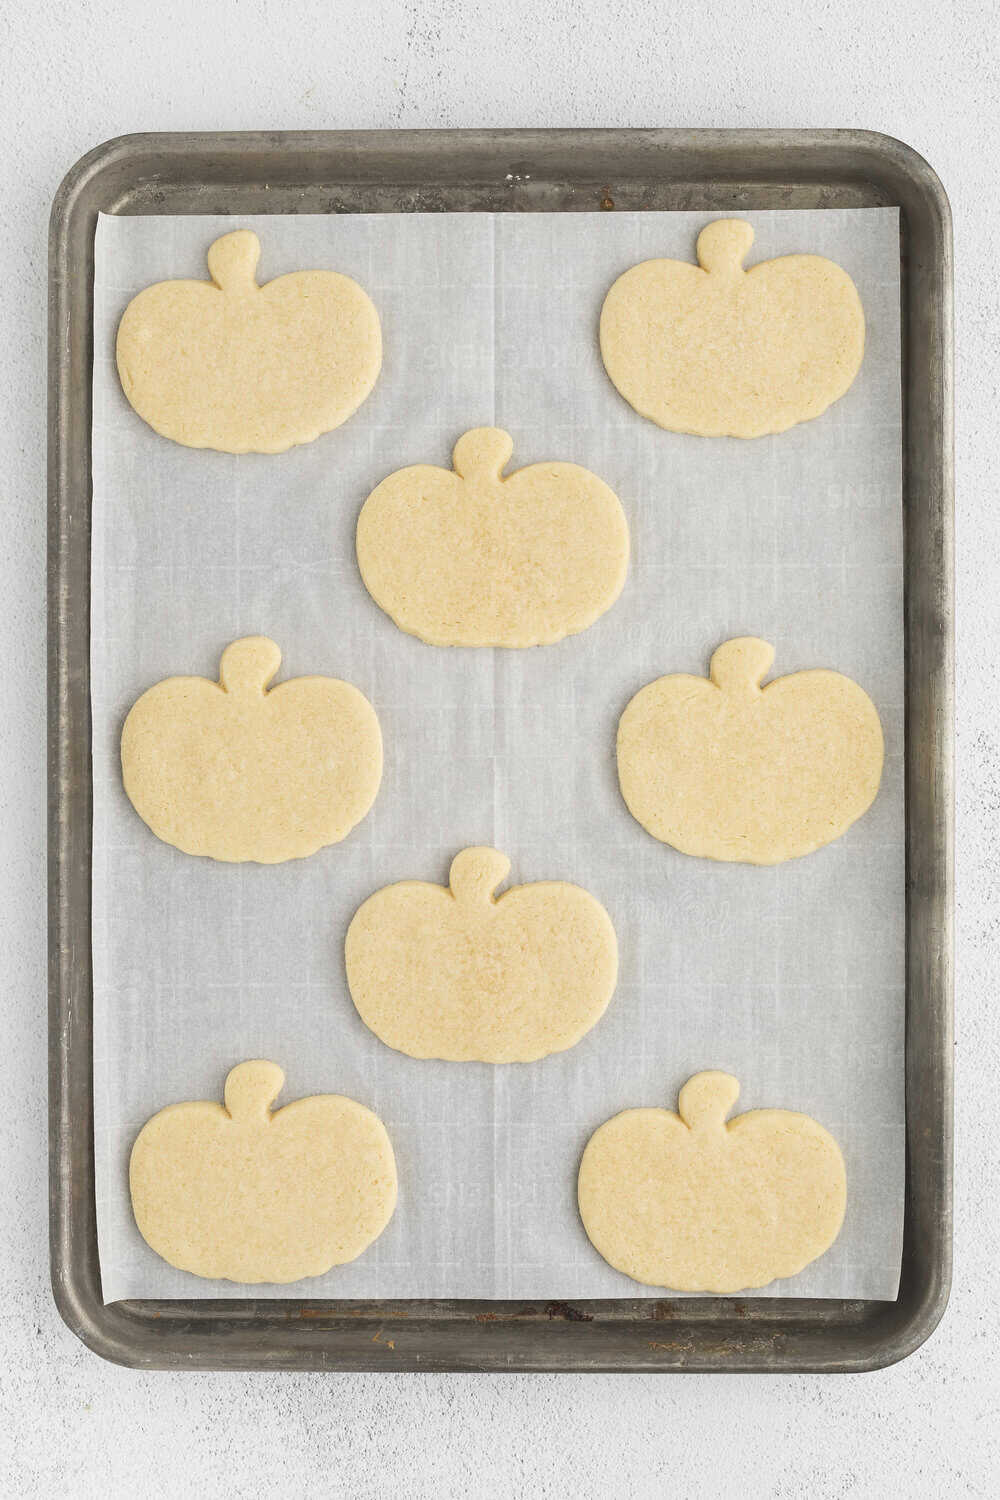
- Allow the baked pumpkin cutout cookies to rest on the cookie sheet for at least 5 minutes, then move to a cooling rack to completely cool.
- If you like the flavor of a golden brown cookie with slightly crunchy edges, you can let these bake an extra minute or two. If you prefer perfectly cooked cookies, you can watch them and take them out as soon as they’re baked before browning. I rarely get browned edges with these cutout cookies – they hold their shape, taste yummy, and are not crunchy! After experimenting with multiple recipes, this has to be my favorite!
How to Make Royal Icing
- Add the meringue powder and 3 1/2 tablespoons of water in a mixing bowl.
- Beat with a hand mixer until it’s foamy (or the whisk attachment in a stand mixer).
- Add in the confectioners’ sugar and mix on low speed until combined. I should note here that I used Great Value powdered sugar from Walmart and I never sift it. However, I’ve bought other brands that did need sifting. If you’re unsure – sift!!
- Add the corn syrup. Add the almond extract, if desired. Adding a little corn syrup adds shine to the frosting – don’t skip that step!
- Increase speed to high and beat for around 5 minutes, until you get stiff glossy peaks.
- Do not overbeat!
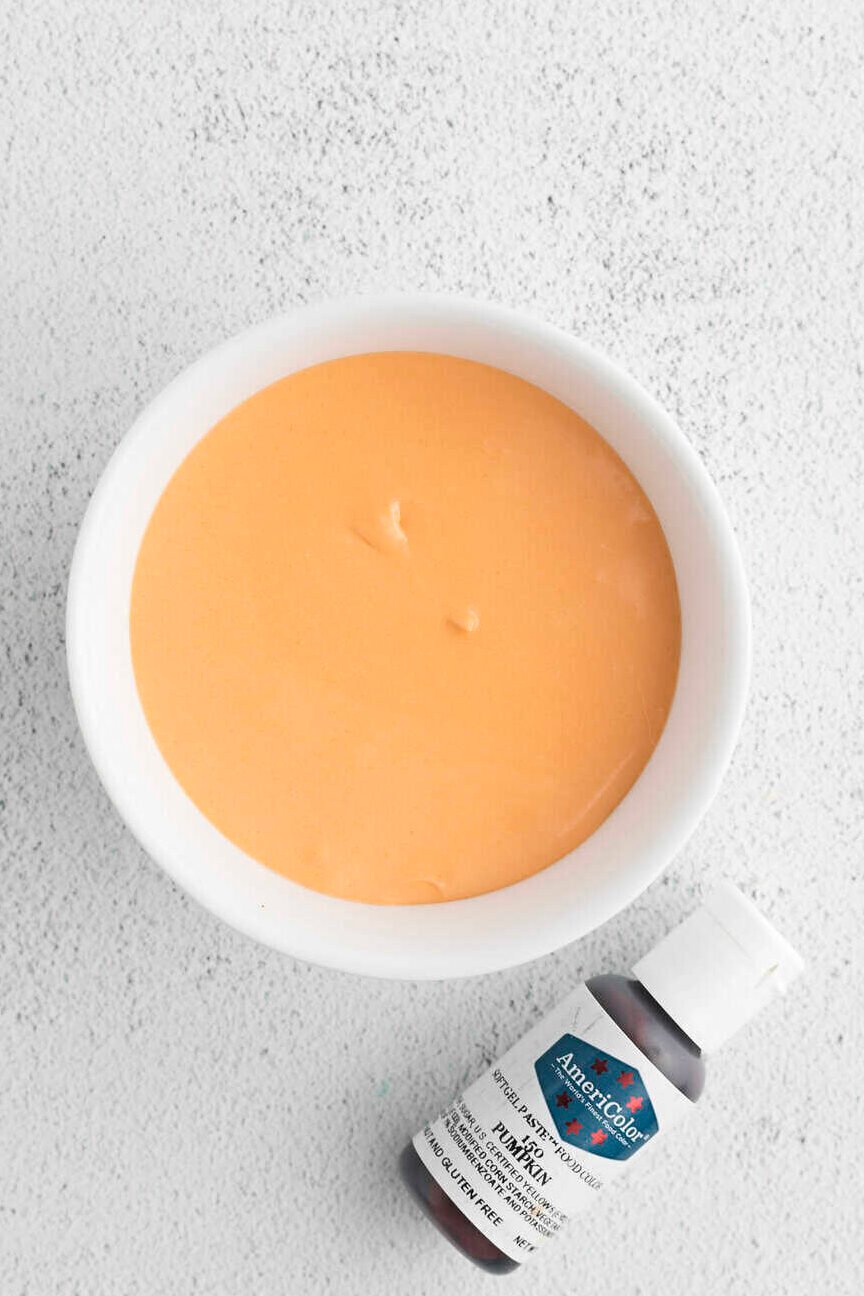
- If you want colors other than white royal icing, add a drop or two of gel food coloring and mix until you get the desired color. Keep in mind that the icing color will darken as the icing dries and hardens so don’t go overboard.
- Use immediately or cover tightly with plastic wrap – make sure the plastic wrap touches the icing or the icing will harden!


Flooding Icing vs. Piping Icing
Flooding Icing (thinner icing): Thinner and more fluid, used to fill in spaces or cover large areas after outlining. It flows smoothly but retains its shape. Flooding icing is made by adding more drops of water to royal icing to achieve a runnier, more spreadable consistency that flows easily when piped.
Piping Icing (thicker icing): For this second consistency, you want thick and firm icing, used for outlining and detailed designs on cookies. It holds its shape well. Typically, piping icing is made by adding less water to royal icing, resulting in a stiffer, more structured texture.
How to Pipe Royal Icing Pumpkin Cookies (Cookie Tutorial)
I will give you very specific instructions to make these pumpkin decorated cookies, but obviously, you can change this up depending on how you want to do your cookies!
Want simple pumpkin cookies? Skip the gold and go easy. More or less colors? Go for it. More gold or no gold? Totally up to you!
I want this to be a fun recipe for you so don’t stress if your first batch is not perfect! Your second batch will be better than your first, and so on.
The more you make, the better you’ll get and beautiful result or not, you’ll have delicious cookies to eat!.
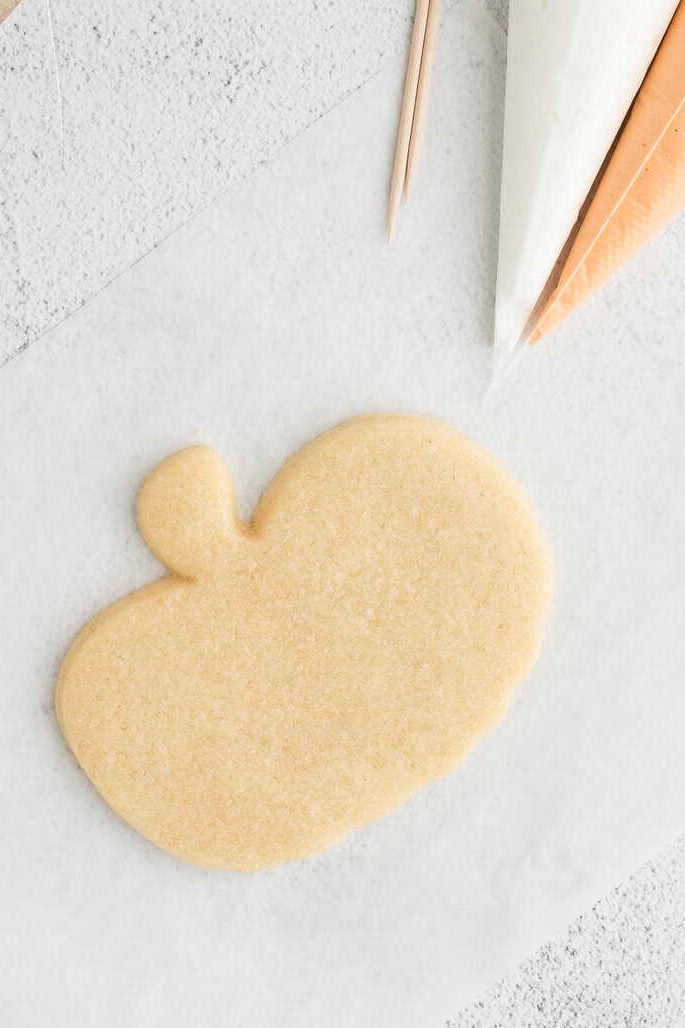
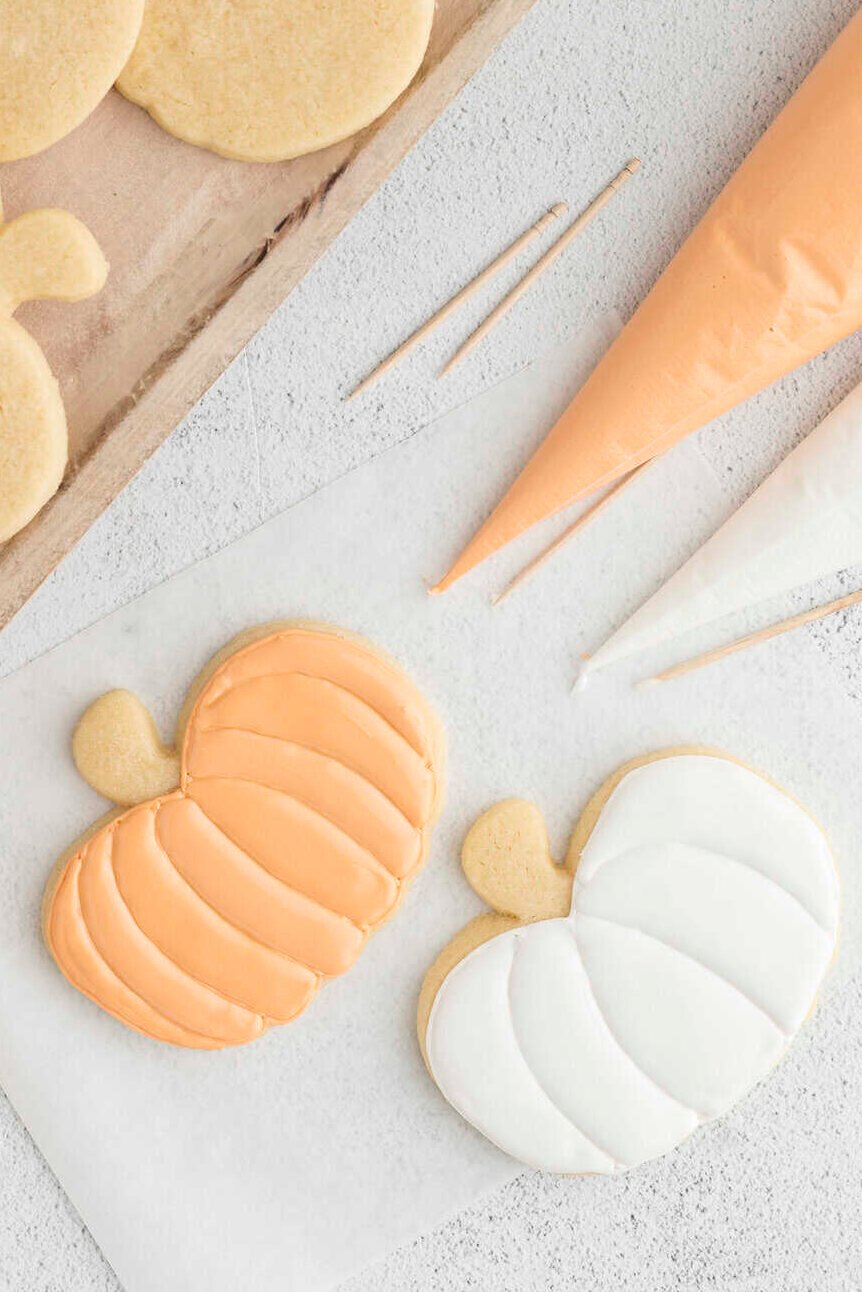
- The easiest thing to do with these cookies is use tipless bags. You can snip off the tiniest of pieces from the bottom of the bag and it acts like a round piping tip. If you prefer, take a piping bag and add a coupler and small round tip. I usually choose a #1 tip for piping and a #3 or #4 for flooding..
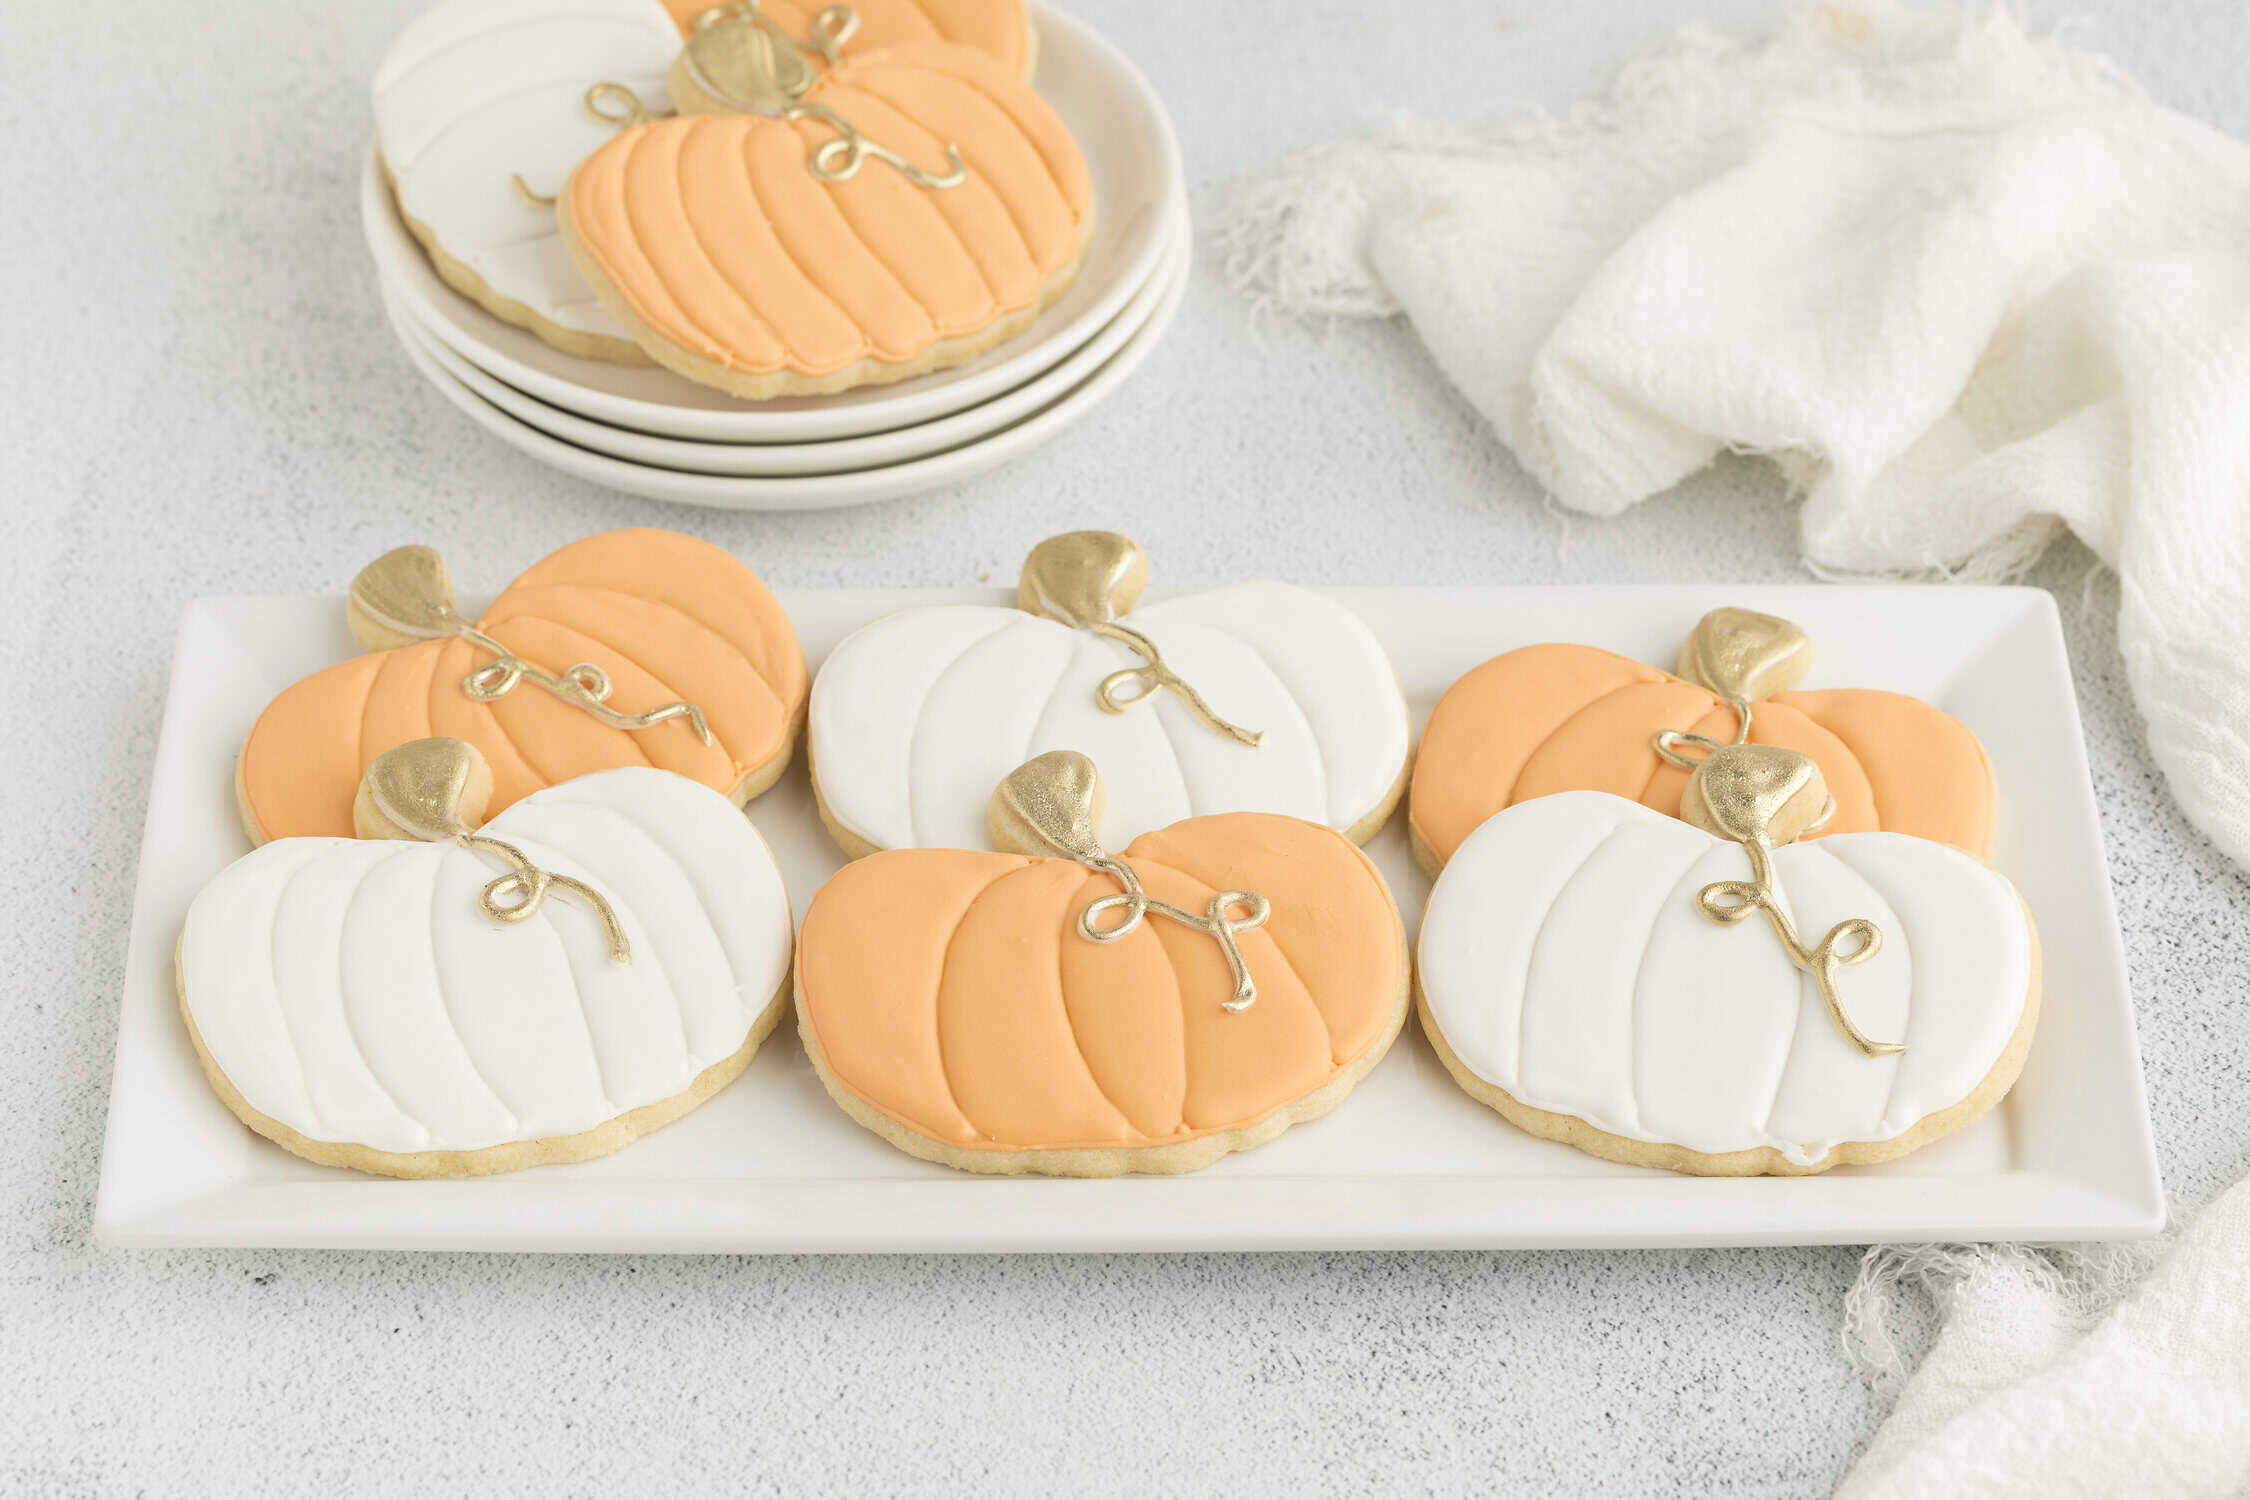
- Separate the icing into two bowls. Keep one white, add a couple of drops of orange gel coloring to the other. I specifically used Americolor Pumpkin, but go with any shade you like!
- For both white and orange icing, you’ll need piping-consistency icing and flooding-consistency icing.
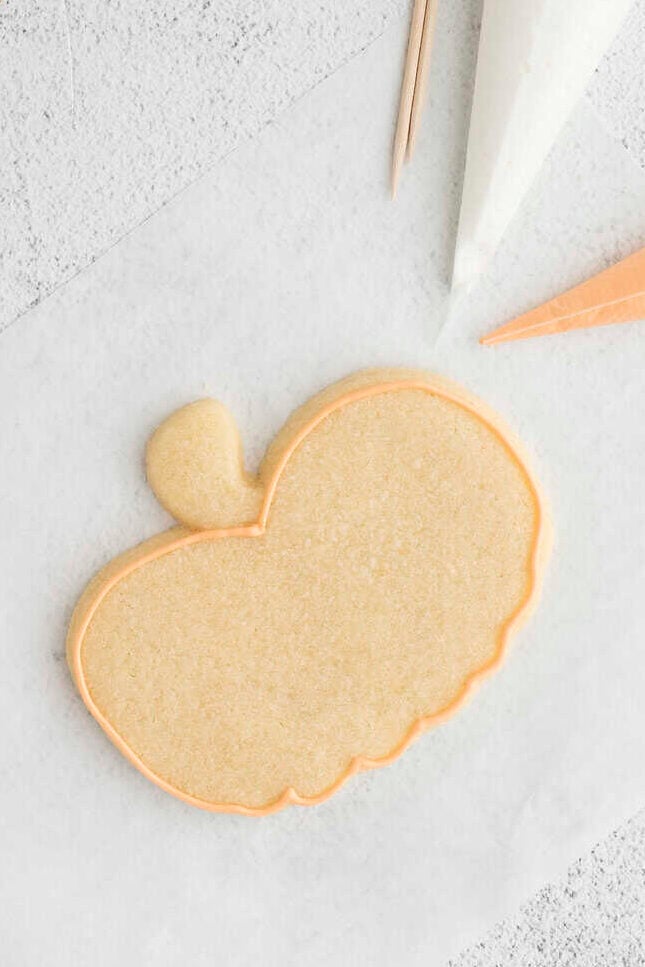
- Using thick piping icing, outline the edges of the cookies with the color of your choice. Allow the outline to dry for 3-4 minutes.
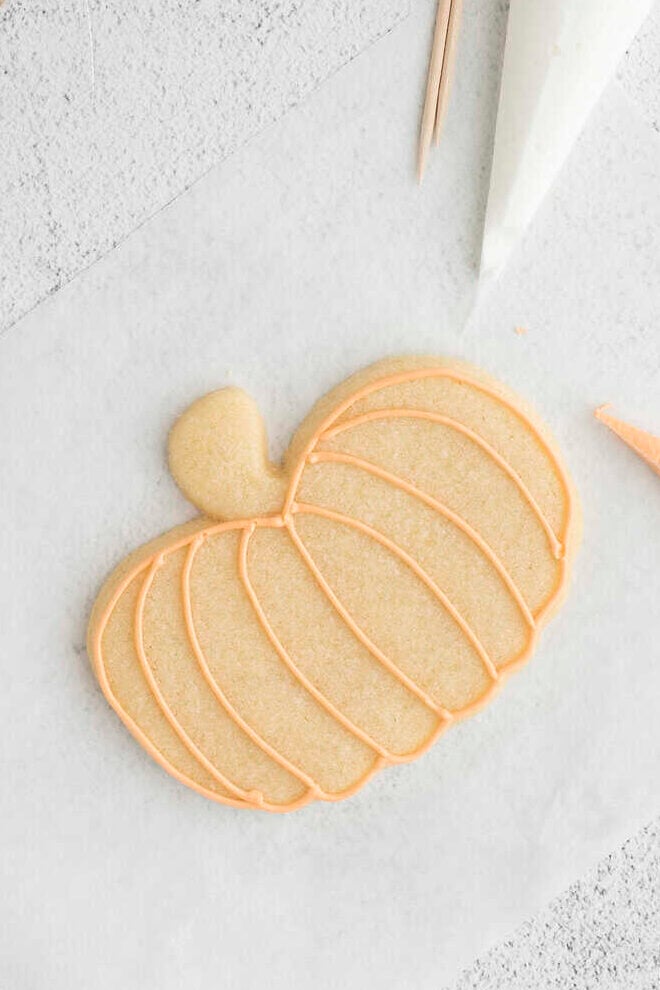
- With the same thick icing, draw curved lines from top to bottom to create the pumpkin’s sections. You can do just a few sections or several – choose the look you like best. Allow the lines to dry for 3–4 minutes.Note: I did a few different ones, so you can choose which pumpkin look you like best. Allow this to dry for 3-4 minutes.
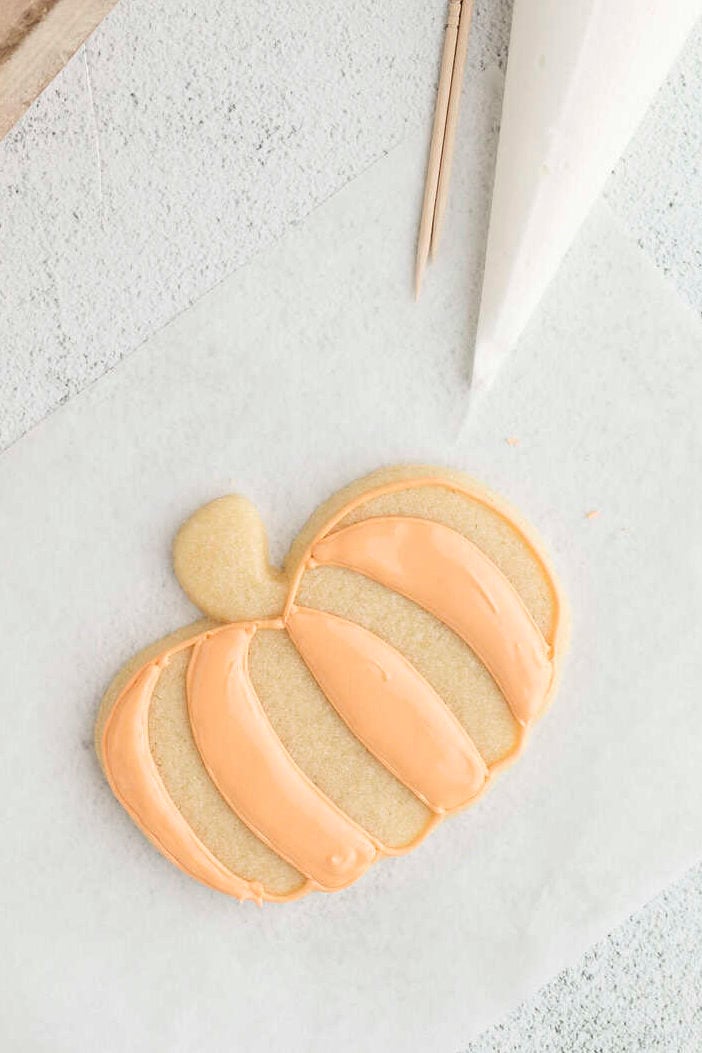
- Use flood icing to fill in every other section of the pumpkin. Let the icing dry for 5–10 minutes, or until it can be gently touched without sticking to your finger.
- To save time, you can outline several cookies first, then add the pumpkin section lines, and then start flooding. By the time you circle back, the earlier cookies will have had time to dry.
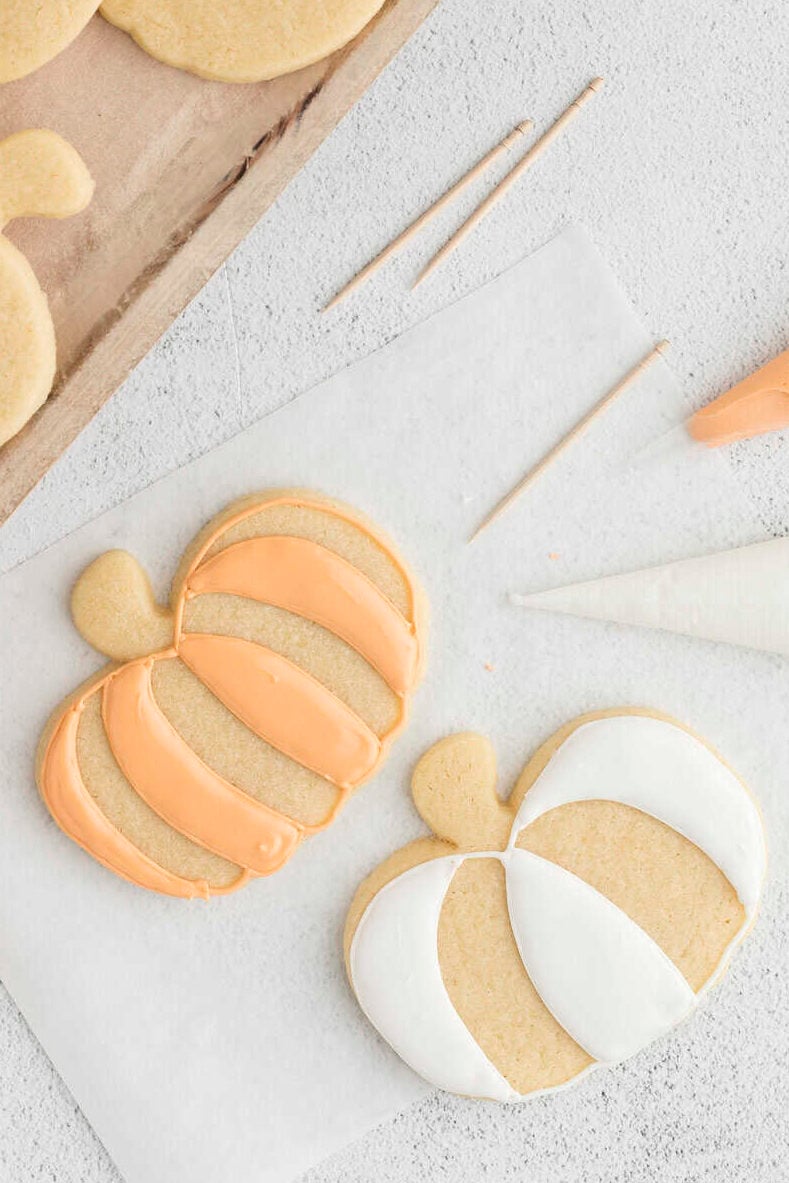
- Once the first set of sections is dry, flood the empty sections with icing to finish filling in the pumpkin. Allow them to dry for 15-20 minutes. Use a scribe tool or toothpicks to pop any bubbles.
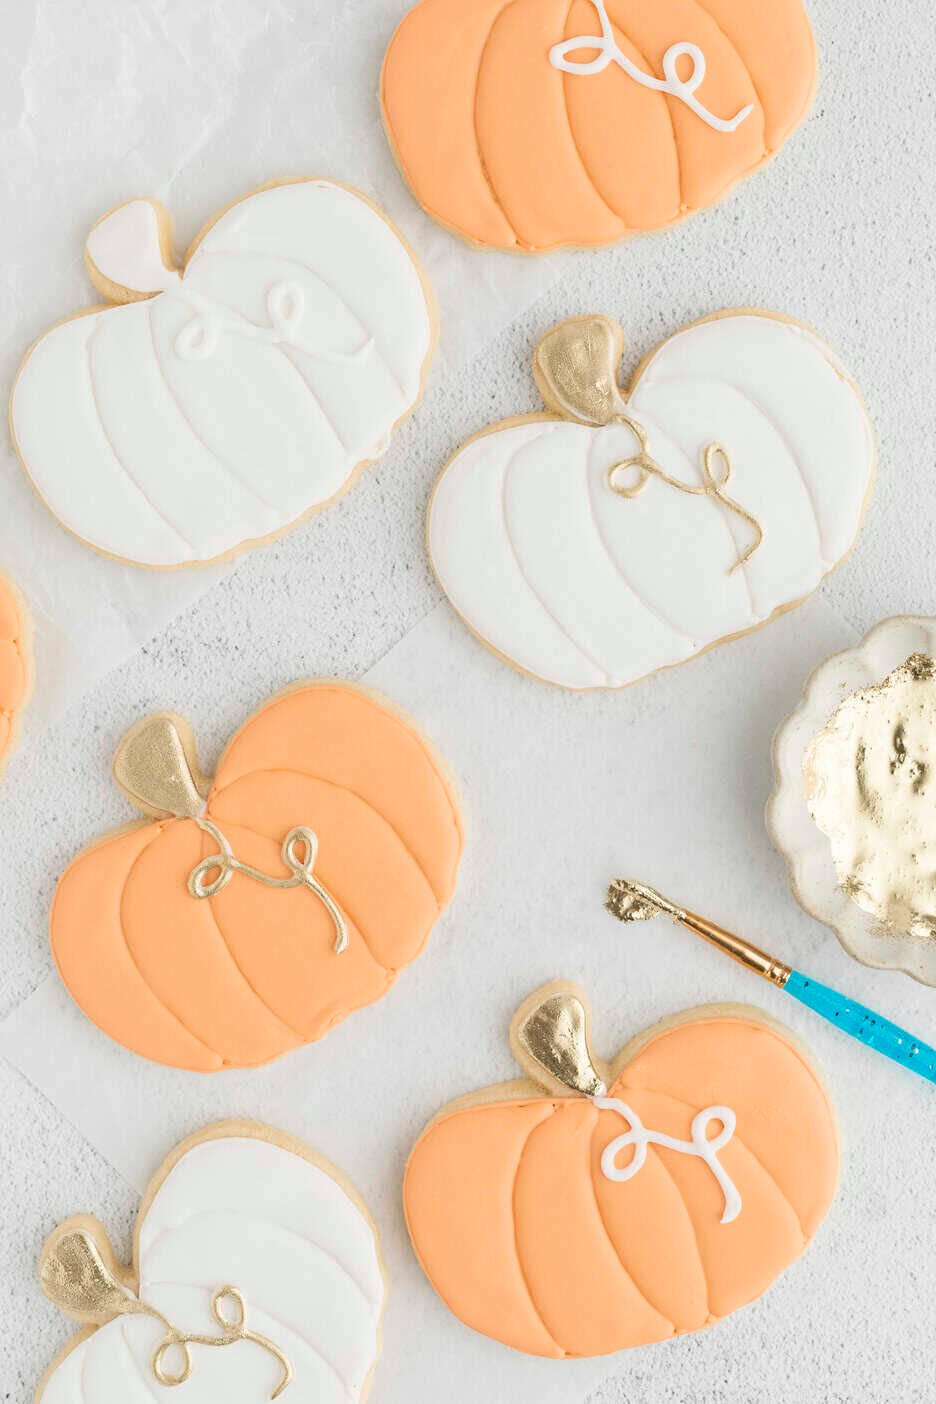
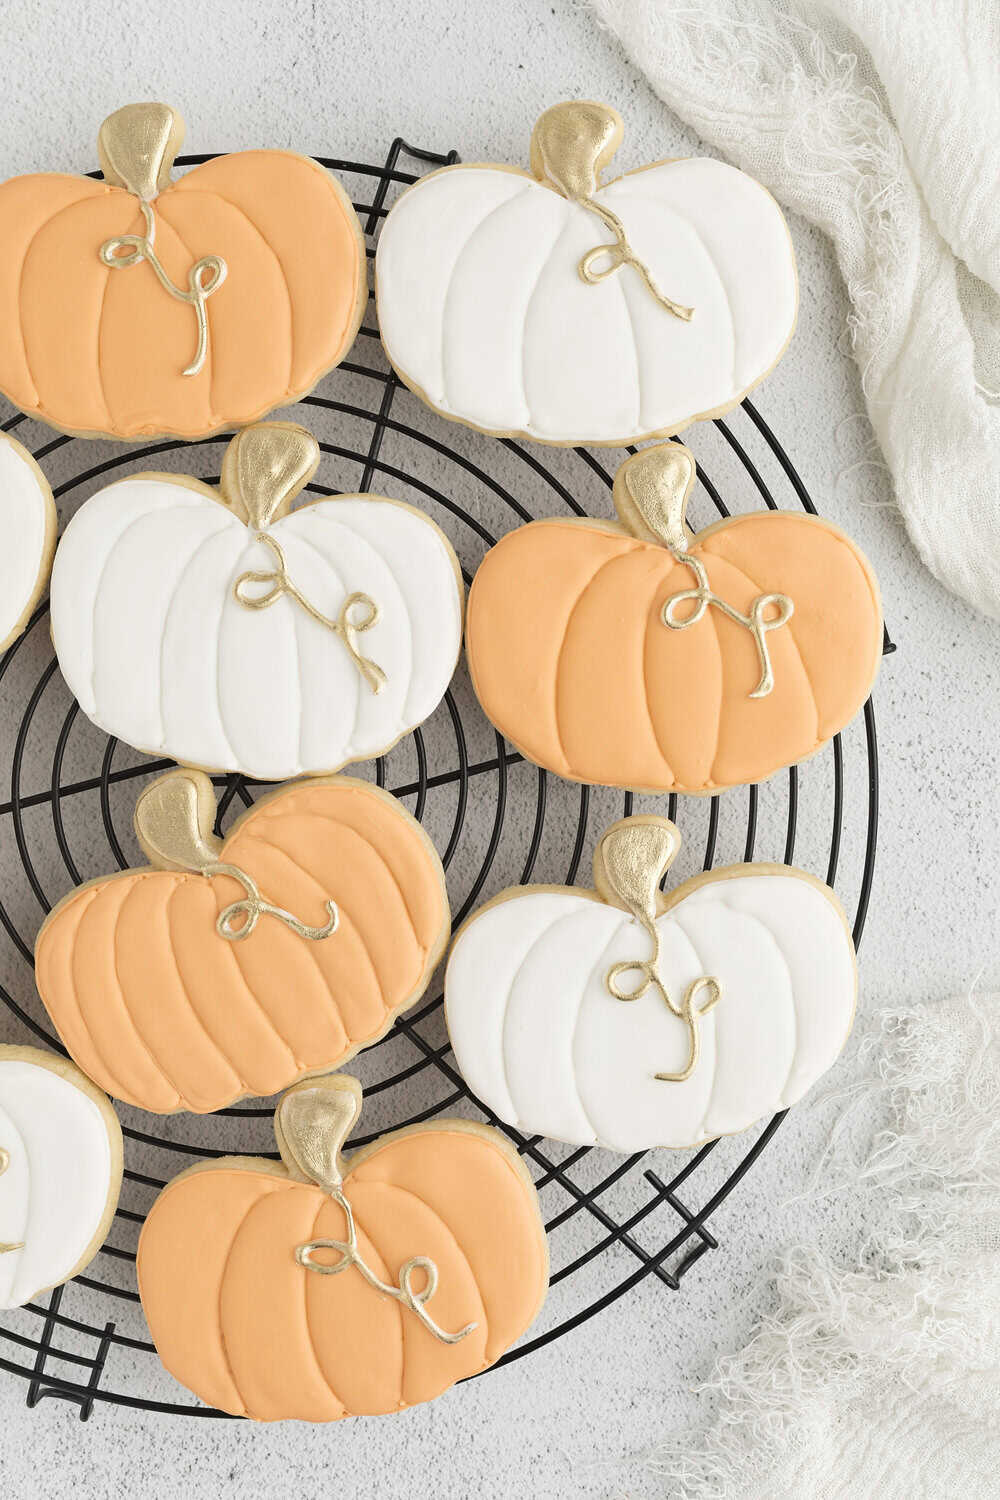
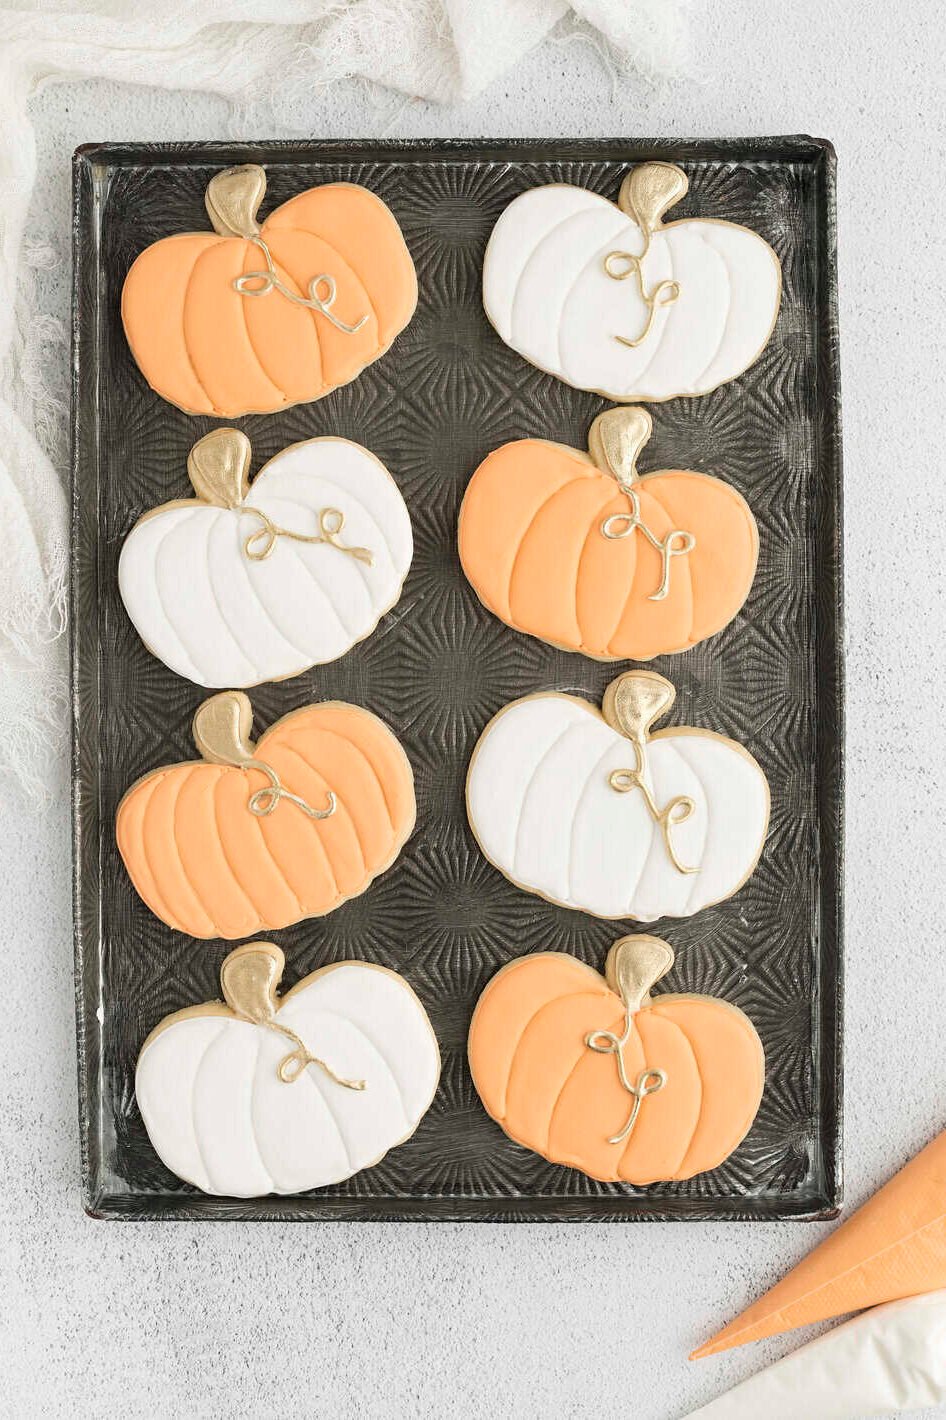
- Use thick white icing to fill in all the stems on the pumpkin top and pipe the curly vines on top of the pumpkins. These will need to dry for at least 8 hours (or overnight) before you paint on them.
Note: since I painted my stems and vines gold, it didn’t really matter what color the icing was underneath. If you choose to use brown icing or green icing and not paint, then you’d obviously use that for the stem and/or vines.
- Paint the stems and vines with the gold paint. Allow it to dry for at least an hour before stacking or packaging.
Snap a picture of your cookies the first time you make these – then practice for a while and snap a picture of later cookies to compare! I promise you will improve with time.
Now, it’s time to ENJOY the fruits of your labor!
Pro Tips
- Use a marker! If you’re nervous about freehand piping the sections on the pumpkin cookies, you could use an edible marker to draw the lines onto the cookies first.
- Pumpkin Halloween Cookies: For Halloween cookie decorating, you could make some black icing and draw a Jack-O-Lantern face on the cookies.
Storage Tips
Store decorated cookies at room temperature in an airtight container once the icing is dry, and they will keep for several days. For longer storage, wrap them in pairs and freeze in a rigid container. Thaw at room temperature; do not thaw in the refrigerator, as condensation can damage the icing.
These homemade pumpkin sugar cookies are a fun project for fall!
More Fun Recipes & Tutorials
Decorated Pumpkin Shaped Cookies (Sugar Cookies with Royal Icing)
Description
Decorated Pumpkin Shaped Cookies are easy, versatile, and perfect for Fall. Made with my favorite roll-out sugar cookie dough, then decorated with royal icing and a little gold “bling” instead of the traditional green or brown, these are perfect for Fall Festivals, Halloween, Thanksgiving, or simply enjoying with family when the leaves turn.
Ingredients
Cookie Ingredients
- 1 cup (2 sticks) Salted Butter, at room temperature
- 1 cup Sugar
- 1/2 teaspoon Salt
- 1 Large Whole Egg
- 1 Large Egg Yolk
- 3/4 teaspoon Vanilla Extract
- 1/2 teaspoon Almond Extract
- 2 1/2 cups All-purpose Flour, sifted
Royal Icing Ingredients
- 2 Tablespoons Meringue Powder
- 3 1/2 Tablespoons of 1/2 Water
- 8 ounces Powdered Sugar (by weight, sifted if needed)
- 1/4 – 1/2 Light Corn Syrup
- A few drops of Almond Extract
- Gel Food Coloring, if desired
Decorations (optional)
- Sanding Sugar
- Sparkling Sugar
- Sprinkles
Instructions
Making Sugar Cookie Dough
- In a large bowl (or the bowl of a stand mixer), use an electric mixer on medium speed to cream together the butter, sugar and salt until light and fluffy
- Next add the egg yolk, beat it some more, then add the whole egg. Mix in the vanilla and almond.
- Add flour and beat on low until well-combined. Do not overbeat. The dough will be sticky!
- Divide the dough in half and wrap in plastic wrap. Refrigerate for at least an hour, but I usually do mine the day before.
Rolling Out & Baking Cutout Cookies
- When you’re ready to bake, allow the dough to come to room temp for at least 10 minutes, then knead it until it returns to a smooth texture.
- Preheat over to 375° F and line a baking sheet with a piece of parchment paper.
- Roll the dough to ¼ inch thickness on a lightly floured surface.
- Continue sprinkling flour when needed to prevent dough from sticking. Use your pumpkin cutter to cut the cookies into pumpkins, then place them on a prepared baking sheet lined with parchment paper.
- Don’t skip the chilling time! Stick the cookies (on the sheets) back in the freezer for exactly 10 minutes to allow them to re-chill. This will keep your cookies perfectly shaped! When they’re chilled, bake for 8-10 minutes (depending on size) for the perfect cookie!
- Allow the baked pumpkin cutout cookies to rest on the cookie sheet for at least 5 minutes, then move to a cooling rack to completely cool.
- If you like the flavor of a golden brown cookie with slightly crunchy edges, you can let these bake an extra minute or two. If you prefer perfectly cooked cookies, you can watch them and take them out as soon as they’re baked before browning. I rarely get browned edges with these cutout cookies – they hold their shape, taste yummy, and are not crunchy! After experimenting with multiple recipes, this has to be my favorite!
How to Pipe Royal Icing Pumpkin Cookies (Cookie Tutorial)
- I will give you very specific instructions to make these pumpkin decorated cookies, but obviously, you can change this up depending on how you want to do your cookies!
- Want simple pumpkin cookies? Skip the gold and go easy. More or less colors? Go for it. More gold or no gold? Totally up to you!
- I want this to be a fun recipe for you so don’t stress if your first batch is not perfect! Your second batch will be better than your first, and so on.
- The more you make, the better you’ll get and beautiful result or not, you’ll have delicious cookies to eat!.
- The easiest thing to do with these cookies is use tipless bags. You can snip off the tiniest of pieces from the bottom of the bag and it acts like a round piping tip. If you prefer, take a piping bag and add a coupler and small round tip. I usually choose a #1 tip for piping and a #3 or #4 for flooding..
- Separate the icing into two bowls. Keep one white, add a couple of drops of orange gel coloring to the other. I specifically used Americolor Pumpkin, but go with any shade you like!
- For both white and orange icing, you’ll need piping-consistency icing and flooding-consistency icing.
- Using thick piping icing, outline the edges of the cookies with the color of your choice. Allow the outline to dry for 3-4 minutes.
- With the same thick icing, draw curved lines from top to bottom to create the pumpkin’s sections. You can do just a few sections or several – choose the look you like best. Allow the lines to dry for 3–4 minutes.Note: I did a few different ones, so you can choose which pumpkin look you like best. Allow this to dry for 3-4 minutes.
- Use flood icing to fill in every other section of the pumpkin. Let the icing dry for 5–10 minutes, or until it can be gently touched without sticking to your finger.
- To save time, you can outline several cookies first, then add the pumpkin section lines, and then start flooding. By the time you circle back, the earlier cookies will have had time to dry.
- Once the first set of sections is dry, flood the empty sections with icing to finish filling in the pumpkin. Allow them to dry for 15-20 minutes. Use a scribe tool or toothpicks to pop any bubbles.
- Use thick white icing to fill in all the stems on the pumpkin top and pipe the curly vines on top of the pumpkins. These will need to dry for at least 8 hours (or overnight) before you paint on them.
- Note: since I painted my stems and vines gold, it didn’t really matter what color the icing was underneath. If you choose to use brown icing or green icing and not paint, then you’d obviously use that for the stem and/or vines.
- Paint the stems and vines with the gold paint. Allow it to dry for at least an hour before stacking or packaging.
Notes
- This recipe yields approximately 2 dozen 3-inch cookies. You may get different amounts using different sizes and shapes of cutters.