Easy Snowman Cake (with Video!)
Looking for a fun Snowman Cake to make for your kids or a Christmas party? This cute Snowman Cake is so easy to make. With a couple of cake pans and easy-to-find decorations, you can have a fun cake for your next winter celebration!

Snowman Cake
Frosty the Snowman has always been my favorite Christmas character (shh, don’t tell Santa), and I love to collect snowmen.
So, of course, I needed to make a Snowman Cake. This cutie is not exactly a “Frosty the Snowman” Cake but he’s still perfect for Christmas parties, right?

Snowman Cake Ideas
When looking at snowman cake ideas and winter-themed cakes, I knew I wanted to keep him simple yet really cute. So, I made sure to include a hat and scarf for him, along with some other cute details!
I planned this cake with the holiday season in mind, but it would also be perfect for a Snowman Birthday Cake, Winter Birthday Cake, Winter Wonderland birthday cake, etc. You get the idea! You could even serve him (or her?) at your work holiday party or as dessert after Christmas dinner.
Video
Why You’ll Love this Gluten-Free Coconut Cake Recipe
The recipe I’m sharing today is a Gluten-Free Coconut Cake. We are not a gluten-free family but with my home cake business, I like to have a few recipes in my pocket for clients who request gluten-free. My other favorite is this Gluten-free, Soy-free, Egg-free & Dairy-free Chocolate Cake and Frosting.

This delicious Gluten-Free Honey Coconut Cake recipe is perfect for coconut lovers and a gluten-free Christmas Cake!
It’s made with coconut flour, coconut milk, and shredded coconut, and it’s gluten-free! What more could you ask for other than the rich and creamy frosting on top?
Oh and you don’t need a special snowman cake pan! A couple of common, round cake pans work just fine for this cute cake.
Tools Needed to Make Snowman Cakes
- Round Cake Pans
- Mixing Bowls
- Measuring Cups and Spoons
- Hand Mixer
- Rectangle Cake Board (rectangle, like you’d get for a sheet cake)
- You’ll also need a decorating bag and piping tip if you use black icing for the eyes and buttons.
Ingredients
There are a lot of special ingredients for this cake if you plan to use the gluten-free coconut cake recipe I’m sharing.
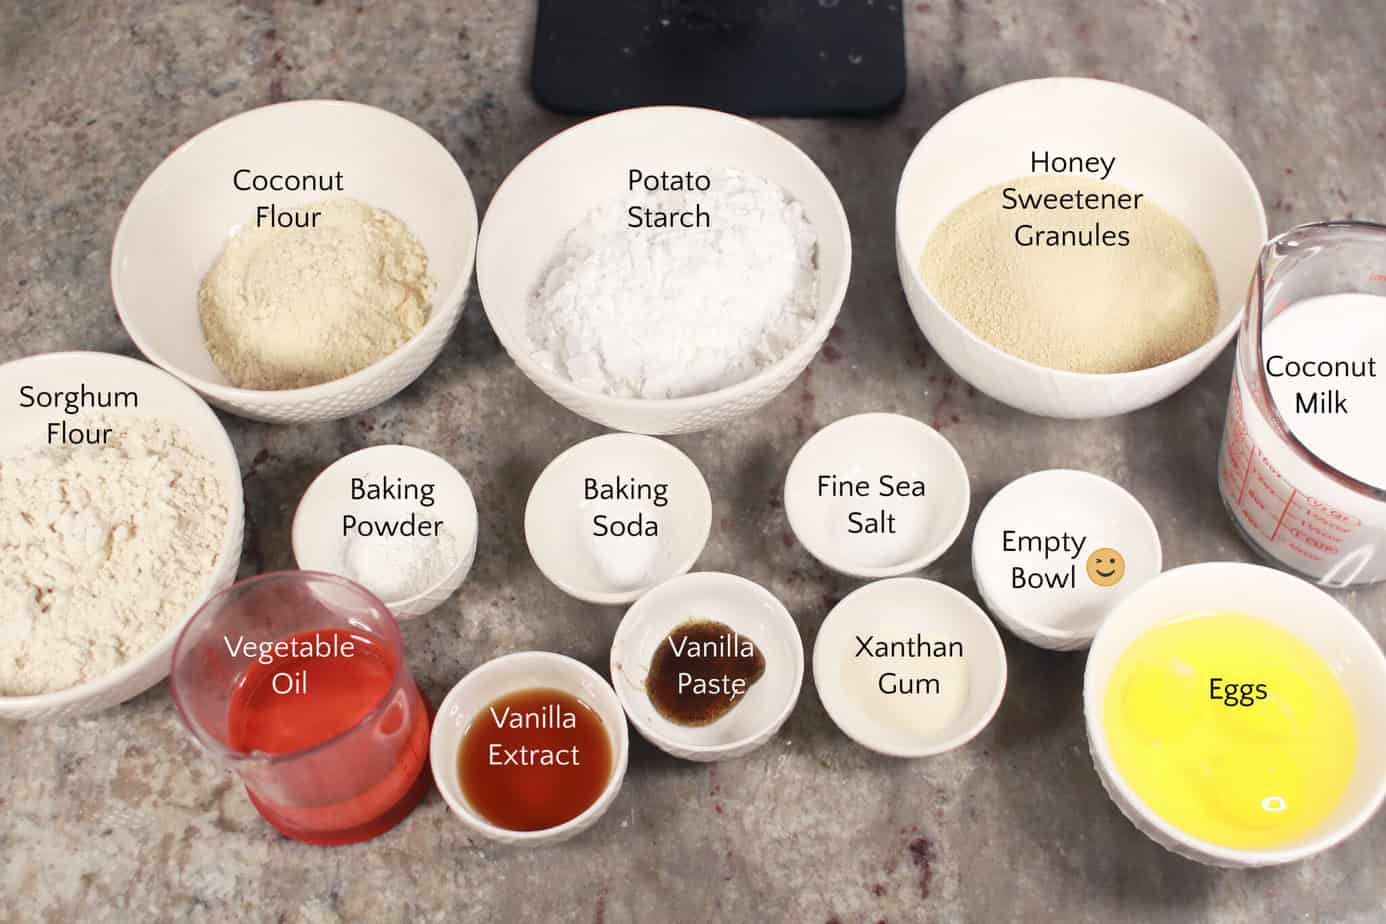
Snowman Cake Ingredients
I used many Judee’s products in this cake because I love them. But that particular brand is not a requirement. Use any brand(s) you prefer.
- Judee’s Products used in this recipe:
- Baking soda
- Baking Powder
- Fine sea salt
- Vegetable oil
- Eggs
- Coconut milk
- Vanilla extract
- Vanilla bean paste
Frosting Ingredients
- Butter
- Shortening
- Pure coconut extract
- Pure vanilla extract
- Powdered sugar
- Coconut milk, as needed
Snowman Cake Decorations
- Flaked Sweetened Coconut
- Satin Ice Gluten-free fondant – you can change up the colors however you like!
- 6 ounces of blue fondant (or red or green or pink) for the hat and scarf
- 5 ounces of brown or black fondant – for the arms, eyes, and buttons
- 1 ounce of orange fondant – for the snowman’s nose
- 3 ounces of white fondant – for the pom-pom and trim on the hat

Substitutions
For the cake and frosting, I do not recommend making any substitutions. However, for the decorations, there are so many things you can use to change up your snowman.
Coconut – If you like coconut but don’t want to decorate your cake with it, you could use sanding sugar on the outside of the cake to make him shimmery and sugary.
Frosting – coconut frosting may be too much coconut for you and if that’s the case, use classic vanilla buttercream instead.
Fondant Decorations – I used store-bought fondant for all of my decorations but you could easily get creative with decorations!
Here are some swaps you could make:
- A real carrot for the nose.
- Gluten-free candies or cookies for your buttons, eyes, etc.
- An orange gumdrop would be a perfect nose and large black gumdrops for the buttons.
- Malted Milk Balls (ie. Whoppers) would also be great for the eyes and buttons (although they are not gluten-free)
- Use chocolate candy melts for the snowman’s eyes and buttons – these are basically extra large (and flat) chocolate chips that you can flip over and place the flat-side up.
- Another fun idea would be to add gluten-free powdered donuts for ear muffs and a fruit snack roll for the scarf or headband. (You can use leftover donuts for snowman breakfast too!)
- Candy Clay or Modeling Chocolate for the hat and fondant scarf.
- Use black frosting for the snowman’s face (eyes and nose) and large pretzel sticks for the arms (again, these are not gluten-free).
Can I use other cake recipes or a cake mix to make this snowman cake?
Yes, absolutely! If you don’t need or want a gluten-free cake, any box of cake mix or doctored box mix recipe will work great for this cake. These are my favorite flavors:
- White Almond Sour Cream
- Vanilla Bean Cake
- Chocolate Cake (doctored cake mix) or from scratch: One Bowl Chocolate Cake
- Chocolate Chip Cake
How to Make a Snowman Cake
Snowman Cake
- First, preheat the oven to 350ºF. For a traditional round layer cake, prep two 8-inch cake pans. I grease the pans with non-stick vegetable oil spray, then dust with coconut flour. Alternatively, you could line the pans with parchment paper if you prefer that method.
- To make the snowman, I used a 7-inch cake pan and a 9-inch cake pan. You might also use 6-inch and 8-inch round cake pans (although you may end up with a little extra batter). Or if you only have 8-inch pans, you can use those and carve the head smaller (or not). Basically, you’ll need two round cakes – you choose the sizes!
- In a large bowl, whisk together all of the dry ingredients (flours, starch, sugar cane granules. baking soda, baking powder, and salt).
- Next, pour in the wet ingredients: eggs, oil, coconut milk, and vanilla. Use an electric mixer and beat on medium speed until completely combined. The batter will be thick and sticky and have a less than smooth texture.
- Divide the cake batter into each prepared pan and spread it as smooth and evenly as possible.
- Bake for 30-35 minutes or until firm and springy. A cake tester inserted into the center should come out clean. Cool on a wired rack.


Coconut Frosting
While the snowman cakes are cooling, make the frosting.
- Cream together the butter, shortening, and extracts until smooth and light.
- Add the powdered sugar and a couple of tablespoons of coconut milk and mix. Continue adding milk until you reach the desired consistency (smooth, creamy, and easy to spread.
How to Frost a Snowman Cake

- First, lay your cool cakes on a large platter or tray or cardboard cake board, with the smaller 7-inch cake at the top and the larger 9-inch round at the bottom of the cake. Again, you could also use 6-inch and 8-inch cakes if you like. I know those cake pan sizes are more common. Either way, this is the head and body of your snowman.
- Use a small offset spatula to cover both cakes with vanilla coconut frosting. There’s no need to get a super-smooth finish with the white frosting because we’re going to finish the cake by covering it with flaked coconut.
- To make the top hat, roll out the blue piece of fondant with a small rolling pin. Cut one straight edge and place it at an angle on the top of the snowman. To trim the edges, use a small paring knife (or pizza wheel).
- Break the brown fondant into small sections and roll them into smooth balls for the eyes and buttons.
- Sprinkle the flaked coconut all over the snowman and press it into the buttercream.
- Roll the orange fondant into a cone shape and place it on the head for the nose.
- Re-knead the leftover blue fondant into a ball, roll it out into a long-thin piece, and then cut it for your scarf. I frayed the ends to give it more texture.
- Next, you’ll want to make a ball of white fondant for the pom-pom on top of the cake on the snowman head. Then roll out a thin strip for the trim on the hat. I used my small paring knife to add texture to the trim.
- Lastly, roll out two small ropes of brown fondant for the ‘stick’ arms. I split the ends to give him hands.
- If you want to make it a little fancier, you could dust the board with confectioners’ sugar or add royal icing snowflakes.
- You are done! Chill until ready to serve.


Tips for Working with Fondant
- Before you use each fondant color, you’ll want to coat your hands in vegetable shortening, then knead the fondant until it’s soft and pliable. Also, coat your work surface you’ll be working on with a thin layer of shortening.
- If your store-bought fondant is too hard to knead, place it in the microwave for 5-10 seconds and knead gently. Repeat until it’s workable but not too soft or melted. Be very careful doing this – hot fondant is dangerous! (not joking!!)
Pro Tips
- It’s always best to have all cake ingredients at room temperature before you start.
- If your cake crumbles as you frost it, but a thin layer of frosting or crumb coat on first (to catch all the crumbs), then chill it for about 30 minutes before adding a second, thicker layer of frosting.
- Usually, I avoid domes on my cakes, but for this snowman cake, I place each cake layer flat-side down (bottom down, like they are in the pans) to use the natural dome of the cake as part of the snowman shape.
- I prefer homemade marshmallow fondant for most of my cake adventures. But for this cake, I used pre-made fondant which is easily found in grocery stores, big-box stores, and craft stores. Or of course, on Amazon. Whether you make it yourself or use pre-made, fondant is gluten-free so it’s the perfect medium for decorating this gluten-free cake.
Storage Directions
Serve this cake at room temperature the day it’s made or the next day for the best flavor and texture. Store any leftovers in an airtight container in the refrigerator, where they will last up to five days.
More Christmas Desserts, Winter Cakes and Christmas Cakes
- Christmas Cake Pops
- Homemade Chocolate Chip Cookies
- Winter Wonderland Cake
- Easy Christmas Mimosa (or Cranberry Mimosa)
- 13+ Christmas Party Cakes
- Easy Snowman Cake (with Video!)
- Santa’s Stuck in the Chimney Christmas Birthday Cake
- 10 Best Grinch Cakes for Christmas + Details for How to Make an Easy Grinch Cake!
- Holly Jolly {Christmas} Candy Birthday Cake

Easy Snowman Cake (with Video!)
Description
Looking for an Easy Snowman Cake to make for your kids or a Christmas party? This cute Snowman Cake is so fun to make. With a couple of cake pans and easy-to-find decorations, you can have a fun cake for your next winter celebration!
Ingredients
For the cake:
- 1 1/2 cups Judee’s Sorghum Flour
- 1 1/2 cups Judee’s Potato Starch
- 1/2 cup Judee’s Coconut Flour
- 1 1/2 cups Judee’s Honey Sweetener Granules
- 2 teaspoons Judee’s Xanthan Gum
- 1 tablespoon baking powder
- 1/2 teaspoon baking soda
- 1/2 teaspoon fine sea salt
- 3 whole eggs, beaten
- 1/2 cup vegetable oil
- 1 13.66 oz can coconut milk
- 2 teaspoons bourbon vanilla extract
- 1 teaspoon vanilla bean paste
For the frosting:
- 8 ounces softened butter
- 8 ounces shortening
- 2 teaspoons pure coconut extract
- 2 teaspoons pure vanilla extract
- 2 pounds confectioners sugar
- coconut milk, as needed to thin the frosting (regular milk or water can be substituted here)
For the coating:
- 3 cups flaked sweetened coconut, for covering the frosting
- Fondant for the eyes, nose, arms, hat and scarf. *see notes in the post
Instructions
First, preheat the oven to 350ºF. For a traditional round layer cake, prep two 8-inch cake pans. I grease the pans with non-stick vegetable oil spray, then dust with coconut flour.
Alternatively, you could line the pans with parchment paper if you prefer that method.
To make the snowman, I used a 7-inch cake pan and a 9-inch cake pan. You might also use 6-inch and 8-inch round cake pans (although you may end up with a little extra batter).
In a large mixing bowl, whisk together all of the dry ingredients (flours, starch, sugar cane granules. baking soda, baking powder, and salt).
Next, pour in the wet ingredients: eggs, oil, coconut milk, and vanilla. Use an electric mixer and beat until smooth. The batter will be thick and sticky and have a less than smooth texture.
Divide the cake batter into each prepared pan and spread it as smooth and evenly as possible.
Bake for 30-35 minutes or until firm and springy. A cake tester inserted into the center should come out clean. Cool on a wired rack.
While it’s cooling, make the frosting. Cream together the butter, shortening, and extracts until it’s smooth and light. Add the powdered sugar and a couple of tablespoons of coconut milk and mix. Continue adding milk until you reach the desired consistency (smooth, creamy, and easy to spread!).
Follow the tutorial above for the snowman cake. For a traditional round-layer cake, place one layer on a cake board or cake stand, then cover the top with frosting. Place the second layer on top of that and cover the entire surface with frosting.
Press flaked coconut all over the surface!

Notes
*To make a traditional round-layer cake, use two 8-inch pans.
Nutrition
- Serving Size: 1 Slice
- Calories: 466
- Sugar: 47.4 g
- Sodium: 85.4 mg
- Fat: 24.2 g
- Carbohydrates: 63.4 g
- Fiber: 1.4 g
- Protein: 2.2 g
- Cholesterol: 37.3 mg