Snowflake Cookies (Sugar Cookies with Royal Icing)
Snowflake Cookies are the perfect holiday cookies for Christmas and Winter. Decorated with royal icing, this sugar cookie dough perfectly balances buttery goodness and almond flavoring. You’ll love sharing them at parties and Christmas cookie exchanges or decorating with the kids for Santa.

Snowflake Cookies
These Snowflake Sugar Cookies are made with my all-time favorite recipe. It’s an easy recipe that takes a little more time, but you will get perfect cookies every time, so it’s worth the extra steps!
In addition to the snowflake cookie recipe, I’m also sharing the royal icing recipe and the detailed instructions for the snowflake cookie decorations.
These Snowflake Sugar Cookie designs are perfect for Christmas parties, baking for Santa, cookie exchanges, or just for fun at home with the kids.
Decorating Snowflake Sugar Cookies
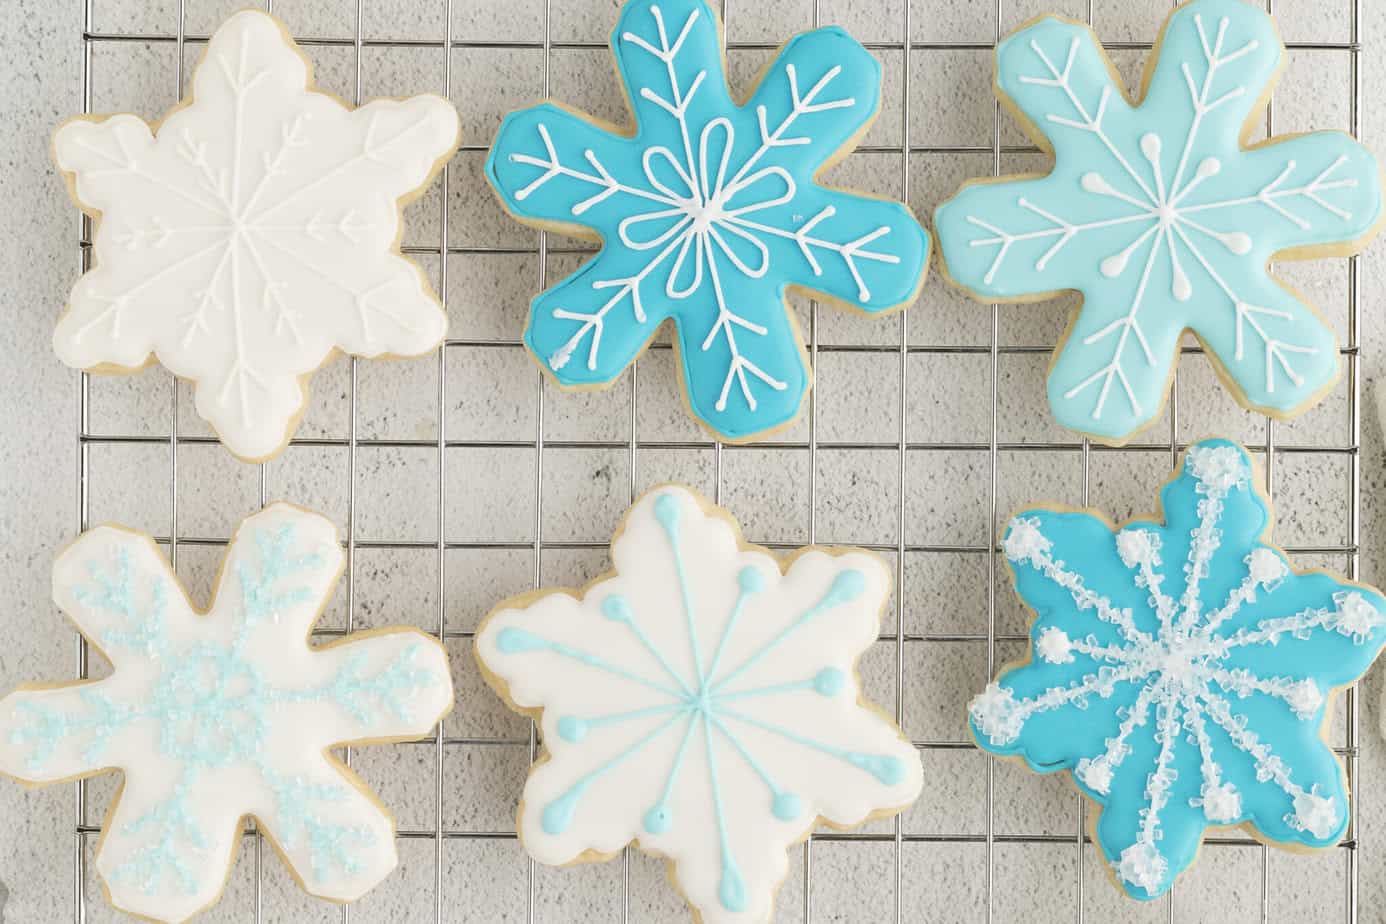
During the holiday season, making decorated snowflake sugar cookies can be as simple or as complicated as you like. You can use a single snowflake cookie cutter, or a variety of them.
You can also use all white icing, or add in shades of blue or purple for variety. The beautiful thing about snowflake cookie designs is that they can all be different, just like real snowflakes, and still be gorgeous!
I’m going to share some decorating tips below but learning to decorate cookies with royal icing does take time. Getting the right icing consistency takes time.
But this is the perfect time of year to bake with your kids, eat your mistakes and just have fun. This is a great recipe and tutorial to do with kids over the Christmas holidays or during a snow day in the winter months.
Snowflake cookies decorated by kids are perfect no matter what they look like!

Tools Needed
- Stand Mixer with Paddle Attachment
- Or Electric Hand Mixer and Large Mixing Bowl
- Snowflake Cookie Cutters
- Rolling Pin
- Cookie Sheet
- Parchment Paper
- Tipless Bags
- OR a Piping Bag and Round Piping Tips
Ingredients
This is a list of very common and basic ingredients for both the cookie dough and royal icing.
The only ingredient that may not be common is meringue powder. But it can usually be found at big box stores and hobby supply stores. And of course in a million places online, but my favorite is Country Kitchen Sweetart.

Cookie Dough
- Salted Butter, at room temperature
- Sugar
- Salt
- Large Eggs: Whole Egg + Egg Yolk
- Vanilla Extract
- Almond Extract
- All-purpose Flour
Royal Icing
I list my favorite meringue powder brands below. Everything else can easily be found at any local grocery store.

- Meringue Powder*
- Water
- Powdered Sugar
- Light Corn Syrup
- Almond Extract
- Gel Food Coloring, if desired
*Note: I prefer Americolor Meringue Powder or CK Products Meringue Powder.
Decorations
If you want to take your cookie decorating a step further, you can add chunky sugar or sprinkles!
- Sanding Sugar
- Sparkling Sugar
- Sprinklesx
Find the complete recipe with ingredients measurements in the recipe card below.
Substitutions
Extracts. The easist substittution for these Snowflake Christmas cookies is changing up the extract flavor that you use. I prefer almond extract in both the cookie dough and the icing, but you could also have a classic sugar cookie recipe with vanilla extract.
If you want to really change things up, you could use a citrus extract such as lemon extract or orange extract for a different flavor.
Icing/Frosting. While this is an easy royal icing recipe, I completely get it if you’re too intimated to use it. So another option would be to use vanilla buttercream or cream cheese frosting. This is my favorite frosting recipe.
You can still pipe pretty designs – but they will not dry like royal icing so you won’t be able to stack them or package them in bags.
Cookie Recipe. If this recipe doesn’t appeal to you for whatever reason, here are a couple of other options:
- No Chill Cut-Out Sugar Cookies
- Classic Sugar Cookies
- or you could make Chocolate Snowflake Cookies

How to Make Snowflake Cookies
I’m breaking this recipe/tutorial into three sections to explain each step thoroughly. First, let’s bake the Snowflake Christmas Cookies! This snowflake cookies recipe is the same recipe I use for almost all of my cookie baking.
I’ve recently started using this no-chill recipe pretty often too, but I’m still a little partial to my original recipe.
Making Sugar Cookie Dough
- In a large bowl (or the bowl of a stand mixer), use an electric mixer on medium speed to cream together the butter, sugar and salt until light and fluffy
- Next add the egg yolk, beat it some more, then add the whole egg. Mix in the vanilla and almond.
- Add flour and beat on low until well-combined. Do not overbeat. The dough will be sticky!
- Divide the dough in half and wrap in plastic wrap. Refrigerate for at least an hour, but I usually do mine the day before.


Rolling Out & Baking Cutout Cookies
- When you’re ready to bake, allow the dough to come to room temp for at least 10 minutes, then knead it until it returns to a smooth texture.
- Preheat over to 375° and line a baking sheet with parchment paper.
- Roll the dough to ¼ inch thickness on a lightly floured surface.
- Continue sprinkling flour when needed to prevent dough from sticking. Use your snowflake cookie cutters to cut the cookies into the desired snowflake shapes, then place them on a prepared baking sheet lined with parchment paper.
- Don’t skip the chilling time! Stick the cookies (on the sheets) back in the freezer for exactly 10 minutes to allow them to re-chill. This will keep your cookies perfectly shaped! When they’re chilled, bake for 8-10 minutes (depending on size) for the perfect cookie!
- Allow the baked cookies to rest on the cookie sheet for at least 5 minutes, then move to a wire rack to completely cool.
- If you like the flavor of a golden brown cookie with slightly crunchy edges, you can let these bake an extra minute or two. If you prefer perfectly cooked cookies, you can watch them and take them out as soon as they’re baked before browning. I rarely get browned edges with these cutout cookies – they hold their shape, taste yummy, and are not crunchy! After experimenting with multiple recipes, this has to be my favorite!


How to Make Royal Icing
- Add the meringue powder and 3 1/2 tablespoons of water in a mixing bowl.
- Beat with a hand mixer until it’s foamy (or the whisk attachment in a stand mixer).
- Add in the powdered sugar and mix on low speed until combined. I should note here that I used Great Value powdered sugar from Walmart and I never sift it. However, I’ve bought other brands that did need sifting. If you’re unsure – sift!!
- Add the corn syrup. Add the almond extract, if desired. Adding a little corn syrup adds shine to the frosting – don’t skip that step!
- Increase speed to high and beat for around 5 minutes, until you get stiff glossy peaks.
- Do not overbeat!
- If you want colors other than white royal icing, add a drop or two of gel food coloring and mix until you get the desired color. Keep in mind that the icing color will darken as the icing dries and hardens so don’t go overboard.
- Use immediately or cover tightly with plastic wrap – make sure the plastic wrap touches the icing or the icing will harden!


Flooding Icing vs. Piping Icing
Flooding Icing (thinner icing): Thinner and more fluid, used to fill in spaces or cover large areas after outlining. It flows smoothly but retains its shape. Flooding icing is made by adding more water to royal icing to achieve a runnier, more spreadable consistency that flows easily when piped.
Piping Icing (thicker icing): Thick and firm, used for outlining and detailed designs on cookies. It holds its shape well. Typically, piping icing is made by adding less water to royal icing, resulting in a stiffer, more structured texture.
How to Pipe Royal Icing Snowflake Cookies
I will give you very specific instructions for the festive cookies I made but obviously, you can change this up depending on how you want to do your cookies! More or less colors? Go for it. More or less decorations? Go for it!
The sky is the limit with snowflake sugar cookie designs! I want this to be a fun recipe for you so don’t stress if your first batch is not perfect! You’ll get better and better with practice. Your second batch will be better than your first, and so on.
- The easiest thing to do with these cookies is use tipless bags. You can snip off the tiniest of pieces from the bottom of the bag and it acts like a round piping tip. If you prefer, take a piping bag and add a coupler and small round tip. I usually choose a #1 tip for piping and a #3 or #4 for flooding..
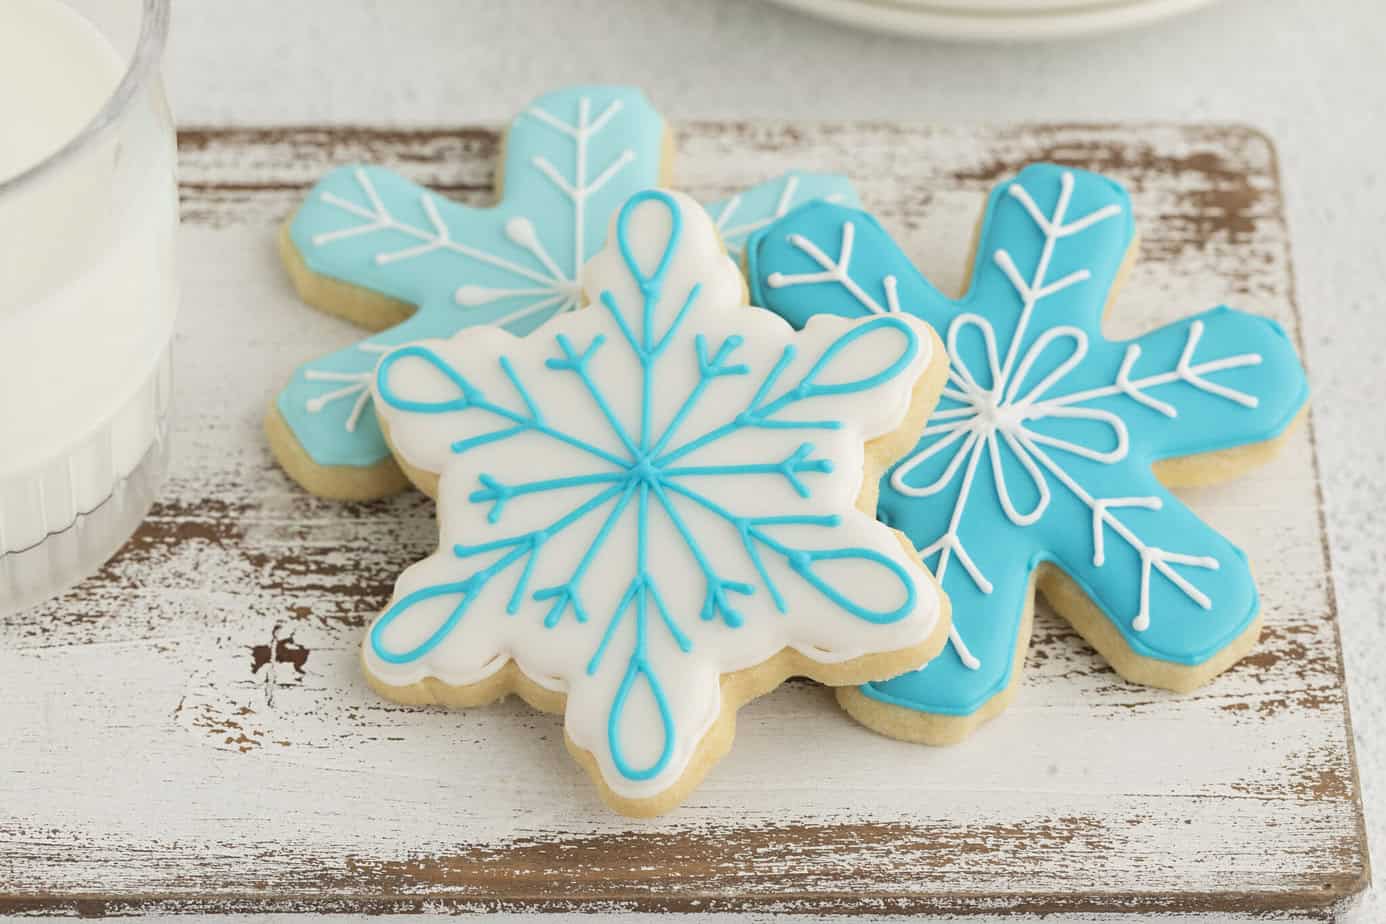
- Separate the icing into three bowls. Keep one white, add a drop of blue gel coloring to one, and add 3-4 drops of blue gel coloring to the other.

- For each color, you’ll need piping-consistency icing and flooding-consistency icing.
- Using piping icing (thick icing), outline the edges of the cookies with blue icing (or white icing, your choice). Allow this to dry for 3-4 minutes.
- Then use flood icing (thin icing) to fill in the inside of each snowflake cookie. Allow these to dry for 1-2 hours (depending on the humidity in the air, temperature in your home, etc.) I often use an oscillating fan to blow over my cookies (not directly on them) to speed up the drying.
- Use piping of a different color (or the same color – totally up to you!) to pipe snowflake cookie designs. I have step by step photos below of a couple of the designs I did so you can get an idea of how to make snowflake sugar cookies.
- If you want to use sprinkles or sparkling sugar on the cookies, add it to the wet designs before they dry.
- Allow these decorated snowflake cookies to completely dry (10-12 hours) before packaging or stacking them on top of each other.


Snap a picture of your first cookie – then practice for a while and snap a picture of later cookies to compare! I promise you will improve with time.
Now, it’s time to ENJOY the fruits of your labor!

Snowflake Cookie Decorations (Simplified)
For ease, here are a few suggestions if you’re not ready for intricate details, colors, and/or piping.

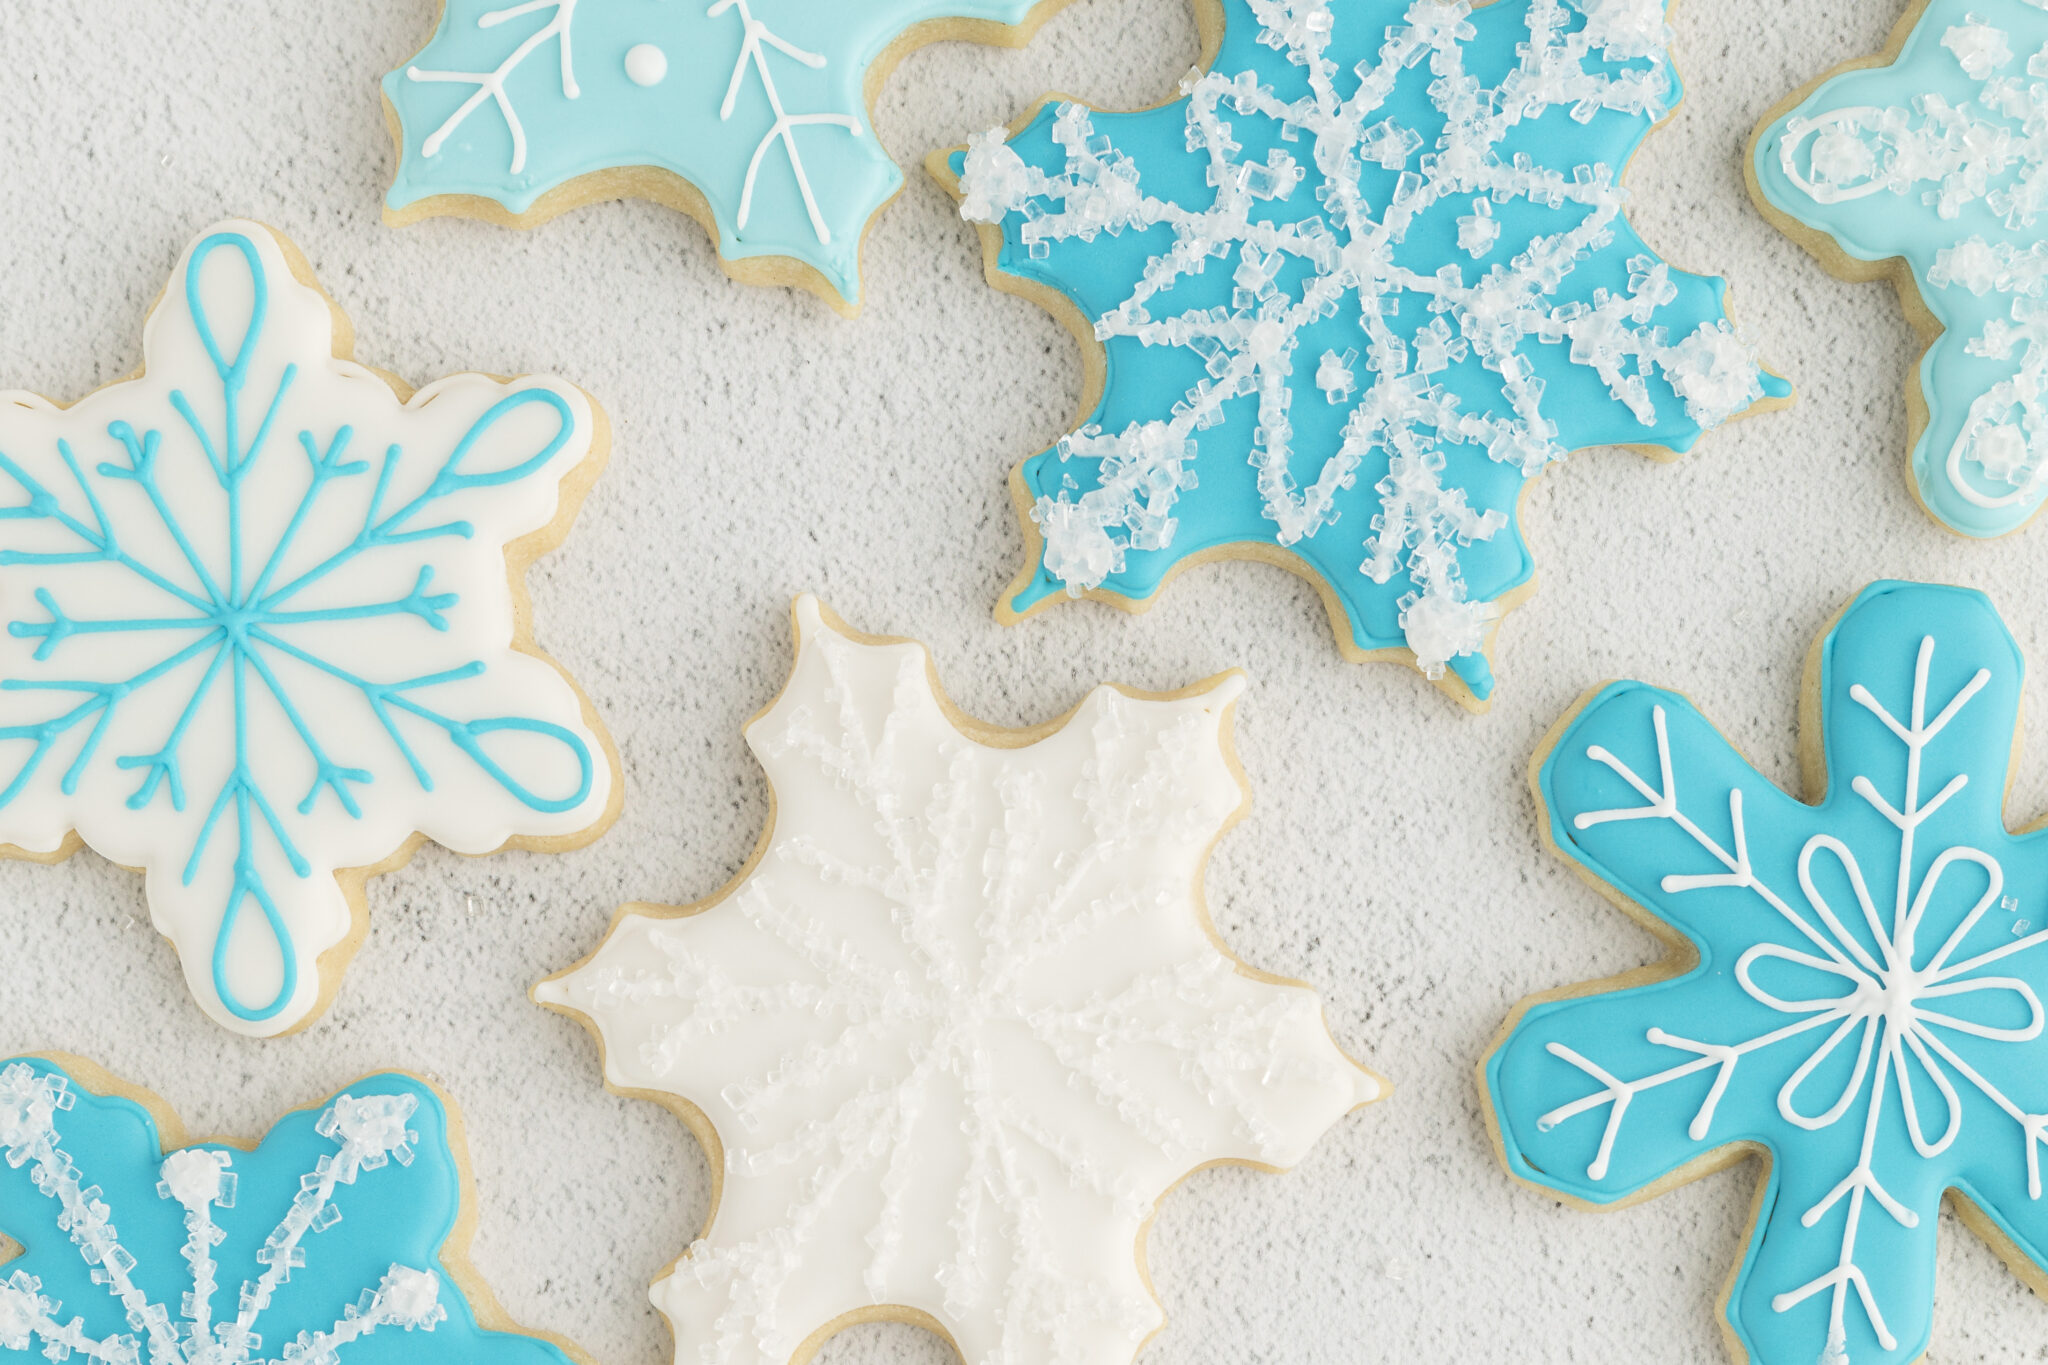
- Make white on white cookies (as seen above) – meaning your first layer of icing is white, then add white decorations onto the iced cookies. You can pipe on designs or use white sprinkles or sanding sugar for beautiful designs. These are easy snowflake cookies and very forgiving if you’re new. Plus, no food coloring required!
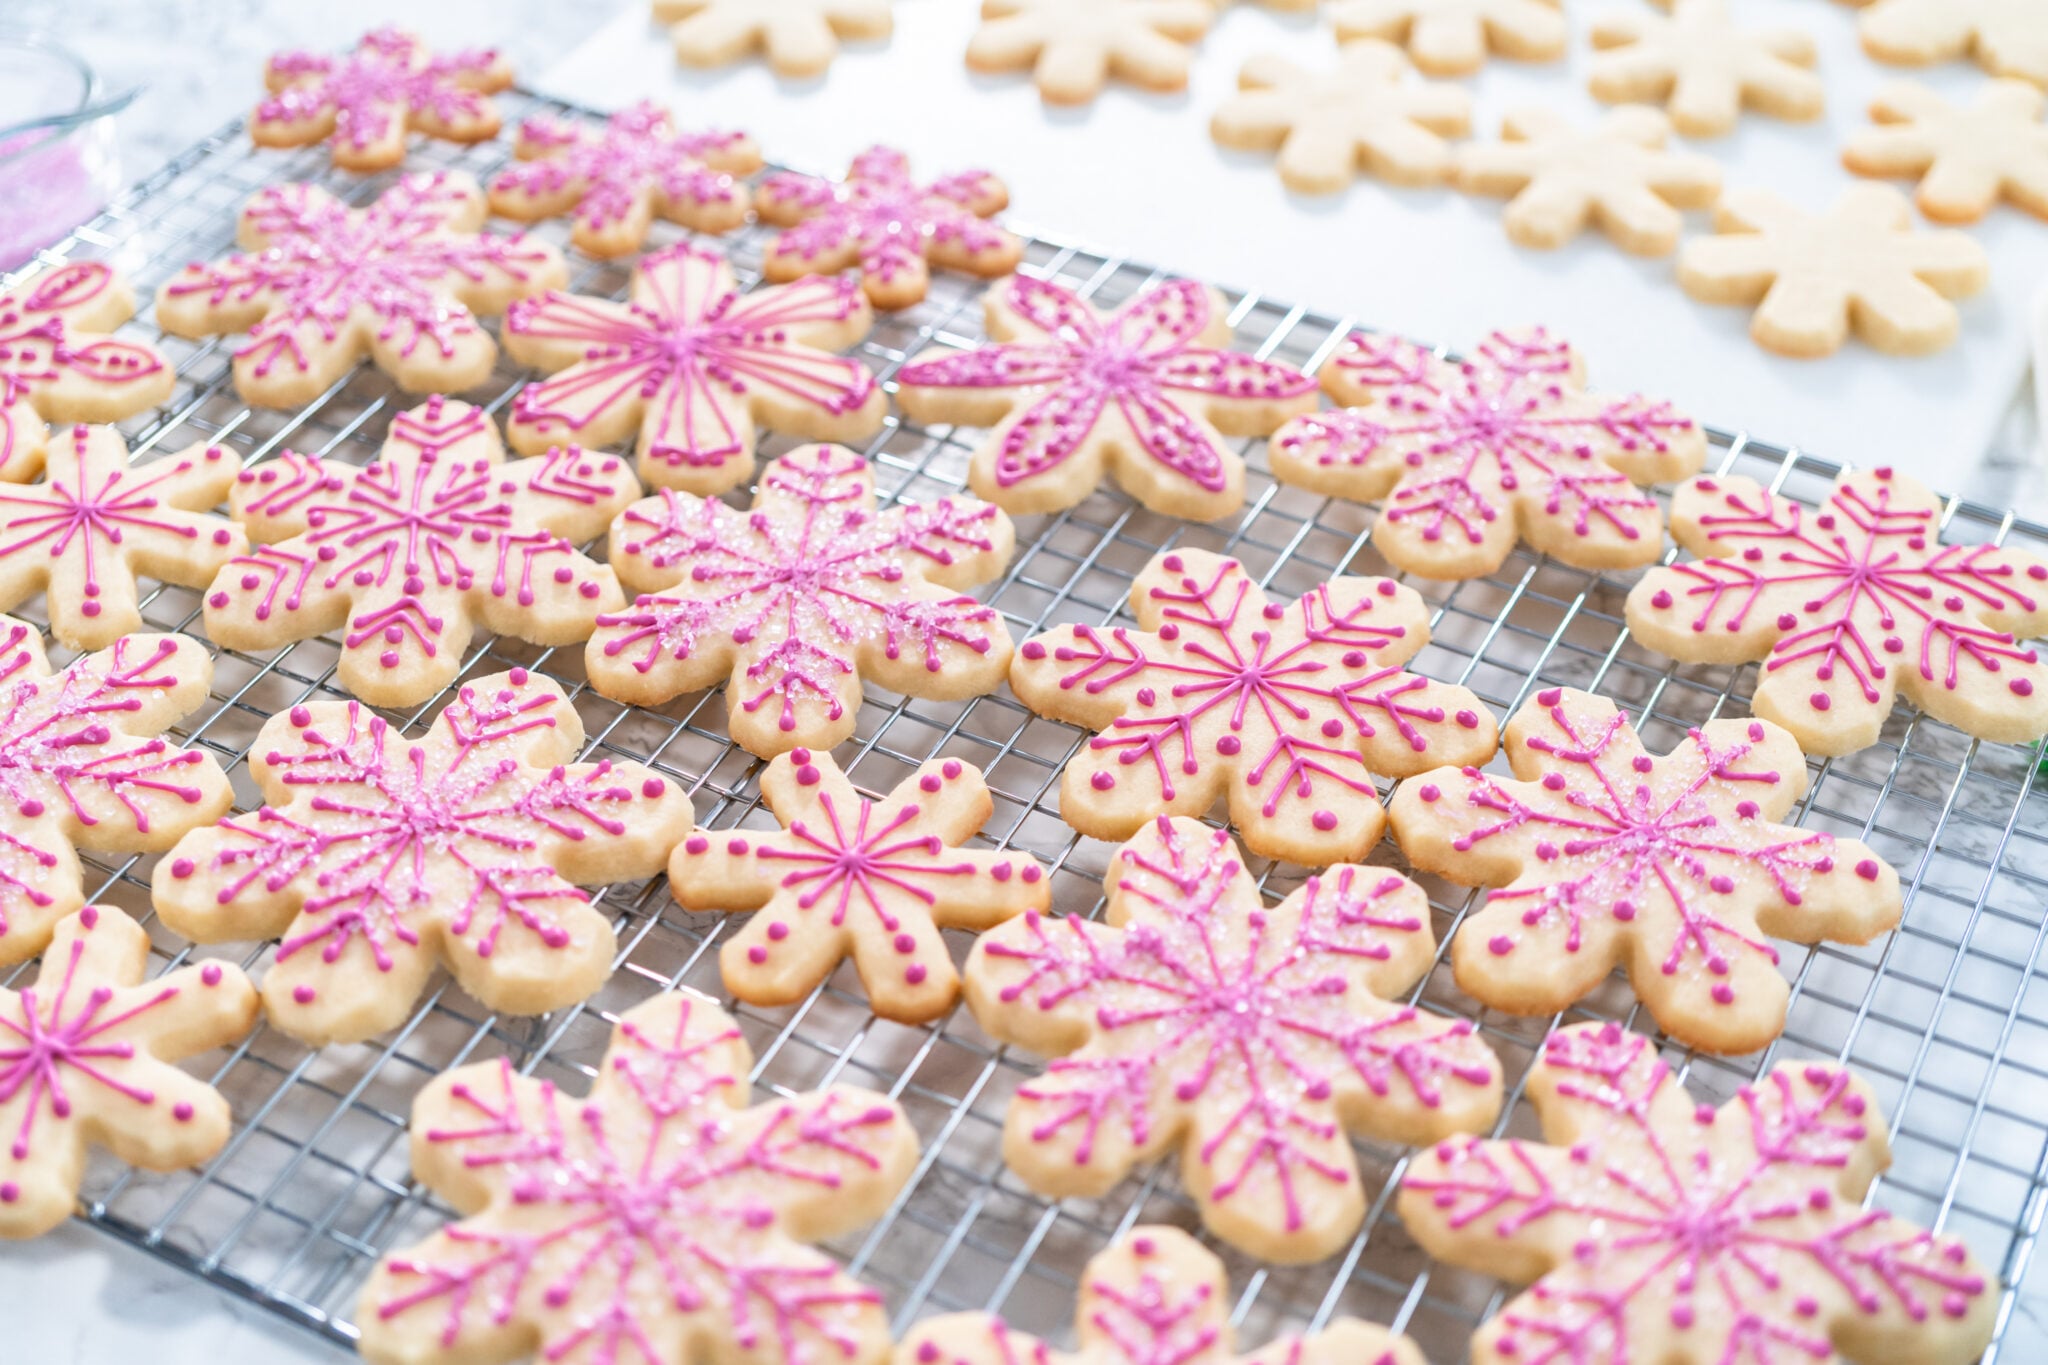
- Skip the flood icing and simply pipe a snowflake design directly on the cookie with no “background” icing (as seen below)
- Dip your cookies in royal icing, then sprinkle on sparkling sugar and sprinkles. I have an example of this method here.
- No snowflake cookie cutter? You can pipe snowflake designs onto round cookies, flower cookies or star cookies. With just a little imagination, you will have beautiful snowflakes! This can also be done with traditional sugar cookies! See below.

Storage Directions
Room Temperature. Store cookies in an airtight container at room temperature after they’ve dried for at least 12 hours. You can keep them for several days, but they will continue to dry out the longer they’re kept.
Freezer. Decorated cookies (that have dried for at least 12 hours) can be frozen. Wrap them individually or 2-3 per freezer-safe bag. Store in an airtight, freezer-safe container to prevent them from being crushed in your freezer.
Thawing. Thaw at room temperature for several hours. Do not thaw in the fridge – condensation can ruin them! Cookies can be frozen for up to 6 months.

FAQ

More Sweet Recipes

Snowflake Cookies (Sugar Cookies with Royal Icing)
Description
Snowflake Cookies are the perfect holiday cookies for Christmas and Winter. Decorated with royal icing, this sugar cookie dough perfectly balances buttery goodness and almond flavoring. You’ll love sharing them at parties and Christmas cookie exchanges or decorating with the kids for Santa.
Ingredients
Cookie Ingredients
- 1 cup (2 sticks) Salted Butter, at room temperature
- 1 cup Sugar
- 1/2 teaspoon Salt
- 1 Large Whole Egg
- 1 Large Egg Yolk
- 3/4 teaspoon Vanilla Extract
- 1/2 teaspoon Almond Extract
- 2 1/2 cups All-purpose Flour, sifted
Royal Icing Ingredients
- 2 Tablespoons Meringue Powder
- 3 1/2 Tablespoons of 1/2 Water
- 8 ounces Powdered Sugar (by weight, sifted if needed)
- 1/4 – 1/2 Light Corn Syrup
- A few drops of Almond Extract
- Gel Food Coloring, if desired
Decorations (optional)
- Sanding Sugar
- Sparkling Sugar
- Sprinkles
Instructions
Making Sugar Cookie Dough
- In a large bowl (or the bowl of a stand mixer), use an electric mixer on medium speed to cream together the butter, sugar and salt until light and fluffy
- Next add the egg yolk, beat it some more, then add the whole egg. Mix in the vanilla and almond.
- Add flour and beat on low until well-combined. Do not overbeat. The dough will be sticky!
- Divide the dough in half and wrap in plastic wrap. Refrigerate for at least an hour, but I usually do mine the day before.
Rolling Out & Baking Cutout Cookies
- When you’re ready to bake, allow the dough to come to room temp for at least 10 minutes, then knead it until it returns to a smooth texture.
- Preheat over to 375°F and line a baking sheet with parchment paper.
- Roll the dough to ¼ inch thickness on a lightly floured surface.
- Continue sprinkling flour when needed to prevent dough from sticking. Use your snowflake cookie cutters to cut the cookies into the desired snowflake shapes, then place them on a prepared baking sheet lined with parchment paper.
- Don’t skip the chilling time! Stick the cookies (on the sheets) back in the freezer for exactly 10 minutes to allow them to re-chill. This will keep your cookies perfectly shaped! When they’re chilled, bake for 8-10 minutes (depending on size) for the perfect cookie!
- Allow the baked cookies to rest on the cookie sheet for at least 5 minutes, then move to a wire rack to completely cool.
- If you like the flavor of a golden brown cookie with slightly crunchy edges, you can let these bake an extra minute or two. If you prefer perfectly cooked cookies, you can watch them and take them out as soon as they’re baked before browning. I rarely get browned edges with these cutout cookies – they hold their shape, taste yummy, and are not crunchy! After experimenting with multiple recipes, this has to be my favorite!
How to Make Royal Icing
- Add the meringue powder and 3 1/2 tablespoons of water in a mixing bowl.
- Beat with a hand mixer until it’s foamy (or the whisk attachment in a stand mixer).
- Add in the powdered sugar and mix on low speed until combined. I should note here that I used Great Value powdered sugar from Walmart and I never sift it. However, I’ve bought other brands that did need sifting. If you’re unsure – sift!!
- Add the corn syrup. Add the almond extract, if desired. Adding a little corn syrup adds shine to the frosting – don’t skip that step!
- Increase speed to high and beat for around 5 minutes, until you get stiff glossy peaks.
- Do not overbeat!
- If you want colors other than white royal icing, add a drop or two of gel food coloring and mix until you get the desired color. Keep in mind that the icing color will darken as the icing dries and hardens so don’t go overboard.
- Use immediately or cover tightly with plastic wrap – make sure the plastic wrap touches the icing or the icing will harden!
How to Decorate Snowflake Cookies with Royal Icing
- The easiest thing to do with these cookies is use tipless bags. You can snip off the tiniest of pieces from the bottom of the bag and it acts like a round piping tip. If you prefer, take a piping bag and add a coupler and small round tip. I usually choose a #1 tip for piping and a #3 or #4 for flooding..
- Separate the icing into three bowls. Keep one white, add a drop of blue gel coloring to one, and add 3-4 drops of blue gel coloring to the other.
- For each color, you’ll need piping-consistency icing and flooding-consistency icing.
- Using piping icing (thick icing), outline the edges of the cookies with blue icing (or white icing, your choice). Allow this to dry for 3-4 minutes.
- Then use flood icing (thin icing) to fill in the inside of each snowflake cookie. Allow these to dry for 1-2 hours (depending on the humidity in the air, temperature in your home, etc.) I often use an oscillating fan to blow over my cookies (not directly on them) to speed up the drying.
- Use piping of a different color (or the same color – totally up to you!) to pipe snowflake cookie designs. I have step-by-step photos in the post above and a couple of the designs I did so you can get an idea of how to make snowflake sugar cookies.
- If you want to use sprinkles or sparkling sugar on the cookies, add them to the wet designs before they dry.
- Allow these decorated snowflake cookies to completely dry (10-12 hours) before packaging or stacking them on top of each other.
- Enjoy or wrap up as gifts or take to a cookie exchange!
Notes
- This recipe yields approximately 2 dozen 3-inch cookies. You may get different amounts using different sizes and shapes of cutters.
Nutrition
- Serving Size: 1 cookie
- Calories: 193
- Sugar: 17.7 g
- Sodium: 115.8 mg
- Fat: 8.2 g
- Carbohydrates: 28.4 g
- Fiber: 0.4 g
- Protein: 1.9 g
- Cholesterol: 35.8 mg


These are so beautiful!